Find inspiration for your confirmation party
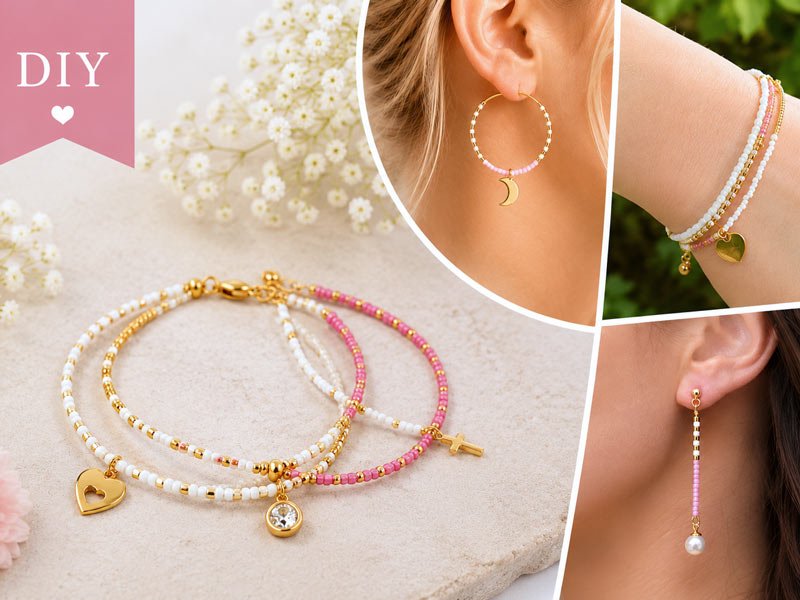
Here you find some examples of festive jewellery inspired by traditional Danish confirmations. On this occasion the girls are dressed elegantly in white. Consequently, this little confirmation party collection is kept in white and pink. Pearls combined with Delica beads and seed beads create a simple, delicate and feminine look for the big day.
You can keep your own jewellery in pure white or go with the trend and mix it with pink – as we do here.
Please note, basic jewellery pliers and jewellery glue are required to make the designs shown below.
In our earlier blog post on Confirmation jewellery you will find more DIY guides and inspiration for your own designs:
DIY | Pearl jewellery for the party
DIY | Silver jewellery for the Confirmation
DIY | jewellery for confirmation and party
Bracelet with Delica beads and seed beads


You need the following materials to make this bracelet:
- 6 jumprings, 4mm, closed, gilded sterling silver
- 2 jumprings, 4mm, open, gilded sterling silver
- 6 crimp beads, gilded brass
- 1 lobster claw clasp, 9mm, gilded sterling silver
- 1 chain extender with coin, gilded sterling silver
(1. strand)
- Delica beads, pure white matte, DB0351V
- Delica beads, golden Delica DB1832
- Delica beads, rosewater, DB1906V
- 2 gold plated silver beads, 2.5mm
- 1 connector bead with crystals, 4mm, gilded brass
(2. strand)
- Delica beads, grey, DB0731V
- Delica beads, pure white matte, DB0351V
- Delica beads, rose with silk effect, DB1867V
- Miyuki seedbeads, gold coated, size #15
- 2 gold plated silver beads, 2.5mm
- 1 heart charm, gilded brass
(3. strand)
- Miyuki seed beads, ivory, #11
- Delica beads, golden Delica DB1832
- 1 jumpring, 3mm, gilded sterling silver
- 1 cross pendant, gilded brass


This bracelet consists of three beaded strands which are finally joined together. In our earlier blog post Mini-bracelets with Delica beads you will find a step-by-step tutorial on how to assemble a bracelet like this.
Once you are done with stringing the beads on the three pieces of wire you connect them using a 4mm jumpring on each end. Finally, you fasten the clasp and the chain extender.
You can make your own chain extender with a piece of cable chain and a coin.
Hoops with Delica beads and moon pendants

You need the following materials to assemble these earrings:
- 1 pair of hoop earrings, 25x0,7mm, gilded silver
- 2 crescent moon pendants, gilded steel
- Delica beads, golden Delica DB1832
- Delica beads, pure white matte, DB0351V
- Delica beads, rosewater, DB1906V
First, you straighten the end of the hoop carefully, so you can easily string the beads. Once all the beads and the moon pendant are strung, you bend the end of the wire carefully back into its original position.
Hoops with heart pendants

You need the following materials to assemble these earrings:
- 1 pair of hoop earrings, 25x0,7mm, gilded silver
- 2 heart charms, gilded brass
- Miyuki seed beads, ivory, #11
First, you straighten the end of the hoop carefully, so you can easily string the beads. Once all the beads and the heart charm are strung, you bend the end of the wire carefully back into its original position.
Earrings with beaded bar and shell pearls


You need the following materials to make these earrings:
- 1 pair of earstuds with ball and loop, gilded sterling silver
- Delica beads, golden Delica DB1832
- Delica beads, pure white matte, DB0351V
- Delica beads, rosewater, DB1906V
- 2 eyepins, gilded sterling silver
- 2 loops with cup and peg, gilded sterling silver
- 2 shell pearls, half-drilled, 6,5mm, white
- jewellery glue

First, you glue the peg on the loop into the half-drilled shell pearl. If necessary, you pinch off a bit of the peg so the pearl sits comfortably in the cup.
Then you open the eye of the eyepin, hang the pearl into it and close the eye again. Afterwards, you string the desired amount of beads on the wire. With the remaining wire you make a loop to round it off. Please click here for our instructions on how to make a loop. Keep in mind that you will need left over wire for the loop while you thread your beads. It may be easier when adding the pearl to the pin before adding the Delica beads.
Finally, you open the eyelet on the earstud, hang the beaded eyepin into it and close the eyelet again.
Hair accessory with beads and shell pearl


You need the following materials to make this hair accessory:
- Delica beads, golden Delica DB1832
- Delica beads, rose-coloured, DB1371V
- Miyuki seed beads, ivory, #11
- 1 hair clip, gilded
- 1 crimp end, gilded sterling silver
- 1 shell pearl, half-drilled, 6,5mm, white
- 1 loop with cup and peg, gilded sterling silver
- 1 jumpring, 3mm, gilded sterling silver
- 1 jumpring, 5mm, gilded sterling silver
- 1 cord end, small, gilded brass
- Miyuki beading tread, white
- beading needle
- jewellery glue

First, you apply a bit of jewellery glue insind the small cord end. Insert the cord and press the cord end together. Then you string the desired amount of beads.
Pull the cord through the crimp end, tie a few knots and close the crimp end. (In case the hole in the crimp end is to large so the knots can pass through, you can hide the last seed bead inside the crimp end.)
Then you take the 5mm jumpring and attach the crimp end to the hair clip. In an earlier blog post on men’s jewellery we explain how to open and close a jumpring correctly.
Next, glue the loop with peg and cup into the half-drilled shell pearl and connect it to the cord end using a 3mm jumpring.
Alternatively, you can fasten a cord end or a crimp end on either side.
Macramé bracelet with Delica beads


You need the following materials to assemble these two bracelets:
(white bracelet)
- 2m nylon cord, 0.5mm, white
- Delica beads, golden Delica DB1832
- 1 gilded pendant with Swarovski crystal, 6mm
(pink bracelet)
- 2m nylon cord, 0.5mm, pink
- Delica beads, golden Delica DB1832
- Delica beads, rosewater, DB1906V
- 1 bead with crystal, 4mm, gilded sterling silver
We made both bracelets using the classic macramé braiding technique.
Before you start, you carefully burn both ends of the nylon cord so it melts, hardens and can be used like a needle. After that, the beads can easily be strung.
For the white bracelet we turned the eye on the charm a bit in order to make it hang the right way. The charm is braided into the bracelet.
Have fun making your own confirmation jewellery!
We will publicly show your name and comment on this website. Your email is to ensure that the author of this post can get back to you. We promise to keep your data safe and secure.