
Are you in need of inspiration for beautiful jewellery this december month? Then you are in luck, because there is a wealth of inspiration coming your way down below.
This time, I have chosen to make some beautiful examples with jewellery setpieces, consisting of necklaces and earring in exclusive stones and crystals. You can, with very few components, create your own setpieces for the christmas party, or maybe new years eve, which suits your desired dress. Both the crystals and the beads are sold in a wealth of colors and sizes, and the jewellery pieces can be sold in silver as well, if that’s your desire.

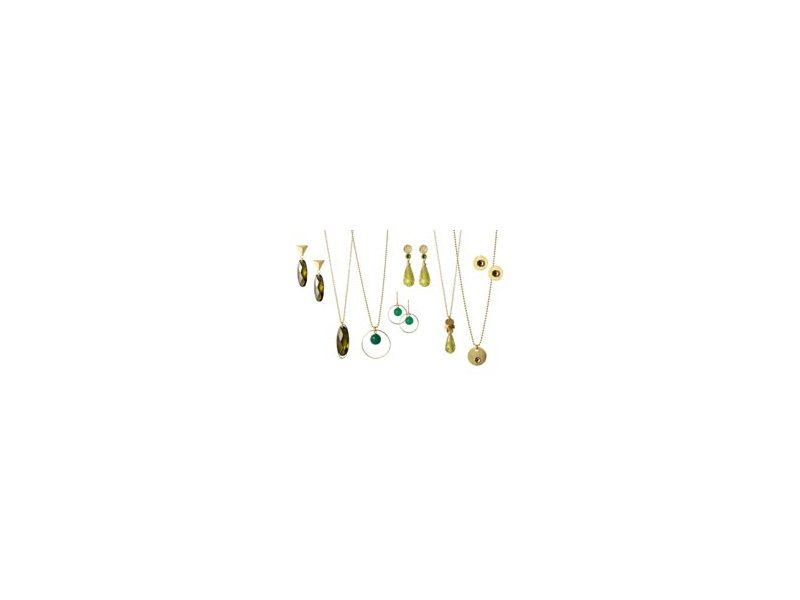
Earrings with oval zirconia

For these earrings, the following materials were used:
2 pcs. zirconia, oval, dark green
1 pair earstuds, brushed triangle stud and eye
2 pcs. jumpring, gilded sterling, 4mm
2 pcs. jumpring, gilded sterling, 3mm

You begin by putting the 4mm jumpring through the zirconia. Be careful when doing so, because the zirconia can break. You can use the 3mm jumpring next, to combine the the eye of the earstud, with the zirconia.
Necklace with oval zirconia

For this necklace, the following materials were used:
1 pc. zirconia, oval, dark green
1 pc. oblong, brushed gilded sterling
2 pcs. jumpring, gilded sterling, 4mm
ca. 60cm cable chain, open, gilded
+ adhesive
Begin by leading the 4mm jumpring through the zirconia, putting the oblong oval ring in the jumpring and then finishing up, by closing the jumpring itself. Be careful when doing so, because the zirconia can break. I would recommend using a bit of adhesive on each side of the zirconia, so the oblong oval ring is glued to it. You then pull the chain through the initial jumpring, before closing the chain with a 4mm jumpring. I have chosen not to use a lobster claw lock, based on the fact, that the chain itself is easily put on without a locking mechanism.

Earrings with half-drilled green agate

For these earrings, the following materials were used:
1 pair gilded earwires with loop
2 pc. gilded sterling rings, 18mm
2 pc. green agate, half-drilled
2 pc. bail, cup with peg, gilded sterling
+ adhesive
You start off, by applying some adhesive on the bail, whereafter you place the bail in the half-drilled agate. Check the length of the bail before glueing – you may need to cut a piece off if it is too long. After that, you will now have to open the eye of the earwire, place the agate and the ring in it, and close it shut. Your earrings are now finished.
Necklace with half-drilled green agate

For this necklace, the following materials were used:
1 pc. green agate, half-drilled
1 pc. gilded sterling ring, 25mm
1 pc. bail, cup with peg, gilded sterling
1 pc. jumpring, gilded sterling, 5mm
ca. 60cm gilded ball chain
+ adhesive
The procedure is the same as with the earrings above. The bail is glued to the agate’s facet, the ring and the agate is put together in the jumpring, where the chain is pulled through in the end.
Earrings with teardrop zirconia

For these earrings, the following materials were used:
1 pair gilded sterling earstuds
2 pcs. hotfix glass rhinestone, 2,7mm
2 pcs. zirconia, teardrop, light green
2 pcs. gilded sterling headpin
2 pcs. gilded sterling stardust bead, 3mm
+ adhesive

Begin by glueing the crystal to the earstud. Then lead the headpin through the teardrop, put on the stardust bead and make an eye. You can see Smyks guide on how to make an eye here. Collect the parts by carefully opening up the eye and closing it shut again. Be careful that the eye does not break during the proces.
Necklace with green teardrop-shaped zirconia

For this necklace, the following materials were used:
1 pc. zirconia, teardrop, light green
1 pc. gilded sterling stardust bead, 3mm
1 pc. gilded sterling headpin
6 pcs. gilded coin, brushed
3 pcs. jumpring, gilded sterling, 4mm
1 pc. jumpring, gilded sterling, 3mm
ca. 60cm cable chain, gilded (dublé)

Step one: lead your headpin through the teardrop and the stardust bead. Make an eye. You can see Smyks guide on how to make an eye here. Now, open the 4mm jumpring, put on a coin, then the teardrop and lastly, another coin. You then close the jumpring.

Step two: Now for the next row of coins. Open another jumpring and place a coin. Before you put on the next coin, lead the jumpring through the jumpring from step one(between the two coins from the first one). Now, place another coin in the jumpring and close it shut. The coins will exist in layers now.

Optional step: It is the same process as step two over again, until you are satisfied with the amount of layers.
Step three: Lastly, pull the chain through the last jumpring and close it in the neck, with a 3mm jumpring. Remember that the chain has to be at least 50cm for the necklace to be put on over the head. Otherwise you will need to by a lobster claw lock or other viable locking mechanisms.

Earstuds with gilded plates and crystals

For these earstuds, you will need the following materials:
1 pair earstuds, brushed coins and eye
2 pcs. gilded sterling coin,rustique
2 pcs. hotfix swarovski crystal, beige facet
+ adhesive

Glue the crystal to the earstud, lead the earstud through the hole in the coin and you are finished.
Necklace with coin and crystal

For this necklace, the following materials were used:
1 pc. gilded sterling coin, brushed
1 pc. hotfix swarovski crystal, beige facet
1 pc. jumpring, gilded sterling, 5mm
ca. 60cm ball chain, gilded sterling with ball chain connector
+ adhesive
Begin by glueing the crystal to the coin as shown. Next, place a jumpring in the coin as shown, close it, and pull the chain through the eye.
Enjoy your new jewellery.
For questions, comments or suggestions – please write in the commentary field below.
We will publicly show your name and comment on this website. Your email is to ensure that the author of this post can get back to you. We promise to keep your data safe and secure.