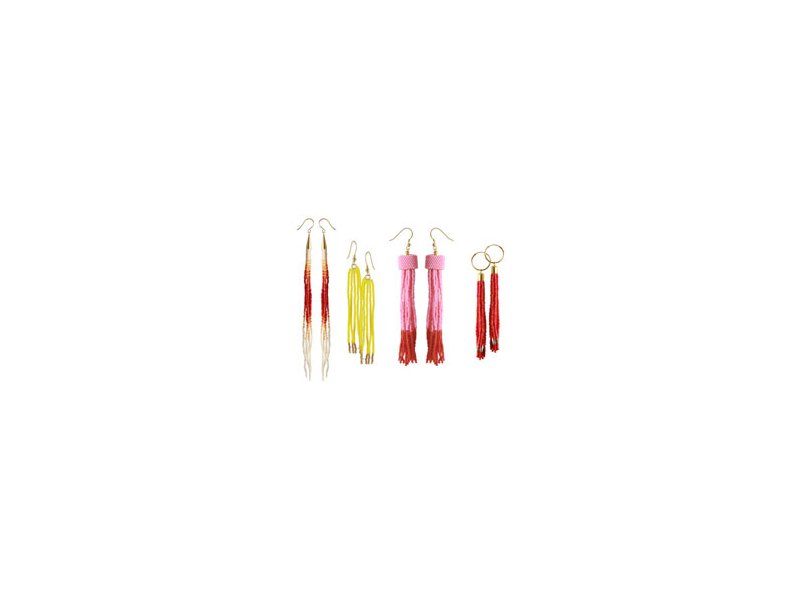

Earrings with seed beads are currently setting the trend. Here we show a little collection of earrings which can inspire you to start your very own earring production.
We used different techniques for our pieces of jewellery so you would have a choice and could pick the model you like the best. Play with colours and techniques and create your own designs!
Smyks has just received new supply of Miyuki seed beads in beautiful colours. Now, we can also offer you a huge assortment of extra tiny beads in size #15. These beads are perfectly suited for earrings and bracelets.
Earrings with pink and orange Delica beads


You need the following materials to make these earrings:
- 3 x Delica beads, pink
- 1 x Delica beads, coral, matte
- 2 glue-in ends, X-large, hole size 12mm, gilded brass
- 2 jumprings, 5mm, gilded sterling silver
- 1 pair of earwires with ball and spiral, gilded sterling silver
- ca. 40cm waxed nylon cord, pink
- Nymo beading thread, size D, white
- FireLine, 0.15mm, white
- beeding needle
- jewellery glue

You start with the fringes. In our earlier blog post on tassel earrings we give you instructions on how to sew the beads to the cord, how to roll it and finally sew it together. Roll the cord until it fits into the glue-in end. We used Nymo beading thread to make the fringes because it is thin and falls beautifully.

Next, you cover the glue-in end with beads. We chose a technique called Peyote Stich to make the band. In our blog post on Peyote stich jewellery, we show you how to make a band like that.
For our purposes here, the band needs to be as wide or a bit wider that the glue-in end. We used FireLine to make the Peyote band so it would be a bit stiffer, but you can use Nymo thread, too.

When the band has got the right length, i.e. when the band fits perfectly around the cap, you sew it together.

Once the band is seamed together, you fasten the ends. Take the band away from the glue-in end and apply a bit of glue on the cap. Then you place the band back on. Now the cap is glued onto the cap.

After that, you apply jewellery glue on the inside of the cap and paste the fringes into it.

Finally, you attach a 5mm jumpring to the glue-in end and connect it to the earwire.
Hoops with seed bead tassels


You need the following materials to make these earrings:
- 1 pair of hinged hoops, 20mm, gilded sterling silver
- 2 glue-in ends, doublé, 6/7mm
- seed beads, opaque luster red
- seed beads, grey opaque
- ca. 40cm waxed nylon cord, pink
- Nymo beading thread, size D, black
- beading needle
- jewellery glue

You start with the fringes. In our earlier blog post on tassel earrings we give you instructions on how to sew the beads to the cord, how to roll it and finally sew it together.
Roll the cord until it fits into the glue-in end.

Apply jewellery glue on the inside of the glue-in end and paste the fringes into it. Finally, you hang the gue-in end on the hoop.
Earrings with long fringes


You need the following materials to make these earrings:
- Delica beads, frosted ivory
- Delica beads, pumpkin, semi-transparent
- Delica beads, coral, matte
- Delica beads, apple red
- 2 conical bead caps, 12.5mm, gilded brass
- 2 clamp-ons with double loop, gilded brass
- ca. 20cm wire, 0.5mm, gilded sterling silver
- 1 pair of earwires with ball, gilded sterling silver
- Nymo beading thread, size D, white
- beading needle
- jewellery glue
- round-nose pliers
- chain-nose pliers
- flat-nose pliers
- cutting pliers

You start with the fringes. String the beads onto the Nymo thread until the fringe has got the desired length. Then, you sew back through all the beads – except the last one which serves as a stopper. String as many fringes as you want. In our example we made five strands in different lengths.

Then, you tie a knot with all the threads together. Tie the knot as close to the beads as possible.

After that, you apply a bit of glue on the knot and cut the remaining threads. Then, you take a clamp-on and close it around the knot.

Next, you take the piece of wire and make a loop that connects the wire to the clamp-on. Click here for instructions on how to make a loop.

Thread the conical bead cap on the wire and pull it down to the beads so it covers the knot and the clamp-on.

Now you make another loop.

Use the new loop to hang your pendant with the gilded cone and the beaded fringes on the earwire.
Earrings with seed beads


You need the following materials to make these earrings:
- Miyuki seed beads (size #15), yellow
- Delica beads, 24K, cool gold
- 2 closed jumprings, 4mm, gilded sterling silver
- 1 pair of earwires with ball and spiral, gilded sterling silver
- Nymo beading thread, size D, white
- beading needle

Please note that the yellow seed beads are size #15 – meaning extra tiny.

Thread the desired amount of beads through a needle. Then, you sew back through ca. half of the beads – but not through the last one which serves as a stopper.

Insert the other end of the thread into the closed jumpring, then you sew the thread back through the other half of the beads.

Pull the thread tight and tie a knot. (We opted for a surgeon’s knot.)

Before you cut the threads, you first sew one thread back through a couple of beads …

… then, you sew the other thread back through a couple of beads into the opposite direction.

Pull the threads to hide the knot. Now, you cut the threats close to the beads.

Make the other fringes using the same method. All the strands are fastened to the same closed jumpring.

In our example, we attached five strands to the same closed jumpring. If you want to make more strands you should use a 5mm closed jumpring.

Finally, you connect the jumpring to the earwire.
Have fun making your own jewellery!
Any questions, suggestions or comments? Please write to us in the commentary field below. Thank you!
We will publicly show your name and comment on this website. Your email is to ensure that the author of this post can get back to you. We promise to keep your data safe and secure.