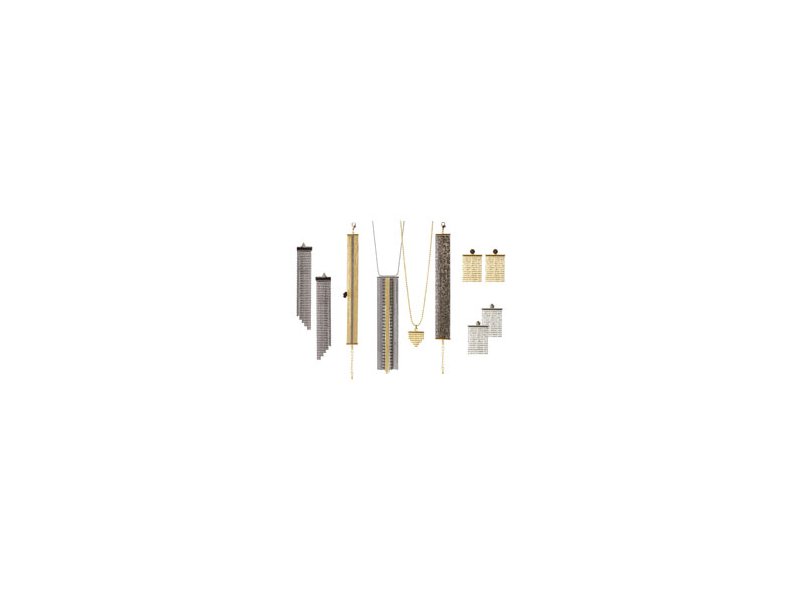

In the picture above you see a little collection consisting of earrings, necklaces and bracelets made of different kinds of ball chain.
It is quite fast and simple to assemble pieces of ball chain and wide cord ends to pieces of jewellery.
We worked with cord ends which are normally used for weaved bracelets, but they proved to be much more versatile. In our jewellery designs, they keep the several kinds of ball chain together and in place .
In the following DIY tutorial, we give you an example of how to combine the cord ends and ball chains. It is the same method you will apply for all the other designs shown in this article.
Necklace with gilded ball chain


You need the following materials to assemble this necklace:
- 60cm ball chain, faceted, 1.5mm, gilded brass (for the necklace)
- ball chain, faceted, 1.5mm, gilded brass (in various lengths for the pendant)
- 1 cord end, 15mm, gilded brass
- 1 jumpring, 5mm, gilded brass
- side cutter pliers
- chain-nose pliers

First, you cut the ball chain into pieces of a certain length. The cord end we use is suitable for up to 10 strands of ball chain with a diameter of 1.5mm.

Next, you close the one end of the cord end by pressing it together with chain-nose pliers. Then you slide one piece of ball chain after the other into the cord end. That is a simple task because there is room for exactly one little ball in the cord end.

Once the cord end is filled with chains, you close it by pressing its other end together as well.

Now you can cut the pieces of ball chain into shape. Finally, you fasten the pendant to the 60cm long ball chain with a jumpring.
In an earlier DIY tutorial you can learn how to open and close a jumpring correctly.
Earrings with oxidised ball chain


You need the following materials to assemble these earrings:
- 2 cord ends, 13.5mm, gunmetal
- ball chain, 1.2mm, faceted, black metal
- 1 pair of earstuds with triangle, oxidised sterling silver
- side cutter pliers
- chain-nose pliers
The best method to assemble the cord end and the pieces of ball chain is the same we explained above under „Necklace with gilded ball chain“.
The cord end we used this time is suitable for 11 strands of ball chain with a diameter of 1.2mm.
Bracelet with gilded and oxidised ball chain


You need the following materials to assemble this bracelet:
- 2 cord ends, 15mm, gilded brass
- ball chain, 1.5mm, faceted, gilded brass
- ball chain, 1.5mm, black metal
- 2 jumprings, 5mm, gilded brass
- 1 lobster claw clasp, 12mm, gilded brass
- 1 chain extender, gilded brass
- 1 pendant, hamsa, gilded brass
- side cutter pliers
- chain-nose pliers
The method to assemble the cord end and the pieces of ball chain is the same we explained above under „Necklace with gilded ball chain“.
The cord ends we used this time are suitable for 10 strands of ball chain with a diameter of 1.5mm. Remember to put the pendant on the chain before you close the second cord end. Once the strands of ball chain have been fastened to the ends, you attach the lobster claw clasp to the one end with a jumpring and the chain extender to the other end with another jumpring. In an earlier DIY tutorial you can learn how to open and close a jumpring correctly.
Bracelet with black ball chain with golden facets


You need the following materials to assemble this bracelet:
- 2 cord ends, 20mm, gilded brass
- ball chain, 1.5mm, black brass, golden facets
- 2 jumprings, 5mm, gilded brass
- 1 lobster claw clasp, 12mm, gilded brass
- 1 chain extender, gilded brass
- side cutter pliers
- chain-nose pliers
The method to assemble the cord end and the pieces of ball chain is the same we explained above under „Necklace with gilded ball chain“.
The cord ends we used this time are suitable for 14 strands of ball chain. Once the strands of ball chain have been fastened to the ends, you attach the lobster claw clasp to the one end with a jumpring and the chain extender to the other end with another jumpring. In an earlier DIY tutorial you can learn how to open and close a jumpring correctly.
Necklace with gilded and oxidised ball chain


You need the following materials to assemble this necklace:
- 1 cord end, 35mm, steel coloured brass
- ball chain, 1.5mm, black metal
- ball chain with ovals, 5mm, black metal
- ball chain, 1.5mm, gilded brass
- side cutter pliers
- chain-nose pliers
The method to assemble the cord end and the pieces of ball chain is the same we explained above under „Necklace with gilded ball chain“.
The cord end we used this time is suitable for 23 strands of ball chain with a diameter of 1.5mm. Slide the strands of ball chain into the cord end in the desired pattern and lengths. This cord end has two eyelets, so you just thread the long ball chain through them. Before you pull it over your head you close it with the ball chain connector (included in the delivery).
Earrings with gilded ball chain


You need the following materials to assemble these earrings:
- 2 cord ends, 15mm, gilded brass
- ball chain, 1.5mm, faceted, gilded brass
- 1 pair of earstuds with 4mm pad, gilded sterling silver
- side cutter pliers
- chain-nose pliers
The method to assemble the cord end and the pieces of ball chain is the same we explained above under „Necklace with gilded ball chain“.
The cord end we used this time is suitable for 13 strands of ball chain with a diameter of 1.5mm.
Earrings with silver-plated ball chain


You need the following materials to assemble these earrings:
- 2 cord ends, 15mm, steel coloured brass
- ball chain, 1.5mm, faceted, silver-plated brass
- 1 pair of earstuds with 3mm ball, sterling silver
- side cutter pliers
- chain-nose pliers
The method to assemble the cord end and the pieces of ball chain is the same we explained above under „Necklace with gilded ball chain“.
The cord end we used this time is suitable for 13 strands of ball chain with a diameter of 1.5mm.
In the picture you see the ball chains in front of the earlobe. But you can also place them behind the earlobe as shown in the picture of the earrings with gilded ball chain.
Have fun making your own jewellery!
Have you got any questions, suggestions or comments? Please write in the commentary field below. Thank you!
We will publicly show your name and comment on this website. Your email is to ensure that the author of this post can get back to you. We promise to keep your data safe and secure.