
Make your own seed bead earrings inspired by Oscar de la Renta’s gorgeous tassel earrings.
The instructions are detailed and it takes time to sew all the tiny beads together, but you will be rewarded with a fantastic result – your own exclusive tassel earrings.The alterative to sewing the beads on the cord end is to string the seed beads on a silver-plated beading wire, apply a bit of glue on the cord end and then wind the stringed beads around the cord end. But you may find it hard to achieve the same even and neat outcome.
Click here to browse our full assortment of seed beads.
Cherry earrings with seed beads

These pretty cherry earrings were made with red seed beads. You find the specific instruction for these earrings in the last part of this blog post.
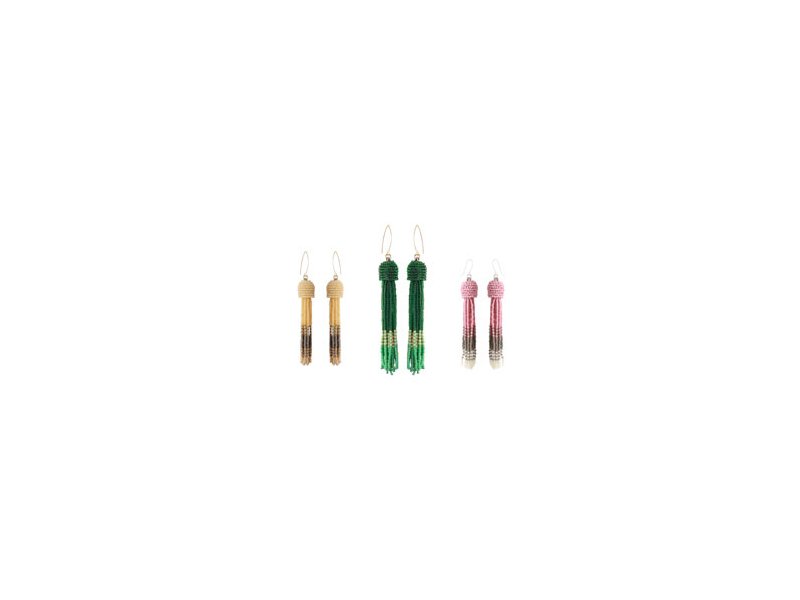
Tassel earrings with seed beads – green


You need the following materials to make these earrings:
- 1 bag of seed beads, dark green, transparent
- 1 bag of seed beads, clover green, iridescent
- 1 bag of seed beads, golden
- 2 cord ends, silver-coloured
- 2 jumprings, 5mm, gold-plated brass
- 1 pair of earwires, gold-plated silver
- ca. 20cm waxed cord, black
- beading needle
- Nymo beading thread, black, size D
- FireLine beading thread, 6lb, black
- jewellery glue

First, you take ca. 2 metres of Nymo beading thread, make a knot on one end and thread the needle.Then you stitch through the waxed cord (a few millimetres away from the edge) and pull the thread through the cord. After that, you string 54 beads on the thread.If you don’t want the waxed nylon cord to frazzle, you can carefully burn the ends so they melt.

Next, you take the needle back through all the beads – except the last one, which is your stopper bead.

When you are done with that, you pull the thread to make sure that all the beads sit tightly and close to the waxed cord.Then, you stitch through the cord so the needle comes out next to the strand of beads you just have stringed.

Now you string the next strand of beads, exactly as you did before.

String one strand of beads after the other, each one with 54 beads.

Once you have made 20 strands of beads, you sew up the end of your thread. You will need to start a new thread from time to time while working on the strands. In that case you also sew up the old thread and continue with a new one.Now you have got a long row of strands of beads which is now going to be rolled up.

Roll up the waxed cord a bit and sew a few stitches through the rolled up piece of cord.

Roll up the cord a little more and sew through it twice. Then, roll it up a bit further and sew through it once again …and so on …

When you have reached the end of the strands of beads, keep rolling up and sewing through the waxed cord until it is compact enough to fit into the cord end.

Once you are done with rolling, you sew up the end of your thread.

But before you start sewing up, check one more time whether the rolled cord really does fit into the cord end.

The next step is to cover the cord end with beads. For this, we are going to use FireLine thread instead of Nymo thread as it is a little stiffer and gives better support.First, you string the beads and then you pass the needle through all the beads one more time creating a circle. I used 29 seed beads but these can vary slightly in size. So, before you tighten the thread, check to make sure the number is right.The circle of beads should sit tighly around the cord end.

Next, place the beads in the bottom groove of the cord end and tighten the thread so the beads sit tightly around the metal.

After that, you tie a double knot. You can apply a small amount of jewellery glue in the groove before you tighten the thread to make sure that the circle of beads won’t slip.

Now you can start sewing on another row of beads. First, you thread a new bead onto the needle, then you pass the needle through the bead in the row below (the bead from which the thread originally came), only in the opposite direction.

Pull the thread so that the new bead is close to the row below and then you pass the needle through a new bead one more time. Now, you have fastened the first bead of the new row.

From now on, you always fasten 2 beads at a time. Thread 2 new beads onto the needle, then count 2 beads in the first row (going forwards). Sew through these two beads and a third one in the first row (backwards – all in all 3 beads), so that the needle finally emerges from the bead directly below the first bead in the second row.

Zieh den Faden fest, so dass die Perlen fest übereinander sitzen, und führe die Nadel dann durch die 3 Perlen darüber.Jetzt hast du die ersten 3 Perlen in der neuen Reihe zusammengenäht.Pull the thread so that the beads come to sit tightly on top of each other. Now, you pass the needle through the 3 beads in the new row.

Now, you sew on the next 2 beads in the same way. Thread 2 beads onto your needle. Count two beads forward in the first row and pass the needle from there backwards through 3 beads so the needle comes out under the last bead in the new row.

Then, pass the needle through 3 beads in your new row.Continue like this: 2 new beads on the thread – through 3 beads in the row underneath – through 3 beads in the new row.

As the first row of beads sits in the bottom groove, a bit of the cord end is still visible. To cover the edge, I have sewn one more row underneath the first one.

First, you sew through a couple of beads so the threads comes out in the first row.

Then, you attach a new bead in the same way as explained above. You thread a bead and sew it onto a bead the row above. Next, you pass the needle once again through the new bead.

As described above, you once again thread 2 beads and pass the needle through 3 beads in the row above.
Note: Change your sewing direction each time you start a new row of beads.

… and then again through 3 beads in the new row. Continue in this way, always threading 2 new beads at the same time until you have finished the row.

Next, pass the needle through the beads so it comes out in the top row. There you start a new row, followed by another new row. Continue in this was until you have completed 5 rows.

After you have finished 5 rows, you will need to start sewing tighter. You do this by threading 2 beads (as before), but now you count 3 beads forward in the row underneath (instead of 2) and sew backwards through 4 beads (instead of 3).The exact place where you need to start sewing tighter can vary. When I notice that the beads are no longer close to the cord, I start to sew them tighter.

There is space for 3 tighter sewn rows, which means a total of 8 rows of beads. When you have finished you 8 rows, you can finally sew up and secure the thread by sewing4-5 times through different beads.

After that, you apply a bit of jewellery glue inside the cord end and glue the seed bead tassel into it.

Finally, you take a jumpring and fasten the earwire to the cord end.

Your tassel earring with seed beads is ready to wear!
Seed bead earrings – pink-grey-cream


You need the following materials to make these earrings:
- 1 bag of seed beads, dusty pink
- 1 bag of seed beads, grey
- 1 bag of seed beads, cream
Seed bead earrings – cream-grey-golden


You need the following materials to make these earrings:
- 1 bag of seed beads, light orange pearl
- 1 bag of seed beads, grey
- 1 bag of seed beads, golden
Have fun making your own earrings inspired by Oscar de la Renta!
Cherry earrings with seed beads

We used the following materials to make these earrings:
- seed beads size #11 red
- seed beads size #11 green
- 2 glass charms, leaves
- 1 pair of earwires, gilded sterling silver
- 2 closed jumprings, 4mm, gilded sterling silver
- 1 candy jade bead, 12mm, red
- ca. 4 m FireLine beading thread, LB6, black
- beading needle

First, you sew the seed beads around the candy jade bead using the same sewing method we described above for covering the cap with beads.
You will need approx. 31 seed beads to make a ring that fits around the jade bead.

Ad one more row with the same amount of beads.

After that, you start taking in. Leave one bead out every second time you fasten two beads (compare instructions above).

Then you fasten another row in the same way. Keep taking in every second round.

So when you take in in the next row, the ring will be composed of 12 beads.

Cover the last part of the jade bead by sewing on 4 beads.

Then, you sew seed beads around the other side of the candy jade bead in the same way.

But instead of covering the last visible part with red seed beads, you pull the needle through the middle of the bead. Having done that, you thread the green seed beads.

Next, you thread the closed jumpring and pull the needle back through the green seed beads. Finally, you fasten the thread.
Open the earwire’s eyelet carefully and insert the glass pendant. If the leaf does not hang in the way you want it, you can turn its eyelet.
Finally, you hang the cherry into the earwire’s eyelet and close it again.
Have you got any questions, suggestions or comments? Please write to us in the commentary field below. Thank you!
We will publicly show your name and comment on this website. Your email is to ensure that the author of this post can get back to you. We promise to keep your data safe and secure.