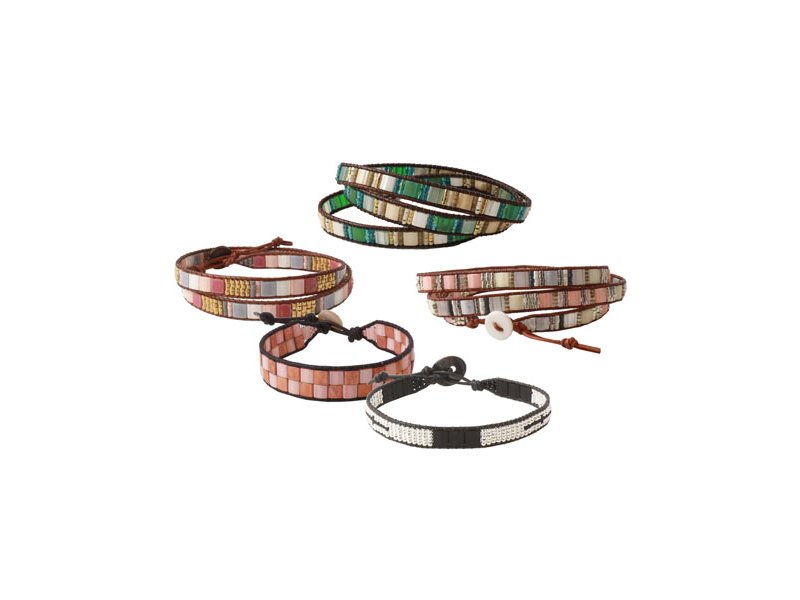
Tila bead bracelet, easily made
You can make these beautiful weaved bracelets with leather edge and Tila beads yourself. Here we show you some examples of bracelets for which we combined Tila beads, seed beads and Delica beads.
Our versions have got a leather edge and a button hole.
Weaving these bracelets becomes very easy when you fasten the leather cords in a beading loom.

Bracelet with Tila beads in shades of pink and grey


For this bracelet we used the following materials:
- 1m leather cord, rosewood brown, 1mm
- 1 coconut button, 10mm
- Tila beads, matte dark red
- Tila beads, salmon
- Tila beads, ivory
- Tila beads, grey
- Delica beads, 24k gold inlaid, DB0031V
- Delica beads, peach, DB0207V
- Delica beads, grey, DB0731V
- FireLine, black, LB6
- wide-eye beading needle
- jewellery glue (optional)
- beading loom

First, you string the button on the leather cord and push it down to the middle of the cord. Cut approx. 2 metres of FireLine off the reel. (You will need a bit more than 2 metres for this bracelet but a thread longer than 2 metres makes sewing difficult.)

Put the thread parallel to the leather cords and tie a knot with the leather cords and the thread together. Push the knot all the way up to the button, then tighten the knot.

Fasten the knot in one of the clamps of the weaving loom and the to ends of the leather cord in the other.
Please take care that the clamp does not cut through the leather cord, espeacially if the leather is quite thin.

Thread the first grey Delica bead onto the needle. Sew underneath the leather cords and push the bead up in between the cords. Do that from left to right.

Sew back through the bead from right to left – now above the leather cords.

Tighten the thread. Now the first bead is tightly sewn to the cords.

Next, string 2 beads onto the needle. Sew underneath the leather cords and push the beads up in between the cords.

Sew through the two beads – above the leather cords – and tighten the thread.

Proceed the same way with the next 3 beads.

Now you fasten the Tila bead. Tila beads have got two holes which means that you have to sew back and forth twice through the same bead.
Sew through the first hole and push the Tila bead up in between the leather cords.

Then you sew backwards through the same hole – from right to left and above the leather cords.

Go up with the needle in between the leather cords, then you sew through the second hole in the Tila bead.

Before you can pull the thread completely through, you have to go back with the needle underneath the two leather cords.
Now the thread is lying underneath the leather cords and can be sewn through the bead.

Push the Tila bead upwards and sew through it – above the leather cords and from right to left.

Tighten the thread. Now the Tila bead sits tightly.

Fasten the next Tila bead in the same way.

Weave two more Tila beads into your bracelet, proceed the the same way. Next, you thread 4 Delica beads on your needle and sew them into the bracelet.

… followed by one more row of Delica beads …

… and 5 rows of gilded Delica beads. Afterwards, you repeat the colour combination until the bracelet has reached the desired length.

If you want to wrap the bracelet twice or more times around your wrist, you will have to change the thread.
Tie the new thread unto the first one and place the knot in a way that will make it disappear within a bead when you continue sewing. Before you continue, apply a bit of jewellery glue on the knot and cut the excess thread tightly at the knot.

Complete the bracelet the way you started it in order to create a pointed end.

Tie a knot with the leather cords and the sewing thread together.

Push the knot all the way up to the beads and tighten it.

Then, you tie another knot in order to create a button hole, this time with the leather cords only.

If you like, you can tie a third knot fto make a second button hole. Apply a bit of glue on the knots and cut the thread. Cut the excess leather cord after the last knot.
Your bracelet is done.
Bracelet with Tila beads in light colours


For this Tila bead bracelet we used the following materials:
- ca. 150cm leather cord, rosewood brown, 0.9mm
- 1 mother-of-pearl button
- Tila beads, salmon
- Tila beads, matte cream
- Tila beads, light tan
- Tila beads, matte silver
- Delica beads, silver inlaid , DB0035V
- Delica beads, matte dark grey, DB0306V
- Delica beads, light yellow, DB0203V
- Delica beads, grey metallic, DB0021V
- Delica beads, greyish brown, DB0671V
- FireLine, black, LB6
- wide-eye beading needle
- jewellery glue
- beading loom
Same procedure as described above.
Bracelet with Tila beads in blue and green

For this Tila bead bracelet we used the following materials:
- ca. 150cm leather cord, rustic medium brown, 1mm
- 1 button, gilded brass
- Tila beads, green iris
- Tila beads, light sea foam
- Tila beads, cream
- Tila beads, light caramel
- Delica beads, 24 K cool gold inlaid, DB0034V
- Delica beads, tan silver-lined, DB1458V
- Delica beads, matte greenish, DB0390V
- Delica beads, matte teal blue, DB0788V
- Delica beads, emerald, DB0125V
- FireLine, black, LB6
- wide-eye beading needle
- jewellery glue
- beading loom
Same procedure as described above.
Tila bead bracelet with two rows


For this bracelet we used the following materials:
- ca. 50cm leather cord, rustic dark brown, 1mm
- 1 button, mother-of-pearl, natural white/brown
- Tila beads, salmon
- Tila beads, matte golden orange
- FireLine, black, LB6
- wide-eye beading needle
- jewellery glue
- beading loom
Same procedure as described above.
Bracelet with Tila beads and seed beads


For this Tila bead bracelet we used the following materials:
- ca. 50cm leather cord, matte black, 1mm
- 1 button, black brass
- Tila beads, matte black
- Seed beads, silver-plated, size #15
- Seed beads, matte black, size #15
- FireLine, black, LB6
- wide-eye beading needle
- jewellery glue
- beading loom
Same procedure as described above.
For a related blog post with Miyuki Delica bead bracelets, please read Mini-bracelets with Delica beads
Have fun designing your own bracelets!
We will publicly show your name and comment on this website. Your email is to ensure that the author of this post can get back to you. We promise to keep your data safe and secure.