


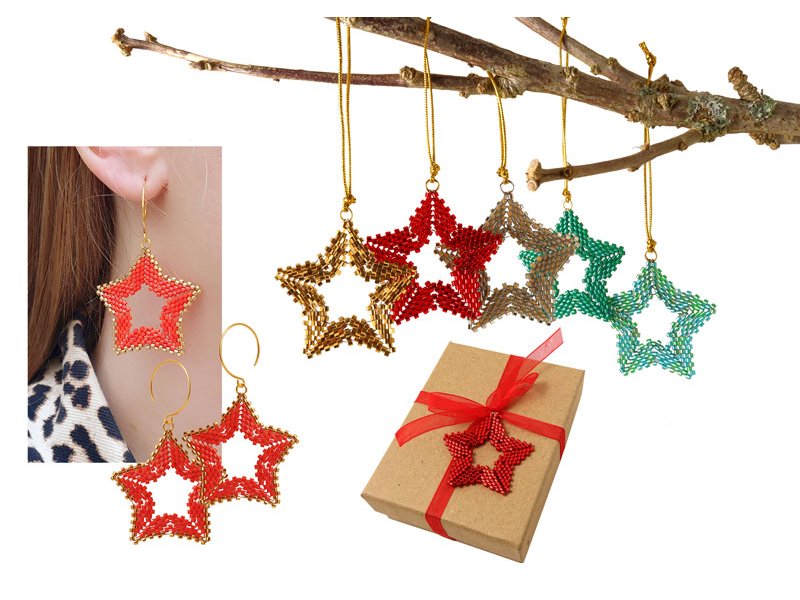
Make your own stars with Miyuki Delica beads in size #11. This photo tutorial shows you how to weave a five-pointed bead star with an open centre. Use your beaded stars as Christmas ornaments, gift decorations or pendants for earrings.
We demonstrate the technique with a green star, then list the materials for a pair of red star earrings with a gold border. Follow the same method and choose colours to suit your Christmas tree or jewellery designs.
Jump to a section:
- Green star: materials and tutorial
- Red and gold star earrings
- Star gift decoration
- Printable PDF guide
Green star made with Miyuki Delica beads

Materials for one green star
- Green Miyuki Delica beads #11, DB0656 – one 5.2 g pack.
- FireLine 6LB, black, 0.15 mm – use about 1.5 m; each unit contains 2 m.
- Closed ring, 4 mm, gold-plated sterling silver – use 1 ring; the pack contains 10.
- Miyuki beading needles, 0.4 mm – use 1 needle; the pack contains 6.
Would you like to choose other colours? Browse all Delica beads in size #11.
Add green star materials to basket
The button adds one pack of green beads, one 2 m unit of FireLine, one pack of rings and one pack of needles. You buy full packs; the rings and needles can be used for several projects.
You will also need small scissors for the thread and, if needed, jewellery pliers to attach the earwires. These tools are not included in the basket buttons.
How to stitch the star, step by step
Follow the photos in order and keep the thread tension even as you work. In this tutorial, a bead that sticks out means the next raised bead in the staggered row.

1. Thread 55 Delica beads onto the thread. Pass the needle back through a few of the first beads and pull the thread snug to form a ring. Leave a thread tail of about 8 cm.
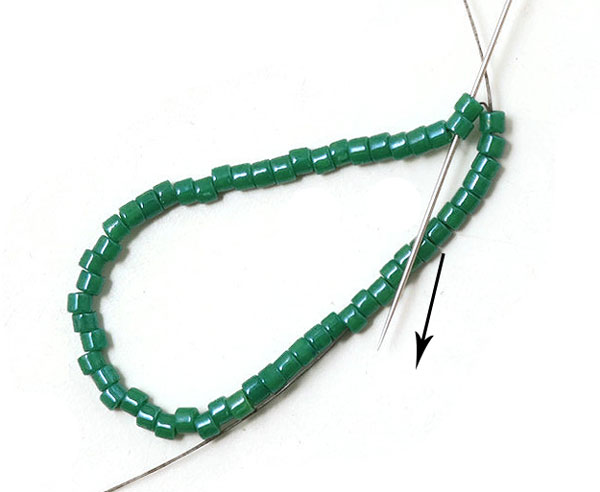
2. Pass the needle through the next 2 beads in the ring.

3. Sew back through the previous 2 beads as shown in the photo. Then pass through the first 2 beads again. This forms the first point of the star.

4. Pass the needle through the next 11 beads.

5. Make the second point in the same way: Sew back through beads 8 and 9 in this group of 11 beads. There should be 7 beads between the points.

6. Then sew back through beads 10 and 11 as shown in the photo.

7. Pull the thread snug. The first 2 points are now complete.

8. Make the remaining 3 points in the same way to form a star with 5 points. Then begin the first stitching round: Skip 1 bead and sew through the next.

9. Skip 1 bead again and sew through the next.

10. Skip another bead and sew through the next.

11. Pass the needle through the last beads on this side, then through the next 2 beads. Work the remaining 4 sides of the star in the same way.

12. Begin the next round by picking up 2 beads. Sew through the bead at the point as shown in the photo.

13. Pick up 1 bead and sew through the bead that sticks out.

14. Pick up another bead and sew through the next bead that sticks out.

15. Sew through the next bead that sticks out without adding a new bead.

16. Pick up 1 bead and sew through the next bead that sticks out.

17. Pick up another bead and sew through the next bead at the point of the star.

18. Pick up 2 beads and sew through the next bead. Work the remaining 4 sides in the same way. Add 2 beads together at each point.

19. When you add the last bead of the round, pass the needle through 2 beads. Finish each round with this step through 2 beads, as shown in the photo.

20. Begin the next round with 2 beads at the point and sew through the next bead. Continue adding 2 beads together at each point.

21. Pick up 1 bead and sew through the next bead that sticks out.

22. Continue adding 1 bead at a time and sewing through the beads that stick out. Add a total of 5 beads on this side in this round.

23. Work the remaining 4 sides of the star in the same way.

24. Begin the next round by adding 2 beads at the point. Then continue adding 1 bead at a time.

25. In this round, add a total of 6 beads on each side of the star. Work all 5 sides in the same way.

26. Begin the next round by picking up 2 beads and sewing through the next bead.

27. Follow the thread path in the photo: Sew on the first group of 3 beads, then pass the needle through the next bead without adding a new one.

28. Continue adding beads as shown in the photo. In this round, add a total of 6 beads on this side.

29. Work the remaining 4 sides in the same way. Begin the final round with 2 beads at the point and sew through the next bead.

30. In the final round, add a total of 7 beads on each side of the star. Repeat on all 5 sides.

31. Sew a closed ring onto one of the points. Weave in the thread ends by passing through 6–7 of the beads already in place.

32. Your star is complete. Trim the excess thread after you have woven in the ends.
Star earrings with red and gold Delica beads

Make two stars using the tutorial above. Use red beads as the main colour and gold beads around the outer edge as shown in the photo, or create your own colour combination. Sew a closed hanging ring onto one point of each star and attach the stars to the earwires using the rings.
Materials for one pair of star earrings
- Red Miyuki Delica beads #11, DB0727 – one 5.2 g pack.
- Miyuki Delica beads #11 with 24K gold plating, DB0034 – one 3.3 g pack.
- Open, round earwires with loop, gold-plated sterling silver, 18 mm – 1 pair; the pack contains 2 earwires.
- FireLine 6LB, black, 0.15 mm – allow about 3 m for the pair, about 1.5 m per star. Order 2 units of 2 m, giving 4 m in total.
- Closed rings, 4 mm, gold-plated sterling silver – use 2 rings; the pack contains 10.
- Miyuki beading needles, 0.4 mm – use 1 needle; the pack contains 6.
Add materials for one pair of star earrings to basket
The button adds one pack of each bead colour, one pair of 18 mm earwires, two 2 m units of black FireLine, one pack of rings and one pack of needles. The total length of thread purchased is 4 m.
If you already have needles, rings or thread, adjust the basket contents as needed. Using both buttons adds the shared materials for both projects.
Beaded stars for Christmas gift decorations

A hand-stitched bead star also makes a decoration for a gift box or Christmas tree. Thread a thin cord or ribbon through the hanging ring and choose colours to match your wrapping.
Browse gift boxes and jewellery pouches at Smyks.
Download the printable guide

Download the original PDF guide to Delica bead stars (in Danish).
The PDF guide shows the stitching technique. Use the material lists above to choose supplies for the green star or the earrings.
More DIY Christmas ornaments with beads
- Christmas decorations with wooden beads
- Beaded Christmas crystals and snowflakes
- Christmas decorations with beads and flowers
- Christmas decorations in copper and gold
- 3D peyote stars
- Beaded mistletoe
- Small beaded angels
- Mini Christmas tree with seed beads
These two PDF guides are also available in Danish:
We will publicly show your name and comment on this website. Your email is to ensure that the author of this post can get back to you. We promise to keep your data safe and secure.