


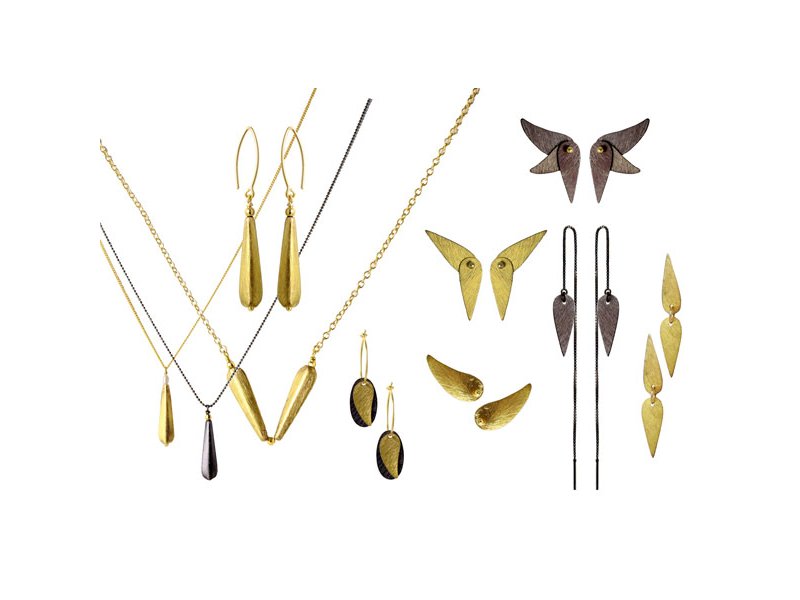
Jewellery components with a subtly brushed, rustic finish are highly contemporary and pair beautifully with timeless jewellery designs. In this guide, we present a collection of simple new necklace and earring designs that you can create using jewellery components from Smyks.com, all at a very affordable price.
Earrings with brushed teardrop

For these earrings, you need the following DIY components:
1 pair of gilded sterling silver earwires
2pcs. gilded teardrops (or 2pcs. silver coated teardrops)
2pcs. 3mm gilded beads
2pcs. gilded headpins with 2mm ball
Thread the headpin through the teardrop and add the beads before forming a loop. As the teardrop is quite large, there will be only a short length of headpin remaining for the loop, but there should be enough to make a single wrap. Next, carefully open the loop on the ear wire, attach the teardrop component, and gently close the loop again. Your earrings are now complete.
Gilded necklace with teardrop and pearl

For this necklace, you need the following DIY components:
1pc. gilded teardrop
1pc. gilded headpin with 2mm ball
1pc. 3mm pearl
80 cm. gilded brass ball chain
First, thread the headpin through the teardrop and the pearl before forming the loop. Due to the size of the teardrop, there is only a small amount of wire left to create the loop, but it should be sufficient for a single wrap. Next, thread the ball chain through the loop of the pendant. Make sure the loop is large enough for the chain to pass through easily. A connector bead is included when you purchase the ball chain.
Necklace with gunmetal teardrop

For this necklace, you need the following materials:
1pc. gunmetal teardrop
1pc. black headpin with a 2mm plate
1pc. 3mm gilded bead
Approx. 80cm. 1.2mm faceted black steel ball chain
Use the same method described above to create this necklace.
Necklace with two gilded teardrops

For this necklace, you need the following materials:
2pcs. gilded teardrops
3pcs. 3mm gilded beads
approx. 20cm. 0.5mm gilded cobber wire
approx. 50cm 0.5mm gilded cable chain
3pcs. 4mm jumprings
1pc 5mm jumpring
1pc. gilded silver lobster claw clasp
Start by forming a loop at one end of the wire. Next, add the beads and teardrops in the following sequence: bead, teardrop, bead, teardrop, bead. Then form a loop at the other end of the wire. Gently bend the wire so that the teardrops create a V-shape.
Use two 4 mm jumprings to attach the chain to the loops at either end of the wire component. Attach the lobster clasp using a 4 mm jumpring at one end of the chain and a 5 mm jumpring at the other.
You can also add a chain extender, allowing you to adjust the length of the necklace as desired.
Hoops with oval plate and wing

For these earrings, you need the following materials:
1 pair of 20mm gilded sterling silver hoops
2pcs. oval gunmetal plates
2pcs. small wings in antique gilded brass
There’s no need for tools when making these earrings, just slide the hoops through the eyes of the pendants.
Earstuds with gilded wing

For these earstuds, you need the following materials:
1 pair of gilded earstuds with a 3mm ball
2pcs. small gilded wings in antique gilded brass
You do not need any tools to create these stud earrings either. Simply insert the ear post through the loop on the wing pendant.
Earstuds with pointed teardrops

For these earstuds, you need the following DIY components:
1 pair of gilded earstuds with a 3mm ball
4pcs. antiqued gold pointed teardrops
and jewellery adhesive
To ensure that the components remain in the desired position, they should be glued together before being attached to the earring. Only a small amount of glue is required.
Fan-shaped gunmetal earstuds

For these earstuds, you need the following materials:
1 pair of gilded earstuds with a 3mm ball
2pcs. pointed gunmetal teardrops
2pcs. big gunmetal wings
2pcs. small gunmetal wings
and jewellery adhesive
You can create these stud earrings in the same way as the previous design. Glue the three components together in your desired arrangement and allow the adhesive to dry. Finally, attach the assembled piece to the earstud.
Earstuds with pointed teardrop pendants

For these earrings, you need the following DIY components:
1 pair of gilded earstuds with flat pad
4pcs. antiqued gold pointed teardrops
2pcs. 6mm gilded brass jumprings
and jewellery adhesive
First, glue the ear stud to one of the pendants. For better adhesion, lightly sand the pad on the ear stud before applying the glue. Once the adhesive has dried, connect the two pendants using the jumpring.
Earwires with gunmetal pendants

For these earrings, you need the following DIY components:
1 pair of 12cm oxidised sterling silver earwires with peg and eye
2pcs. pointed gunmetal teardrops
2pcs 4mm jumprings, dark steel
Simply attach the pendant to the loop of the ear wire using a jump ring to create these earrings.
We hope these examples have inspired you and encouraged you to create your own unique jewellery by combining the different shapes and components. Enjoy designing and making your own pieces!
If you have any questions or comments about this guide, please feel free to leave them in the comments section below.
We will publicly show your name and comment on this website. Your email is to ensure that the author of this post can get back to you. We promise to keep your data safe and secure.