Guide to Using Crimping Pliers for Crimp Beads / Wire Crimps
When making a beaded necklace or bracelet, it is important to secure the clasp properly so the jewellery does not come apart during use. This is typically done using a specialised crimping pliers.
Crimping pliers are designed to close crimp beads or wire crimps neatly and securely around jewellery wire. This ensures that your clasp stays firmly attached and that your jewellery looks professional. In this step-by-step tutorial, we demonstrate how to use crimping pliers correctly when working with DIY jewellery and beaded designs.
In this guide we use a standard model of crimping pliers, which can be found in the category Jewellery pliers on Smyks.com.
However, there are several versions of this tool available. The most important factor is that the pliers' jaws match the size of your crimp bead. For this reason, it is recommended to choose a crimping pliers model with multiple jaw sizes so that it can be used for different jewellery projects.
Tiger tail beading wire in various thicknesses and colours can be found in the category Beading wire and metal wire.
Crimp covers can be found in the category End caps and crimp beads.
Make sure that the hole in the crimp bead is large enough for the tiger tail wire to pass through twice. It is recommended to have a little extra space in the hole to make the crimping process easier.
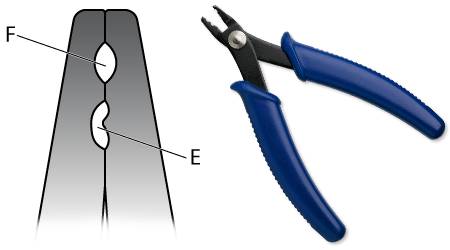
Crimping pliers typically have two jaws – E and F. First, press the crimp bead using jaw E. This flattens the crimp bead while creating a small bend in the centre.
Next, rotate the crimp bead 90 degrees and press it using jaw F. This folds the crimp bead neatly around the wire.
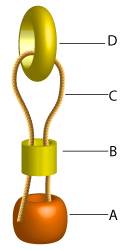
The jewellery wire is threaded through the last bead of the necklace or bracelet (A), then through the crimp bead and through the loop or clasp (D).
After that, feed the wire back through the crimp bead and ideally through the next 2–3 beads on the strand. This improves stability and prevents the wire end from sticking out.
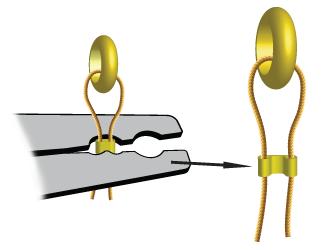
Pull the wire tight up to the loop or clasp and gently press the crimp bead using the inner jaw E of the pliers. At this stage the wire is securely fastened.
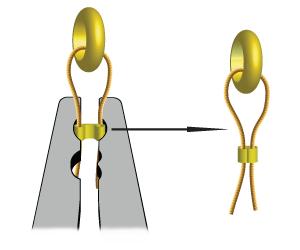
Rotate the crimp bead 90 degrees and fold it completely closed using jaw F.
Tips for professional DIY jewellery making:
- For aesthetic purposes, the crimp bead can be hidden with a crimp cover (knot cover). This small open bead is placed over the crimp bead and gently closed to form a decorative bead that hides the crimp.
- To reinforce the wire loop at the end of your jewellery piece and protect it from wear, you can use wire guards. These U-shaped protectors prevent friction and extend the durability of your jewellery.