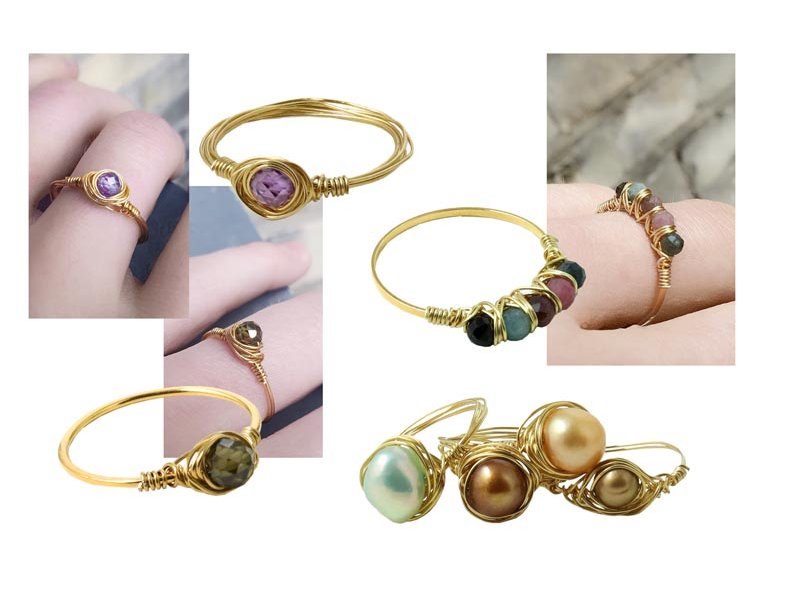
In this guide, we show you how to create your very own statement ring using the wrap method. The design gives you plenty of creative freedom: you decide how the ring sits on your finger, which gemstone, crystal or natural pearl you want to include, and whether the ring should be simple or feature small decorative deltas in the wire.
Jewellery with fine organic details and a light, natural expression continues to shape current trends – whether in earrings, necklaces, bracelets or rings. That’s why we want to help you get started making your own handmade jewellery, pieces that only you possess.
We’re also seeing a strong interest in beads, pearls and charms made from natural stones, crystals, semi‑precious stones and moonstones. Their appeal lies not only in their beautiful, distinctive appearance but also in the fascinating energies many people associate with these materials.
So here, we’d like to show you a simple way to make gorgeous rings that suit both your finger and your temperament. Read on below and discover the materials you need right here.
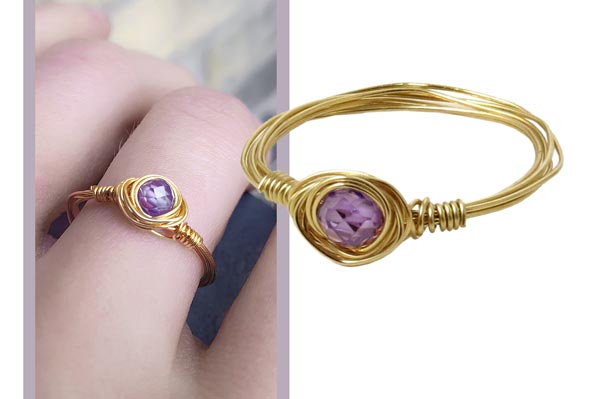
Wire-wrapped ring with purple zirconia

Order our DIY jewellery kit for wrapped rings here
We used the following DIY components to make this ring:
- 1 cubic zirconia, 4mm
- approx. 60cm wire 0.4mm, gold-plated sterling silver
- 1 ring mandrel


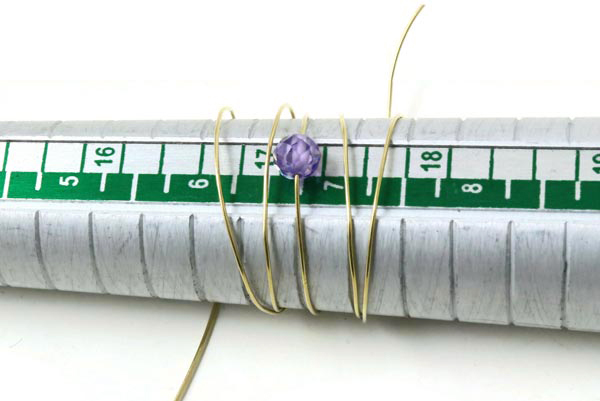
Position the bead in the middle of the wire. Decide with size your ring is going to be and place the wire around the respective groove in the ring mandrel.
Tighten the wire.

Wind one of the wire ends around the ring mandrel twice.
Then you wind the other end of wire around the ring mandrel on the other side of the bead.

After that, you wrap the wire around the bead ... and tighten the wire.

You do the same with the other end of the wire.

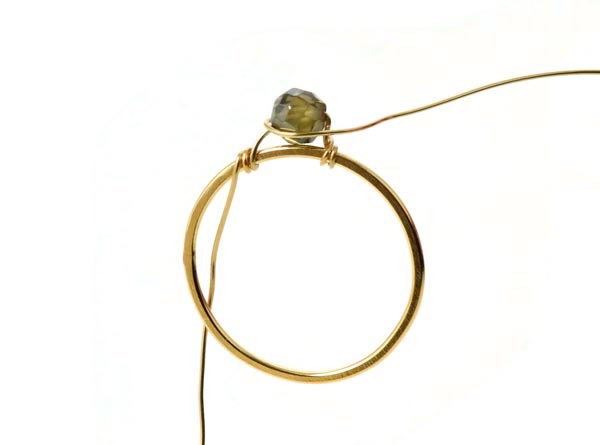
Then you remove the ring mandrel...

... and wind one wire end around the ring.

Next, you wind the other wire end around the ring. Now the ring has got some support and and you can start wrapping the wire around it.can keep its shape. Now the ring has got some support and you can start wrapping.

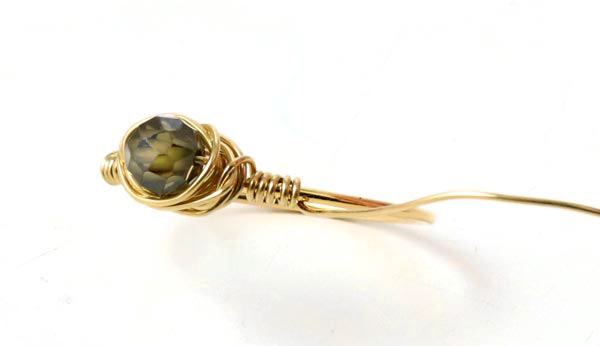
Wind one wire end around the bead a few times.

Then you wrap the other wire end around the bead a couple of times. Continue like this - wrapping the two wire ends around the bead alternately.

Once you are done, you wrap one wire end around the ring a few times. Make sure that the windings are close to each other.

Then you wind the other wire end around the ring on the other side.

Cut the excess wire and press the ends in with chain-nose-pliers, if necessary. Make sure that the wire ends are placed on the outside of the ring to avoid scratches on the finger.
Wire-wrapped ring with green zirconia


We used the following DIY components to make this ring:
- 1 cubic zirconia, 4mm
- approx. 25cm wire 0.4mm, gold-plated sterling silver
- 1 ring 18/16mm, gold-plated sterling silver

Place the bead in the middle of the wire. Wind the wire around the ring a few times.

Wind the other wire end around the ring a couple of times.
Then you wrap one wire end around the bead.

Wrap it around the bead a few times.

Next, you wrap the other wire end around the bead. Continue wrapping ...

Wind one of the wire ends around the ring a couple of times...
... then you wind the other wire end around the ring.

Cut the excess wire. If necessary, you press the wire ends carefully inwards with chain-nosed pliers.

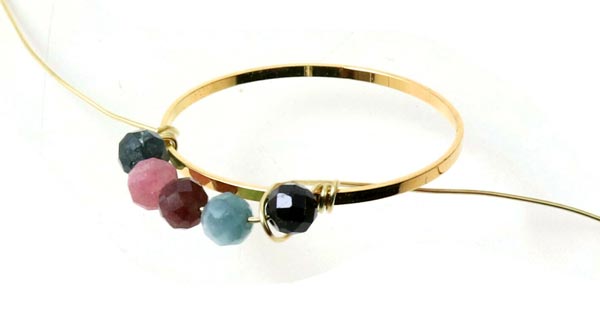
Wire-wrapped ring with tourmaline beads


Til denne fingerring er der brugt følgende materialer:
- 5 tourmaline beads, 3mm, faceted
- approx. 50cm wire 0.4mm, gilded copper
- 1 closed jumpring, 20mm, gilded brass

Position the beads in the middle of the wire. Wind one of the wire ends around the ring a few times.

Wind the other wire end around the ring a couple of times.
Now you wrap the wire around the ring between the 1. and 2. bead.

Wrap the wire around the ring between the 2. and the 3. bead.

Go on like this and wrap the wire around the ring between the beads.
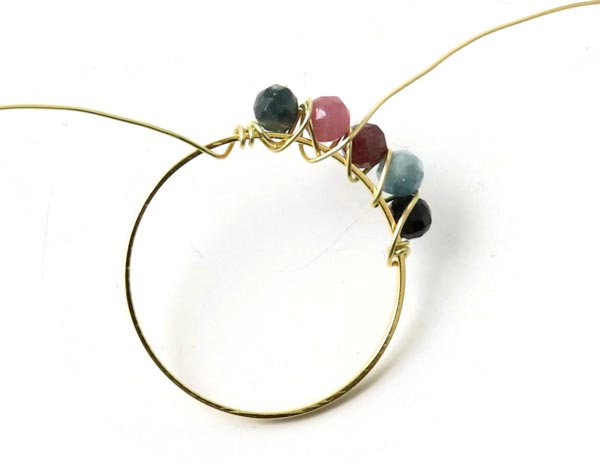
Wind the same wire end backwards in the same way.

Now the take the other wire end and wrap it around the ring between the beads.

Once you have reached the other side, you switch direction and wrap backwards.

You finish your wrapped ring by winding each of the wire ends around the ring a few times.

Cut the excess wire and press the wire ends inwards with chain-nose pliers.

Wrapped rings with silver wire

You can, of course, make all the rings using silver wire if you prefer silver jewellery. The method is the same.
Have fun!
We will publicly show your name and comment on this website. Your email is to ensure that the author of this post can get back to you. We promise to keep your data safe and secure.