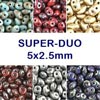
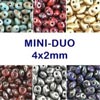
Super-duo beads og Mini-duo beads are quality glass pearls by the Japanese company Matubo. The beads are very uniform in size and shape and feature a soft oval shape and two parallel holes.
This special shape and the two holes allow you to create exciting and unique designs for nearly every kind of jewellery.
Matubo Super-duo is the larger of the two sizes and is mostly used for bracelets and other larger pieces of jewellery. Mini-duo beads feature the same characteristics as Super-duo beads, but they are smaller in size and more suitable for earrings and "finer" pieces of jewellery. These beads, which are relatively unknown here in Danmark, make it possible to produce new and fascinating jewellery designs which are just waiting for to be realised. In this blog post, Charlotte has collected her suggestions on how to use these beautiful beads. Smyks in Copenhagen will soon offer jewellery workshops (in Danish) where we teach this technique. Click here for the jewellery workshops. Have fun :-)
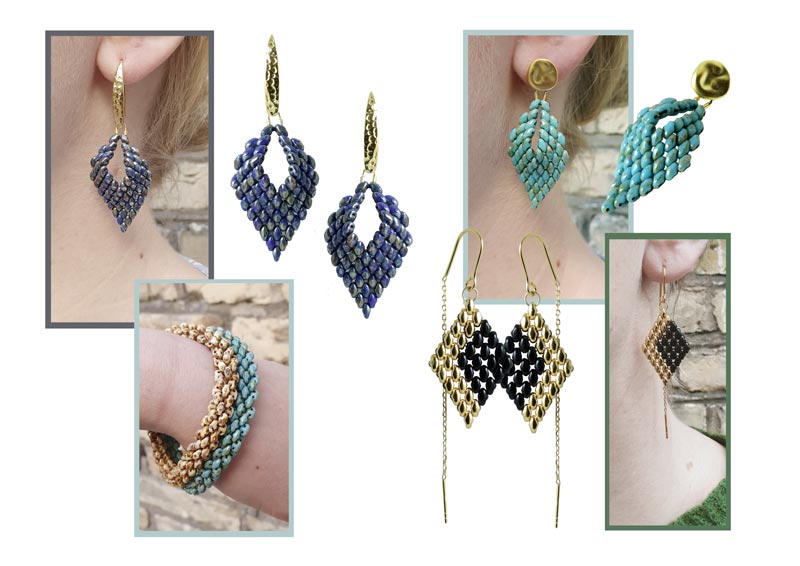
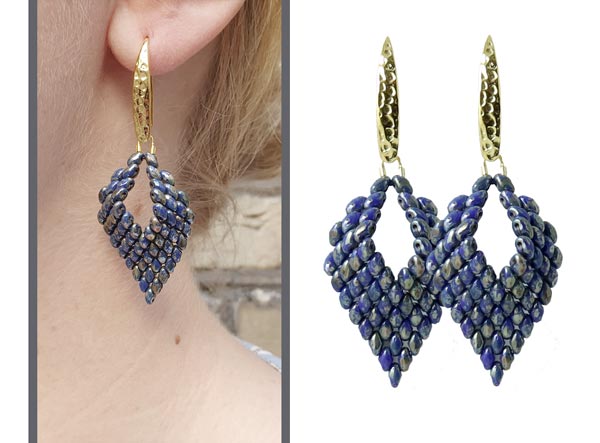
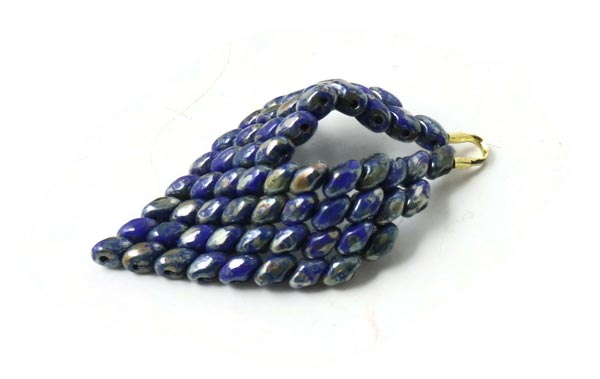
Russian Leaf Earrings with Mini Duo Beads
We used the following DIY components to make these earrings:
- Mini duo beads, dark blue Picasso
- 1 pair of earwires, hammered teardrop, gilded sterling silver
- 2 wire guards, gilded silver
- approx. 2 x 1m FireLine, 6LB, black
- 2 beading needles
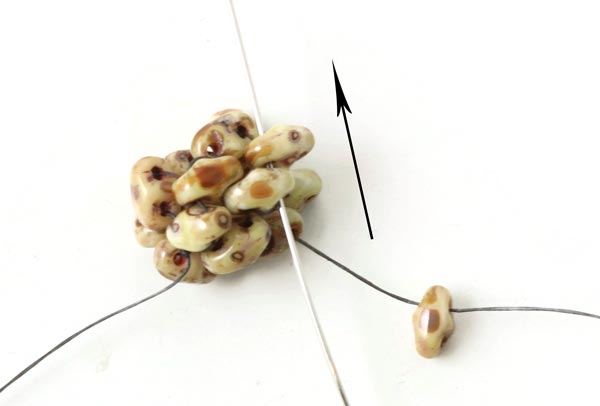
You sew this model with 2 beading needles - one on each end of the thread.
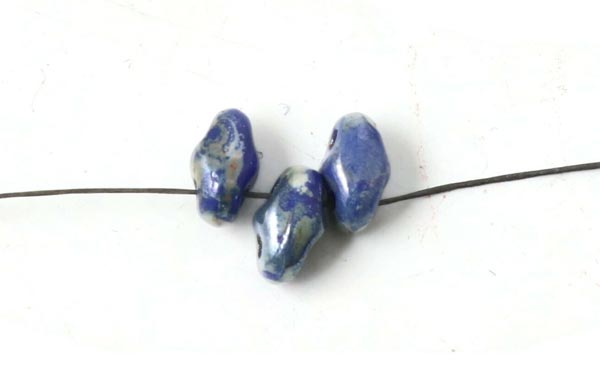
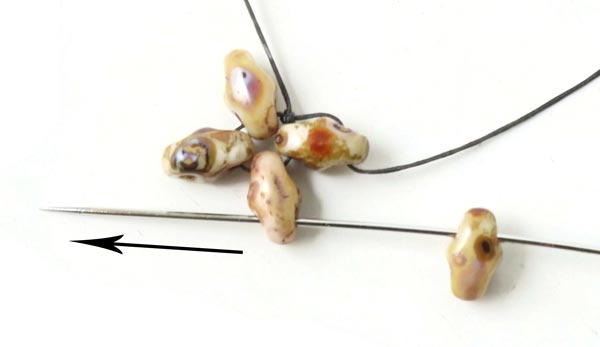
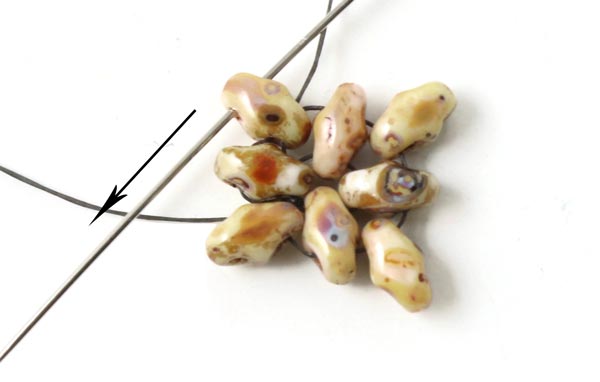
First, you string 3 beads ... and place the in the middle of the thread.
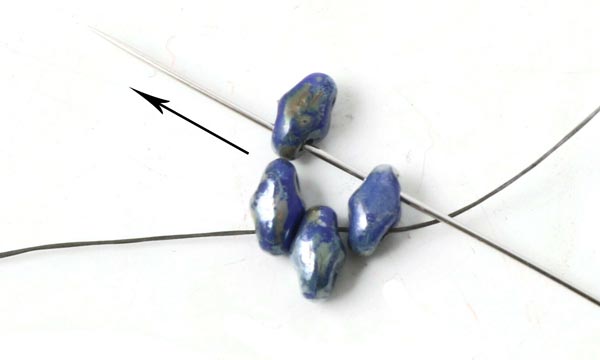
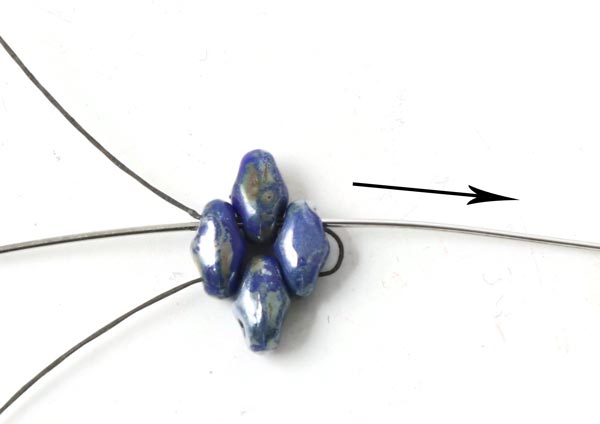
Sew back through the 1. bead with the needle on the right ... and string a new bead.
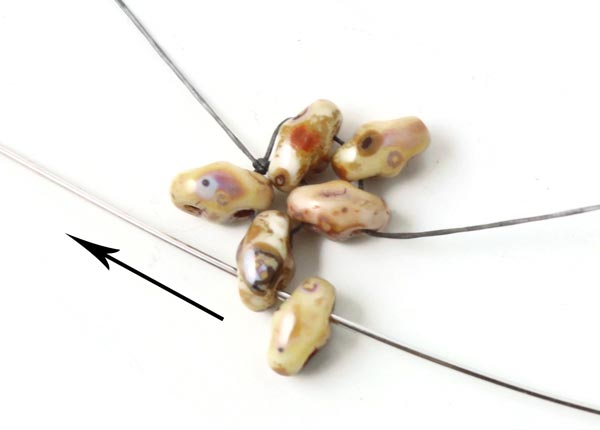
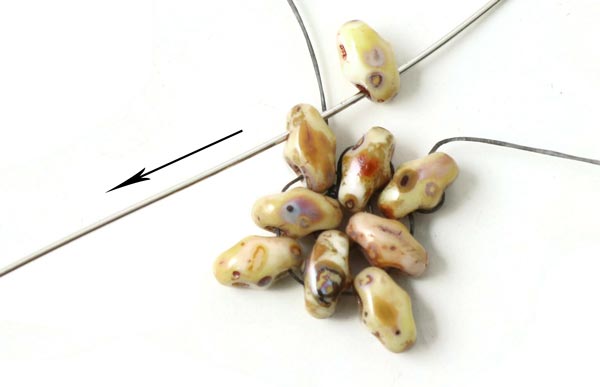
Sew through the bead on the left ... and tighten the thread.
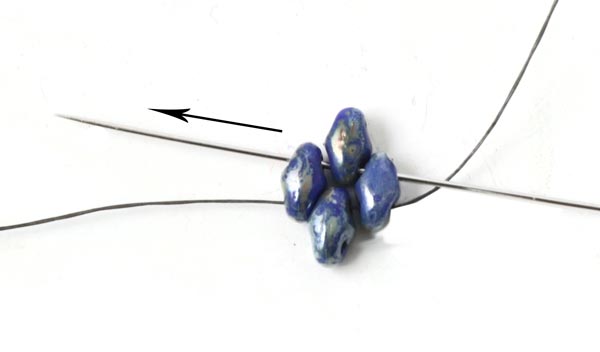
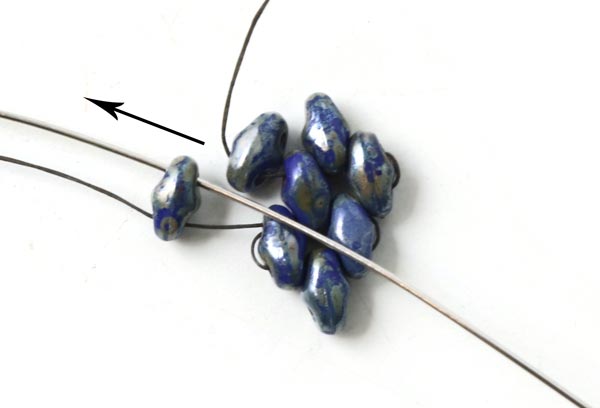
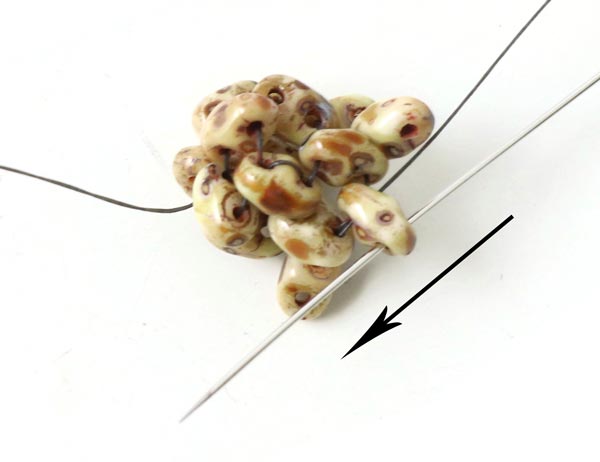
Now you take the needle on the left and sew through 3 beads ... as shown in the picture. Tighten the thread.
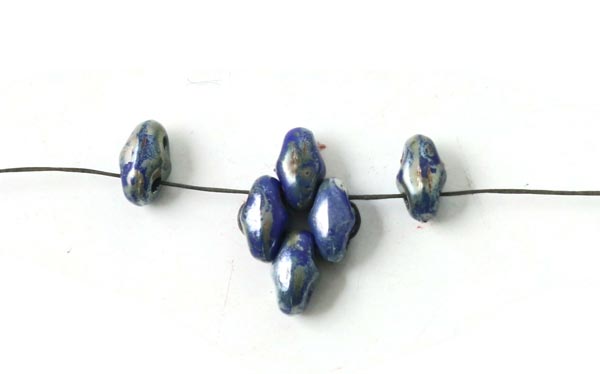
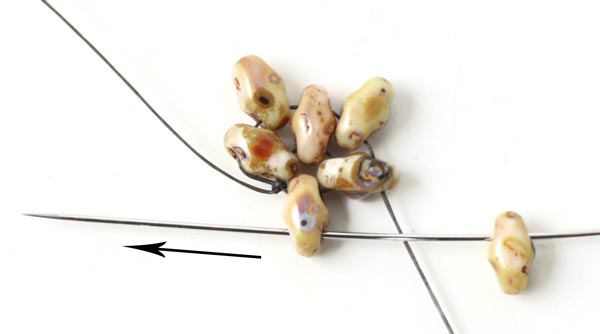
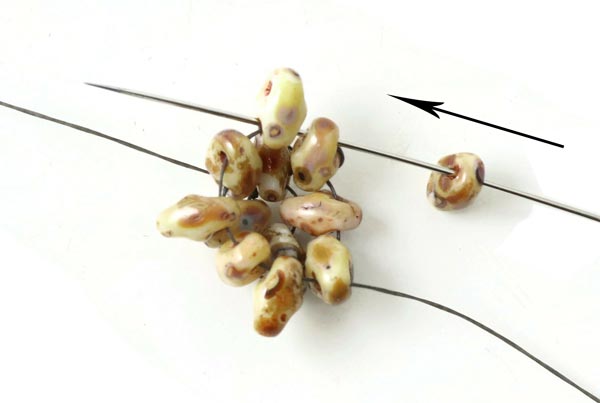
String 1 more bead on either end of the thread.
Sew back through the bead with the needle on the right ... and string a new bead.
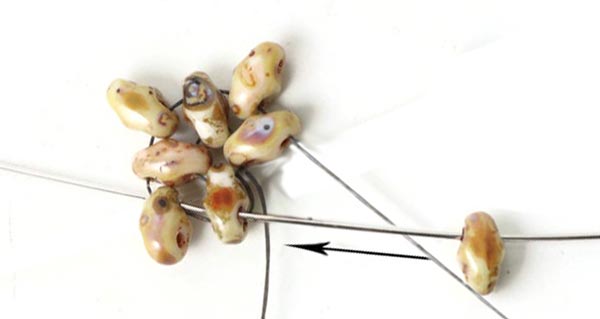
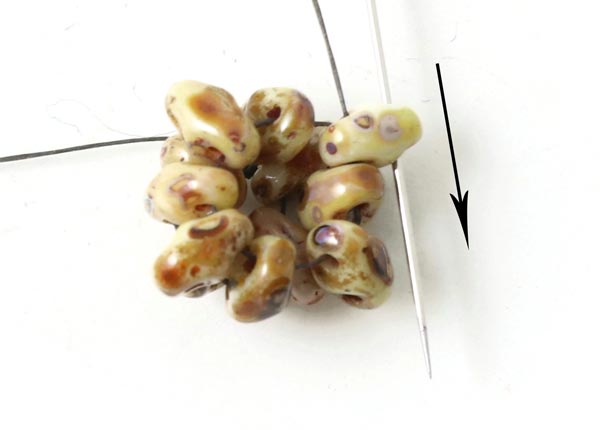
Sew through the next bead on the left.
String 1 more bead ... and sew through the last bead.
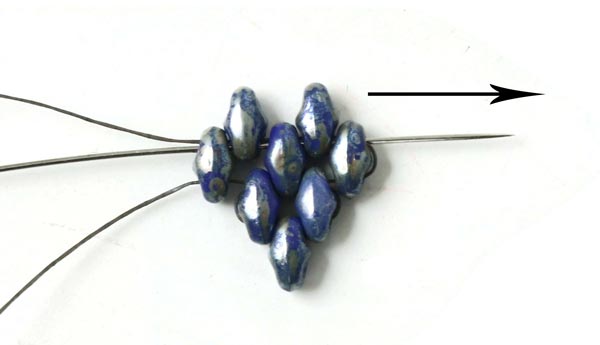
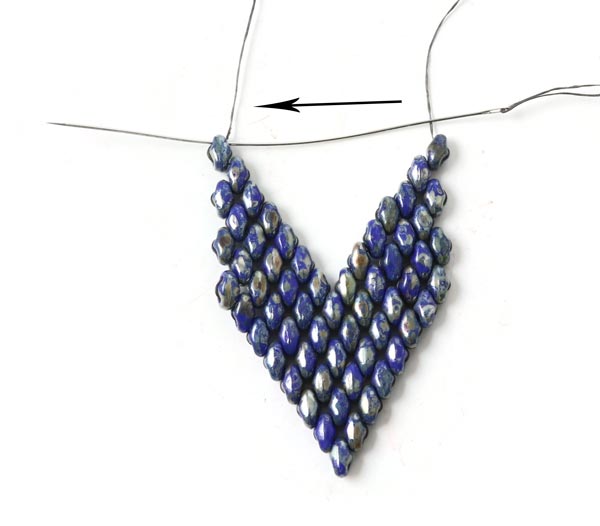
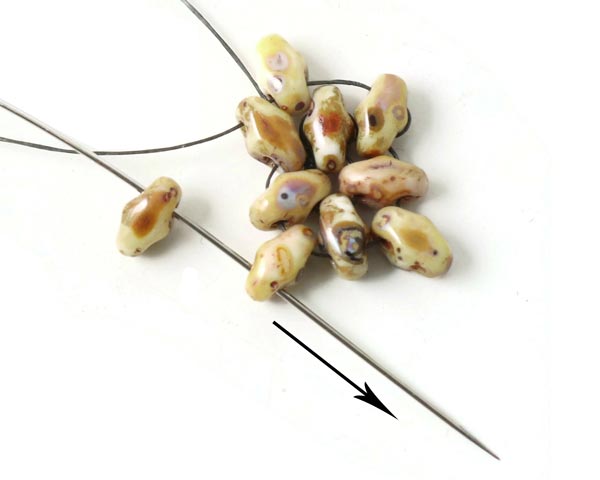
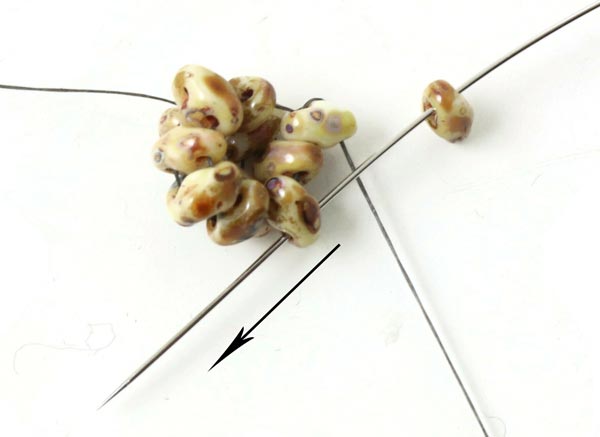
Now you you take up the needle on the left and sew through all the beads.
Tighten the thread.
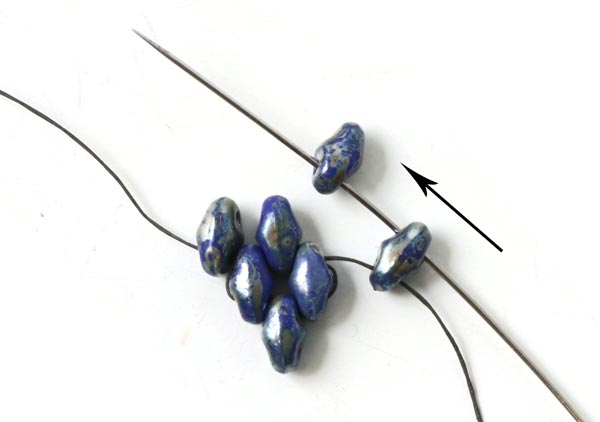
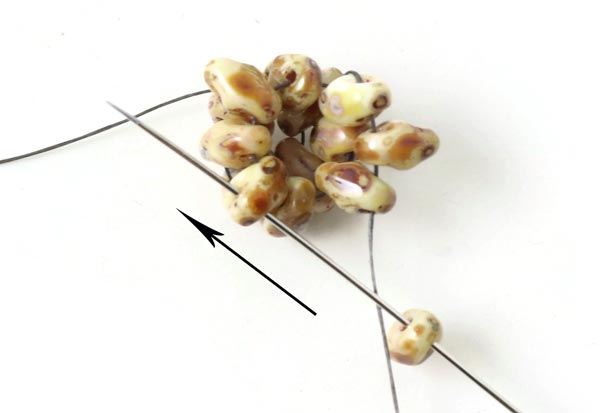
Then you string a new bead on either end of the thread ... sew back through the last bead in the row ... string a new bead ... and sew through the next bead on the left.
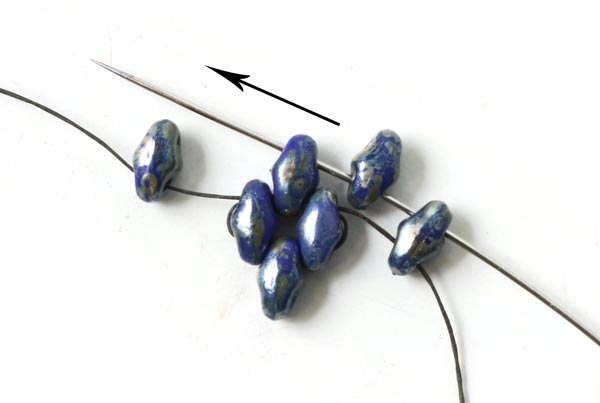
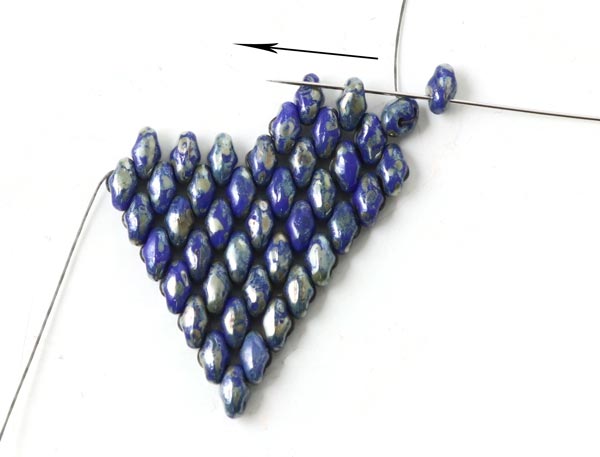
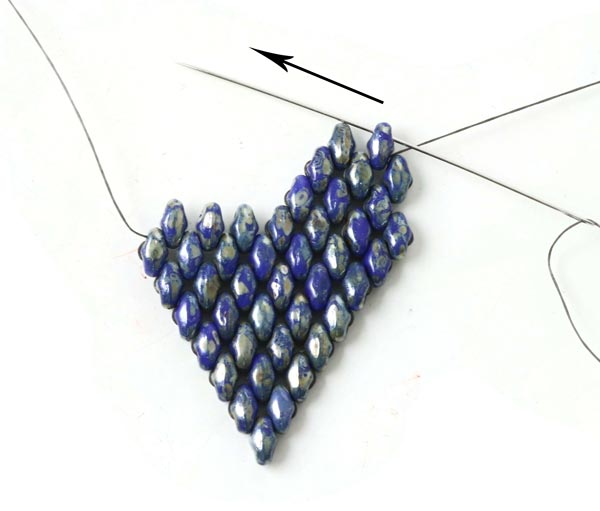
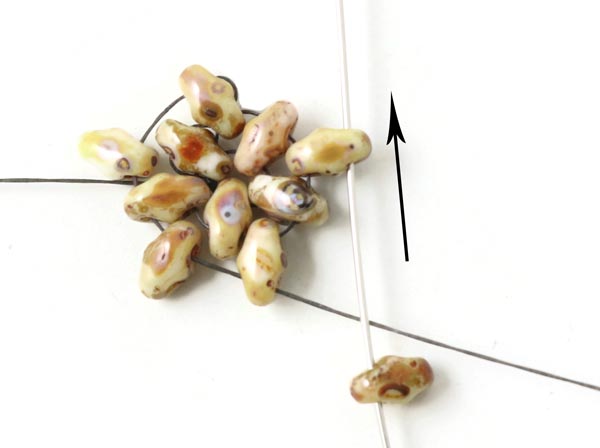
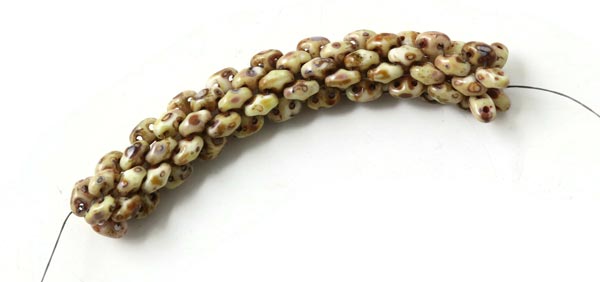
Continue this way and sew more rows. Add new beads with the needle on the right ... and sew through all the beads with the needle on the left. Tighten the thread.
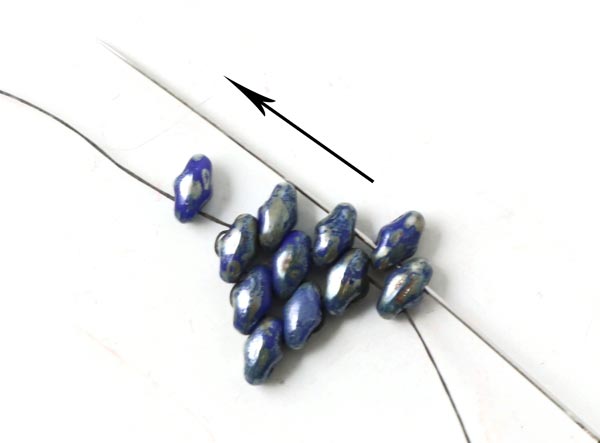
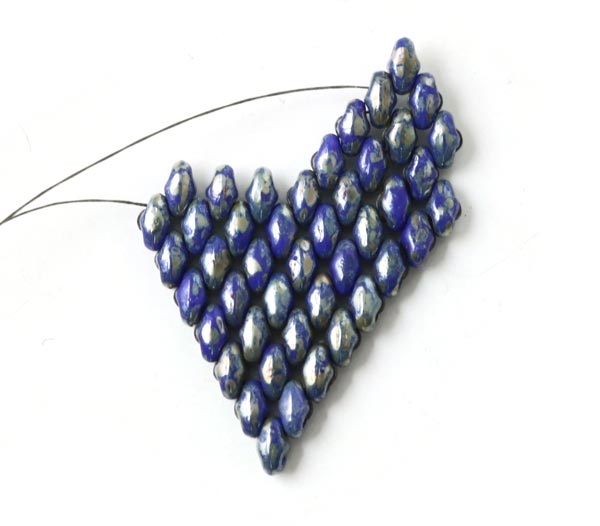
You continue until 6 beads stick out at the top. .. as shown in the picture.
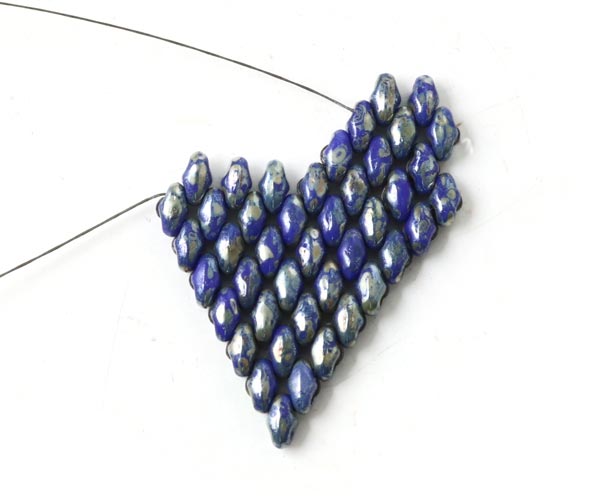
Now you sew the one side of the leaf. String 1 new bead with the needle on the right (this time you do not add a bead on the left side).
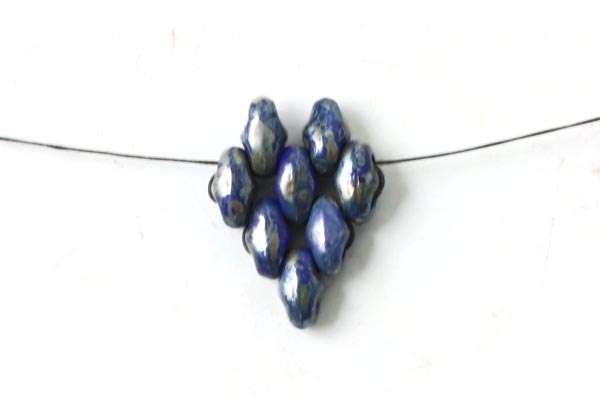
Fasten the first 3 beads ...
Now you sew backwards through the beads with the same thread. Sew through the first 2 beads. (It can be difficult to sew through several beads at a time because they sit tightly.)
Sew through the next 2 beads.
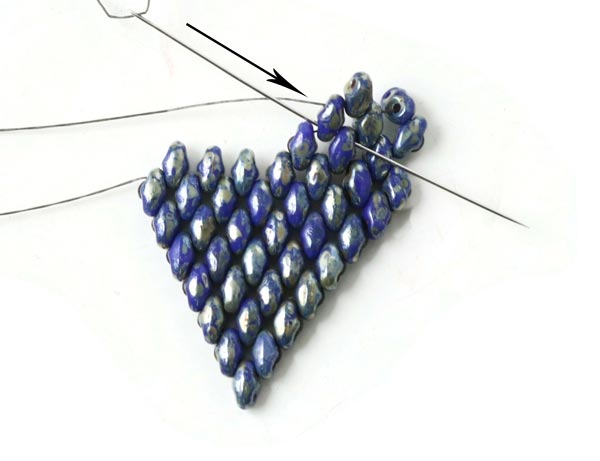
Sew through the last 2 beads as shown in the picture. The thread has to come out of the lower hole in the first bead in the upper row, because you narrow the leaf down.
Sew back through the upper hole in the first bead. Now you add another row.
Fasten 2 beads.
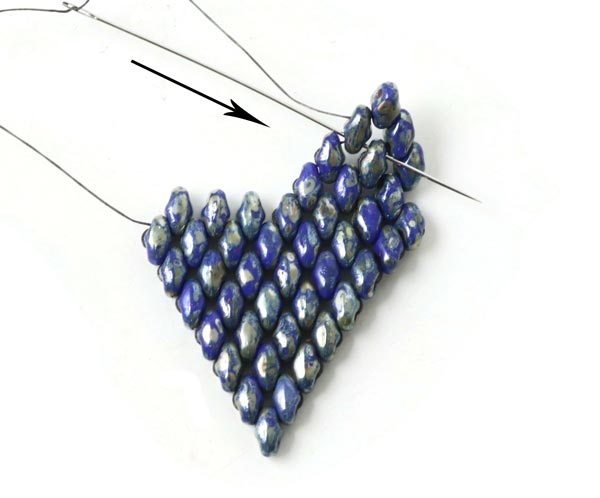
Sew backwards with the same needle. Sew through the first 3 beads ... as shown in the picture.
Sew through another bead ...
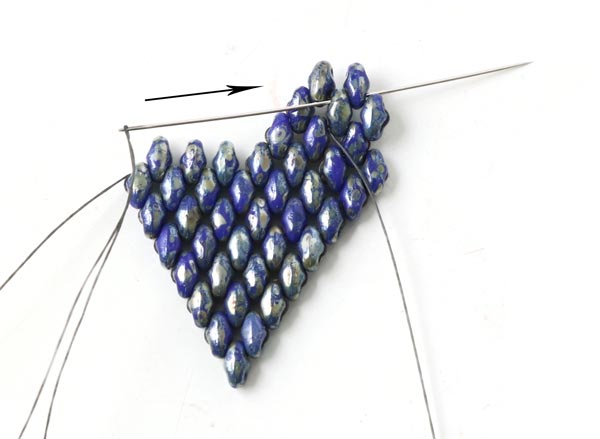
... and through the last bead. Make sure that the needle comes out of the upper hole in the first bead in the second row from top. As shown in the picture.
String a new bead ...
... and sew back through the upper hole in the bead. Tighten the thread.
String 1 new bead and sew through the next bead on the left.
Sew on 1 more bead and tighten the thread.
Sew back through the first 2 beads ...
... and continue through the last 2 beads. The needle has to come out of the lower hole in the first bead in the upper row.
Sew back through the upper hole of this bead.
Sew on 1 bead more ... and tighten the thread.
Sew back through 2 beads.
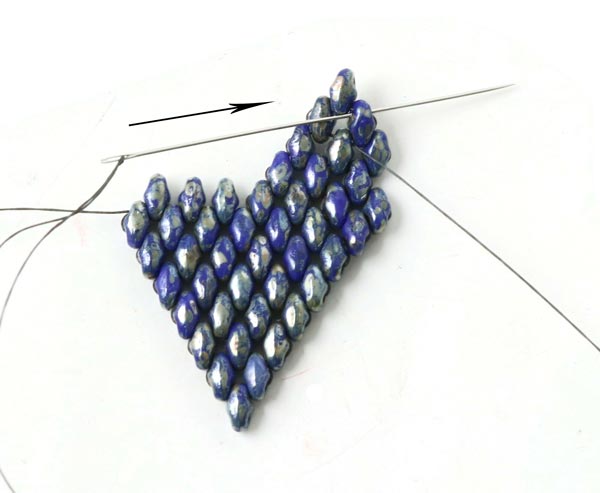
Sew back through the upper hole in the bead in the row above - as shown in the picture. 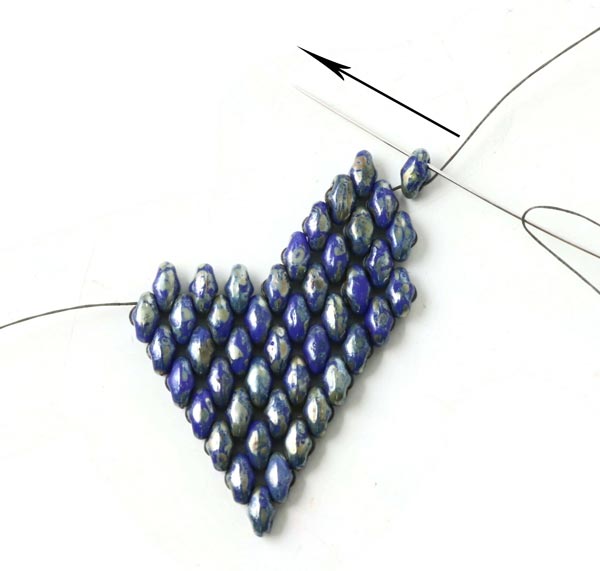
String 1 new bead and sew back through the upper hole of the this new bead. Tighten the thread.
Sew on 1 new bead ...
... and sew back through 3 beads ...
... sew back through 2 beads more ... as shown in the picture...

.. . and back through the bead on top.
String a new bead and sew back through the upper hole of this bead...
... sew back through the lower hole of the same bead ...
... and one more time through the upper hole.
Turn your work ... and sew the opposite side of the leaf in the same way.
Now you connect the two sides of the leaf. Take the needle on the right and sew through the top bead on the left.
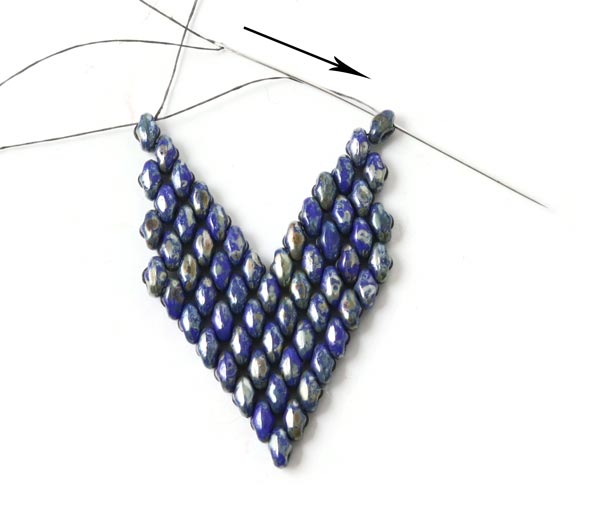
After that, you take the needle on the left and sew through to top bead on the right.
Tighten the threads.

Now you fasten a wire guard fast. Sew upwards through one end and downwards through the other end.
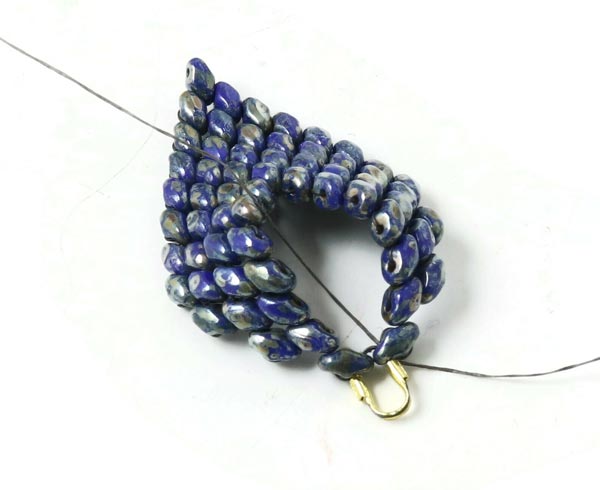
Tighten the thread. The thread is supposed to lie in the groove of the wire guard. You can sew one more round through the wire guard.
Sew through random beads to sew up the threads, but make sure that the threads are not visible.
Finally, you open the loop of the earwire carefully, insert the hook of the leaf and close the loop again.
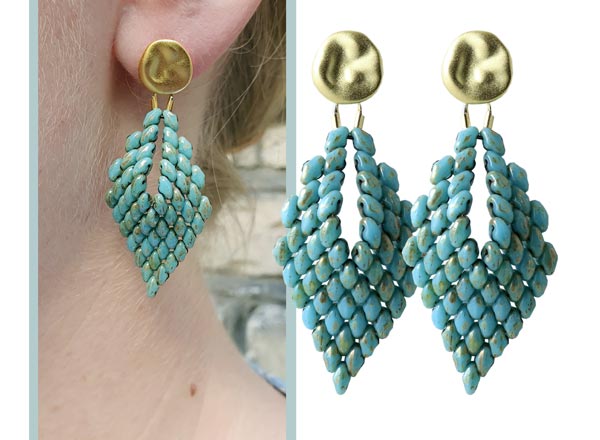
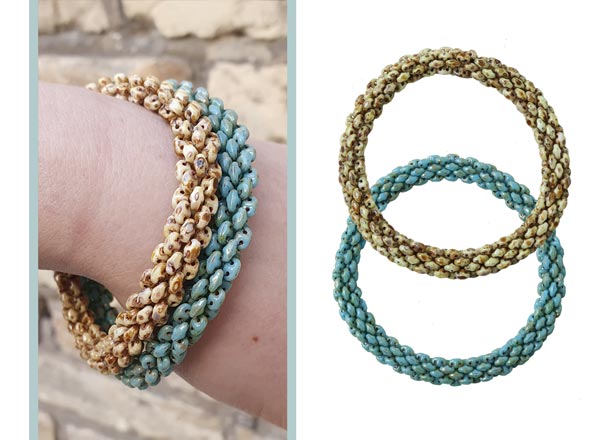
Russian Leaf Earring with Super Duo Beads
We used the following DIY components to make these earrings:
- Super duo beads, turquoise picasso
- 1 pair of earstuds, uneven coin, matte, gilded sterling silver
- 2 wire guards, gilded silver
- approx. 2 x 1m FireLine, 6LB, black
- 2 beading needles
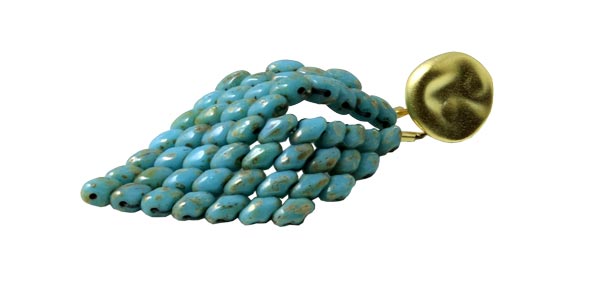
These earrings were made in the same way as described in the first example. This time we used super-duo beads which are larger than the mini-duo beads. That's why the earrings have fewer rows of beads.
Bangle with Mini Duo Beads
We used the following DIY components to make this bangle:
- 2 x Mini duo beads, picasso sand
- approx. 6m FireLine, 6LB, black
- 1 beading needle
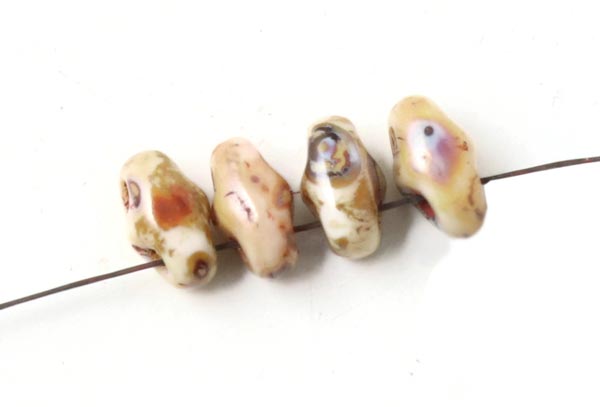
First, you string 4 beads. Start with approx. 2m of thread. You will need more, but it is hard to word with a thread longer than 2m. During your work, you will have to sew up/fasten the first thread and continue with a new one.
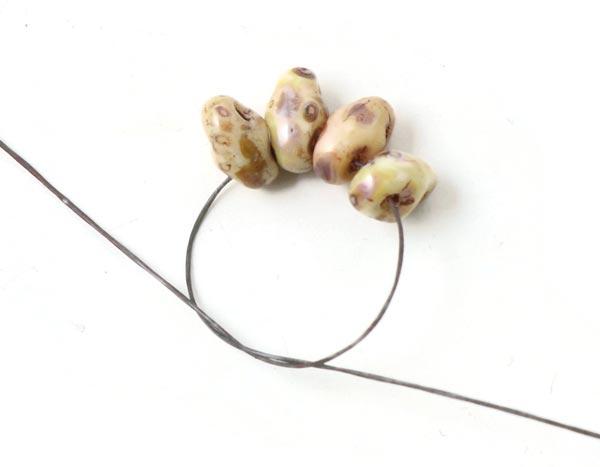
Tie a double knot in order to form a circle. The end of the thread should be aproxx. 10cm long.
Sew through the upper hole in the bead next to the knot.
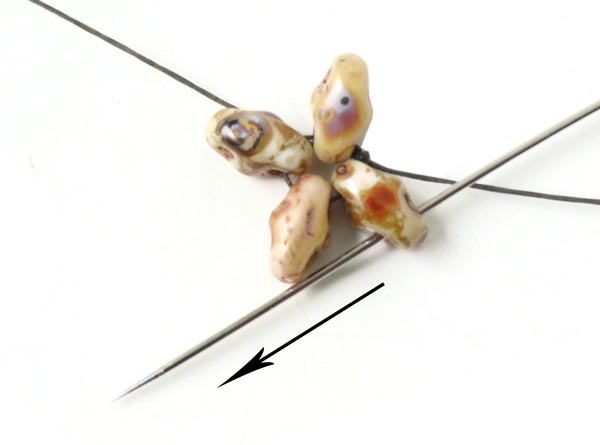
String 1 bead and continue through the bead next to it.
String a second bead and sew through the bead next to it.
String a third bead ... continue through the next bead ...
and thread a fourth bead. (This is the last bead in this round. Every round consists of 4 beads.)
Now you fasten the fourth bead by sewing through the bead next to it ... and through the lower hole in the next bead (the first bead in the second round).
Every time you start with a new round, you sew back through the upper hole in the bead. You sew the rounds alternately anti-clockwise and clockwise.
Thread a first bead and sew through the next bead sticking out.
String a second bead and sew through the next bead sticking out.
Sew the third bead on ... in the same way.
Sew the fourth and last bead on in this round - by sewing through 2 beads. (Every time you finish one round, you sew through 2 beads. This way you "step up" to the next round.)
Sew back through the same bead. Now you start the next round, sewing into the opposite direction.
Thread 1 bead and sew through the bead sticking out.
.... thread another bead and sew through the next bead sticking out.
When you sew on the fourth bead, you sew through 2 beads...
... and then back through the same bead. There you turn and start the next round.
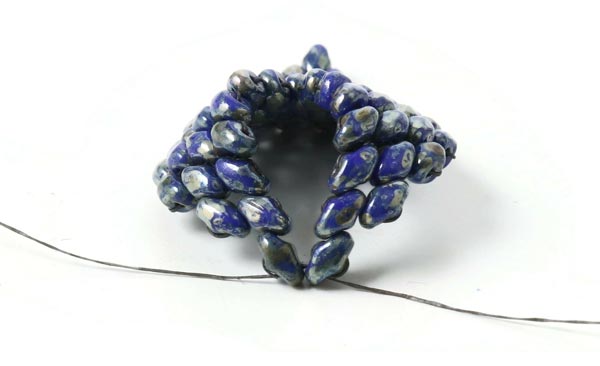
Continue like this until the bracelet is as long as you want it.
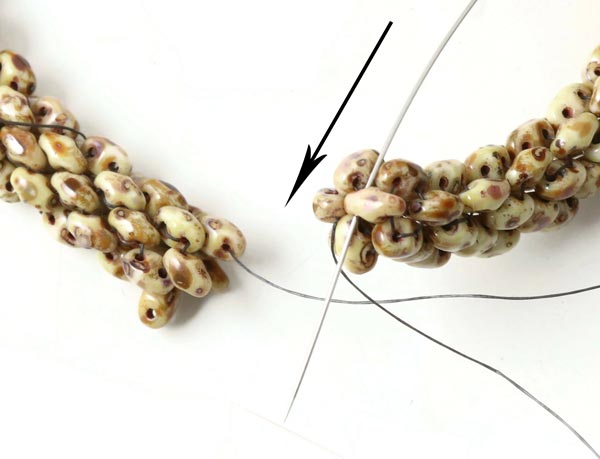
Now you connect the two ends of the bracelet. You do that by sewing through the the top of a bead on one end.
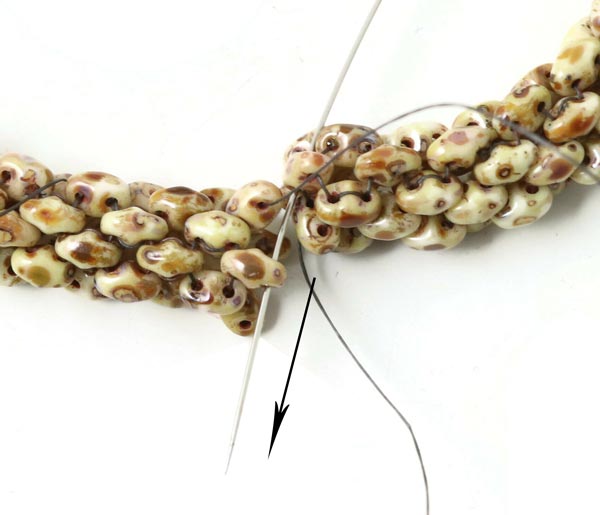
Go on like this and sew through the next bead sticking out. Continue connecting the two ends in this way until you have finished the round.
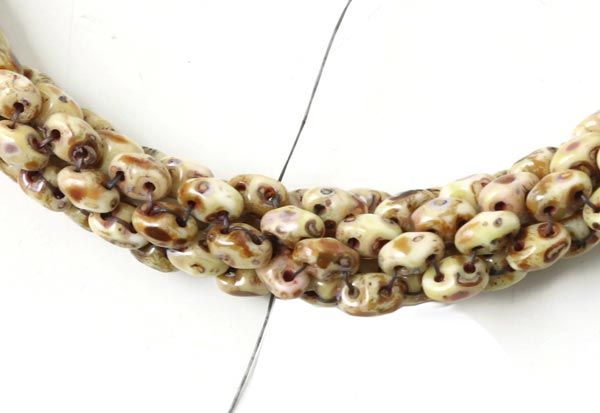
Finally, you sew up the thread ends through random beads.

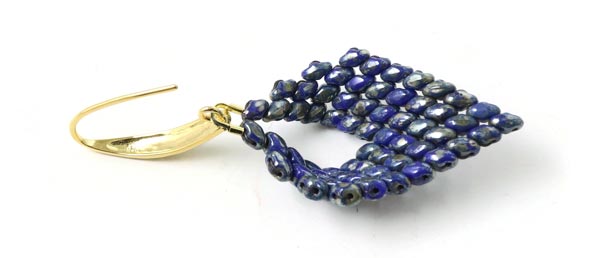
Earrings with Mini Duo Bead Rhomb
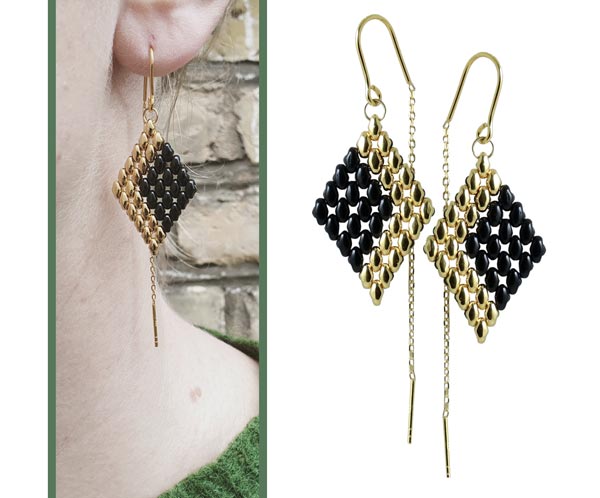
We used the following DIY components to make these earrings:
- mini duo beads, 24-carat gold-plated
- mini duo beads, black
- approx. 2 x 1m FireLine, 6LB, black
- 2 jumprings, 4mm, gold-plated steel
- 1 pair of earwires with cable chain, gold-plated silver
- 2 beading needles
The first half of this model is sewn with two beading needles - one on either thread end.
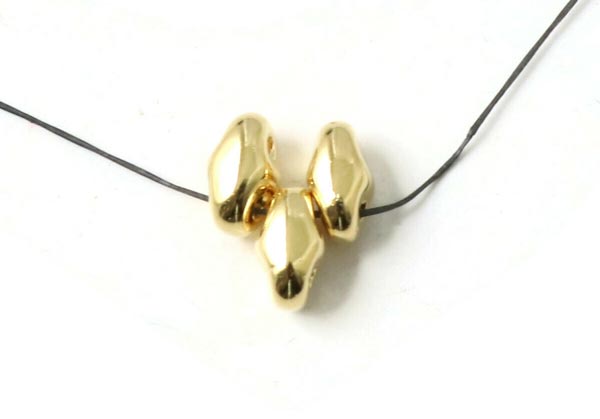
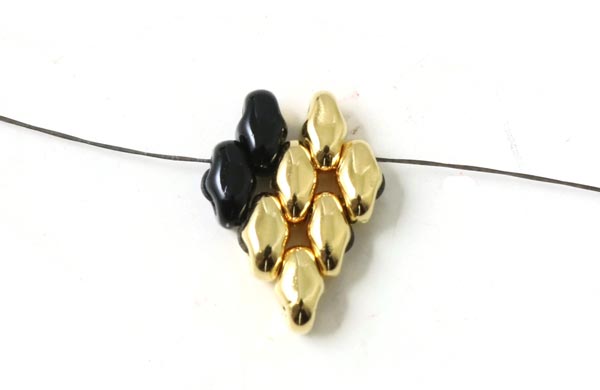
First, you string 3 beads and place them in the middle of the thread.
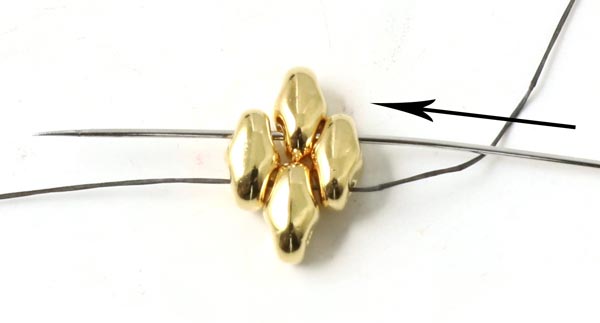
Take up the needle on the right and sew through the upper hole in the bead on the right. String a new bead and continue through the upper hole in the bead on the left. (See the beginning of the DIY guide "Russian Leaf Earrings".)

Take up the needle on the left and sew through 3 beads. Tighten the thread.
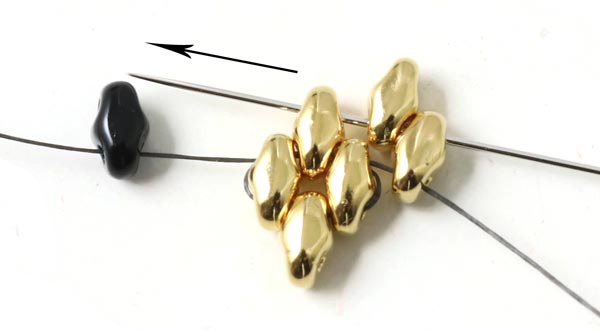
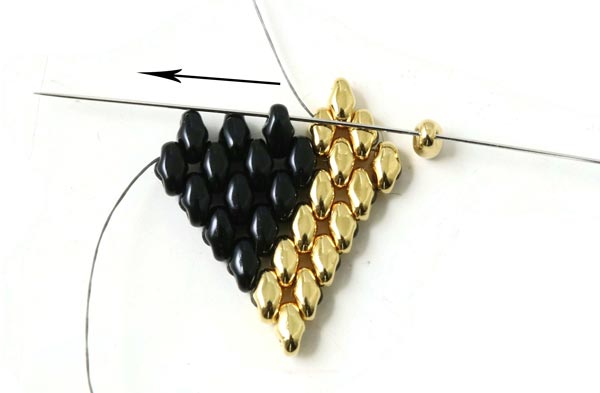
String a golden bead on the right thread and a black bead on the left thread. With the needle on the right you sew through the upper hole of the new golden bead, ... string 1 new golden bead ... and continue sewing through the golden bead left to it.
String 1 black bead and sew through the black bead left to it.
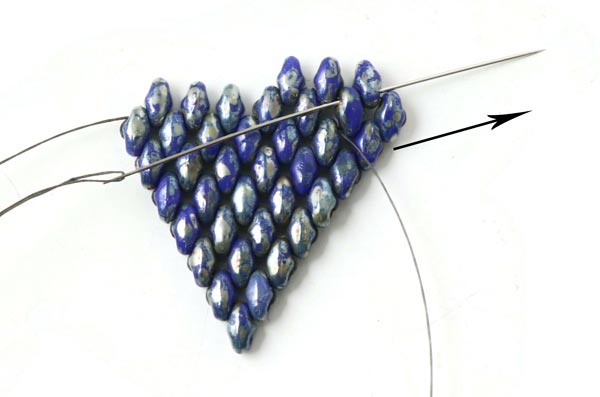
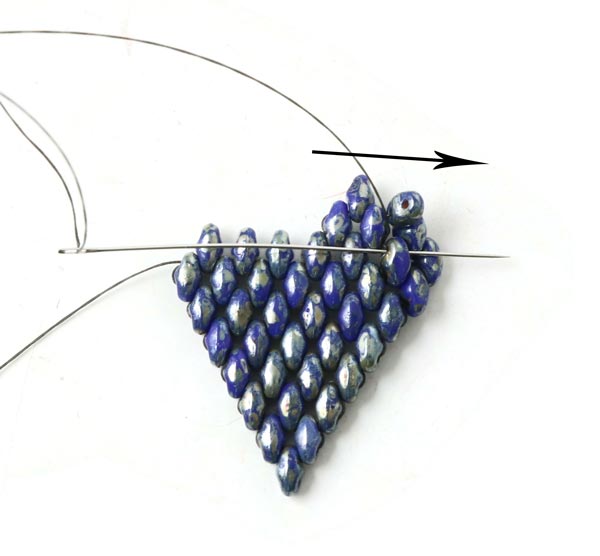
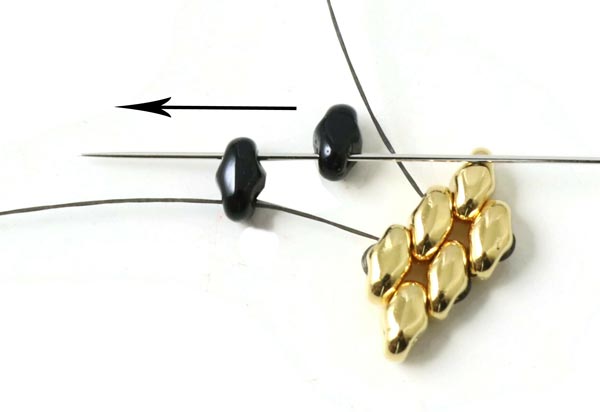
Take up the needle on the left and sew through all the beads ... as shown in the picture.
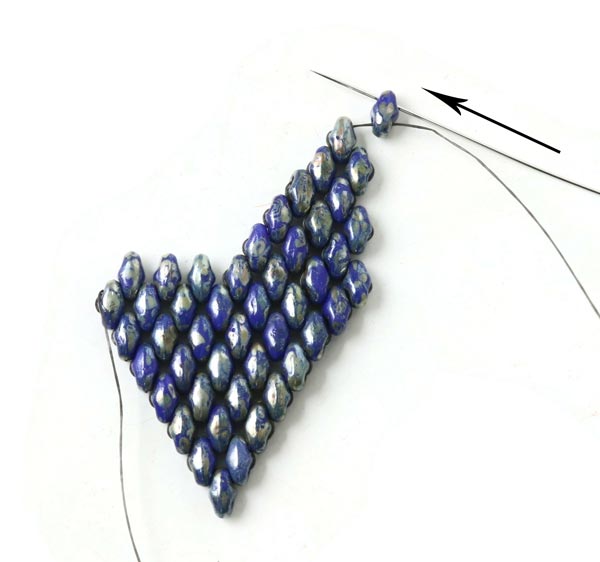
Tighten the thread. For the next row, you string 1 black bead on the left and 1 golden bead on the right. The first bead you add while sewing from right to left is a golden one, all the others are black.
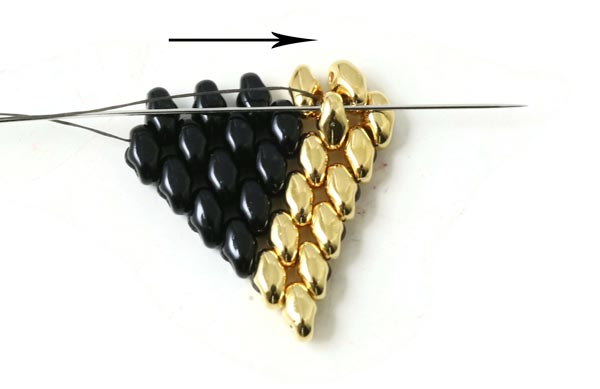
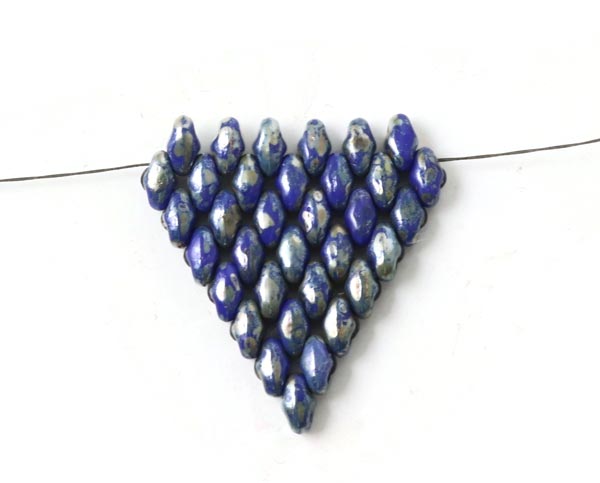
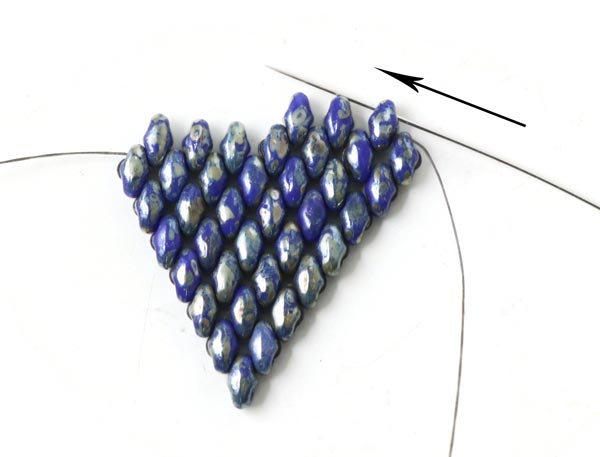
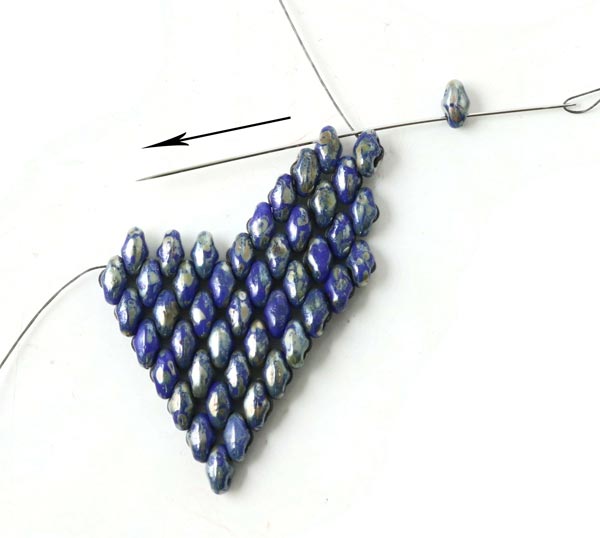
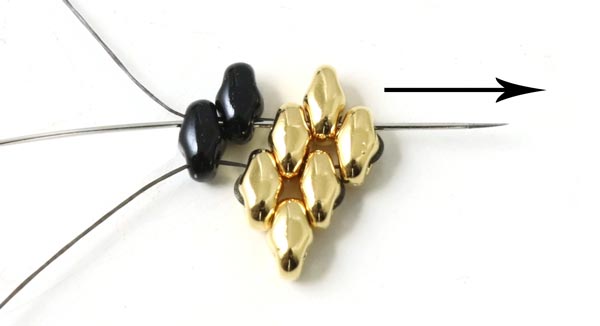
Continue like this and add more rows until there are 5 beads sticking out at the top. (The first 2 beads on the right are supposed to be golden.)
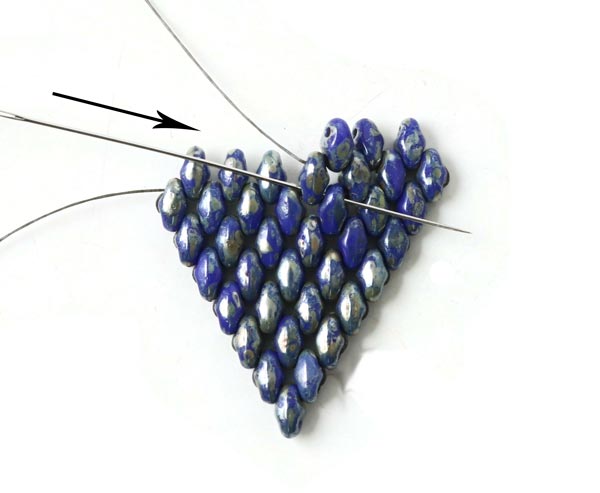
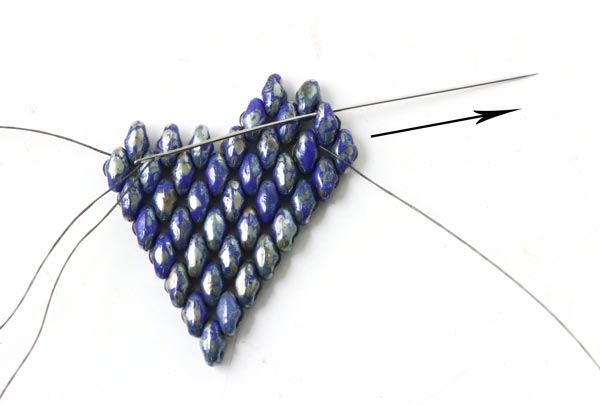
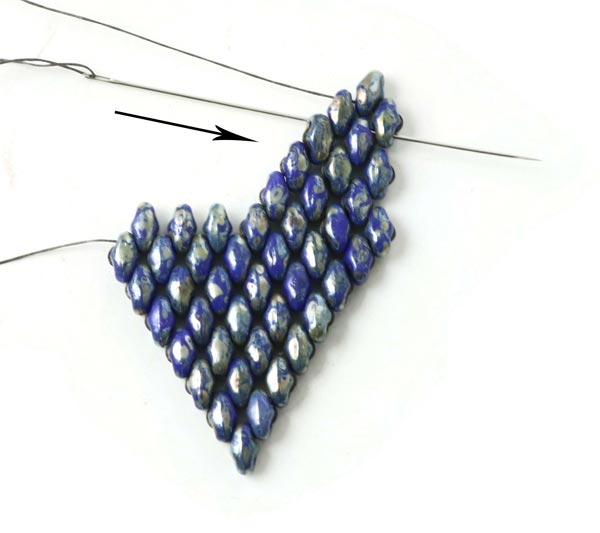
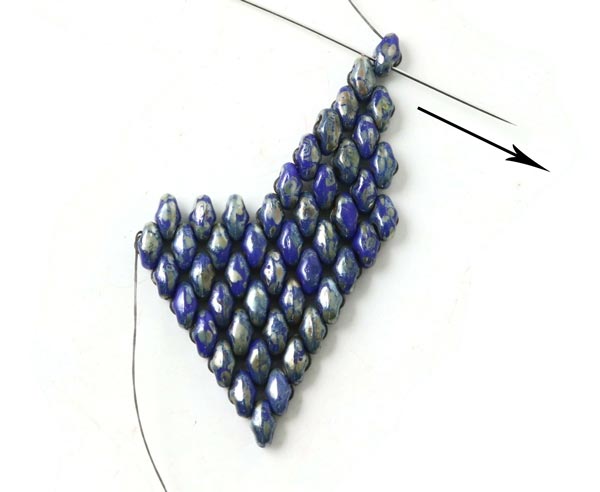
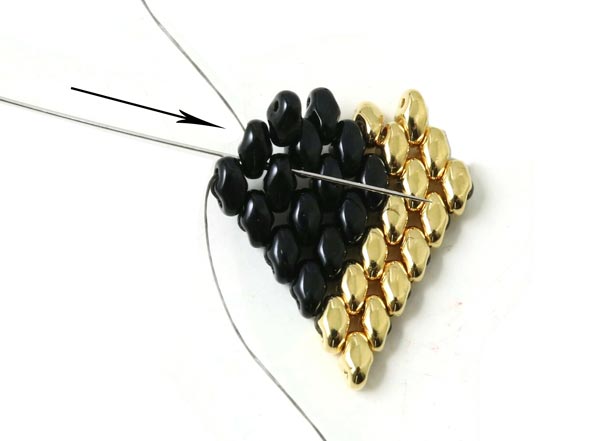
Take up the needle on the left and sew through 9 beads ... sew through a few beads at a time because they sit tightly together. Sew through the top of the golden bead second from right in the second row from top - as shown in the picture.
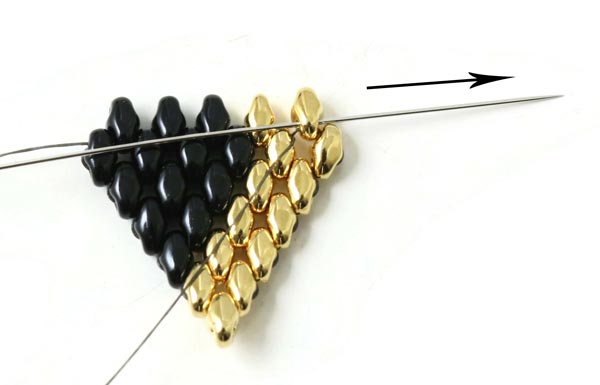
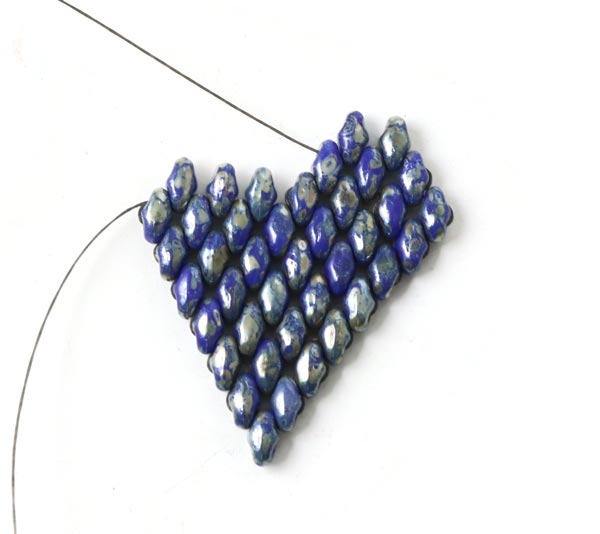
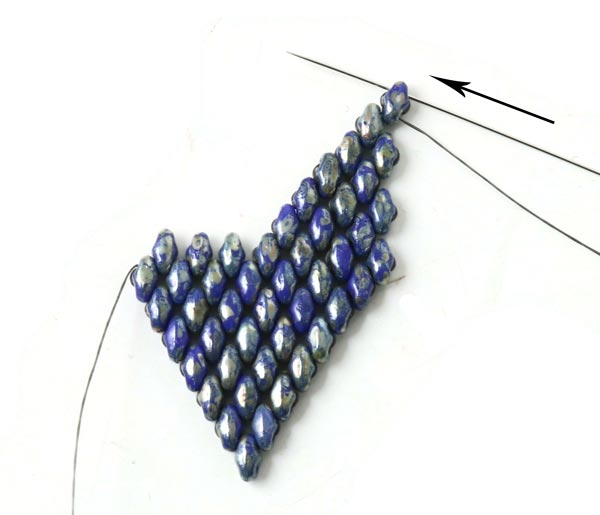
After that, you sew through the lower hole in the first golden bead from right in the first row.
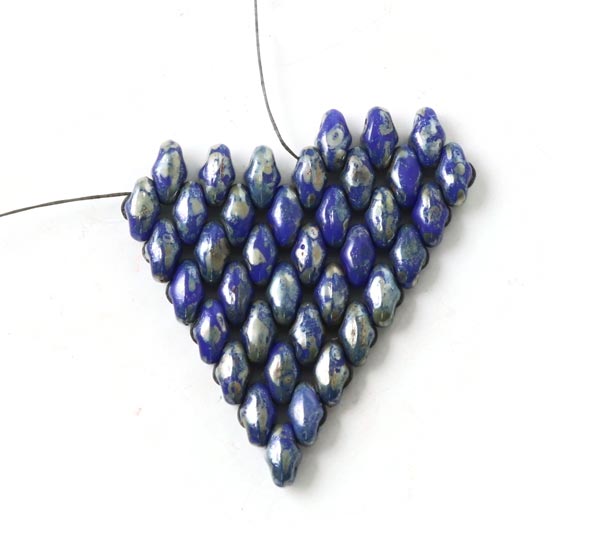
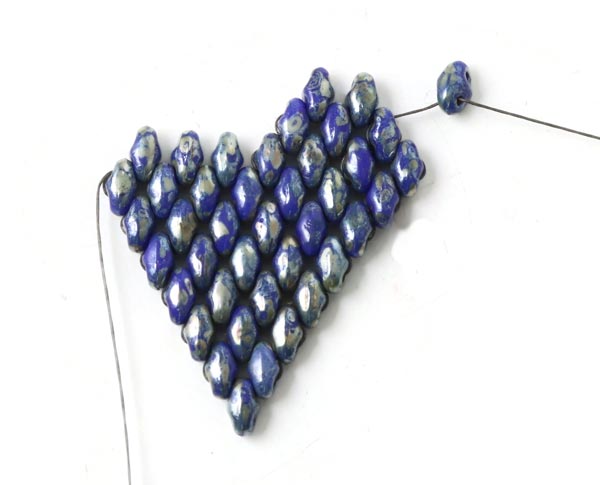
Sew back through the upper hole in the first golden bead ... string 1 new golden bead ... and sew through the next golden bead.
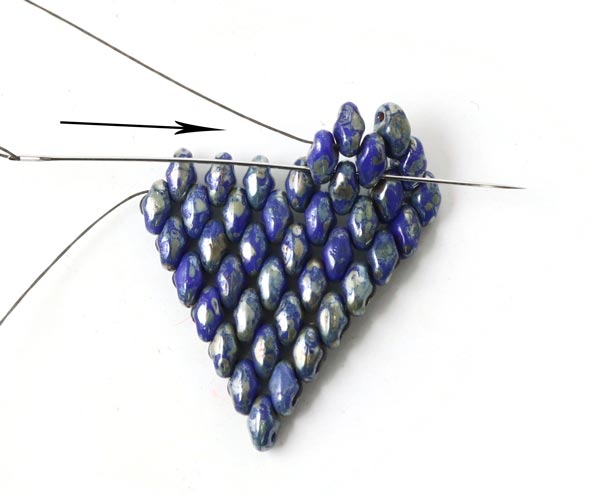
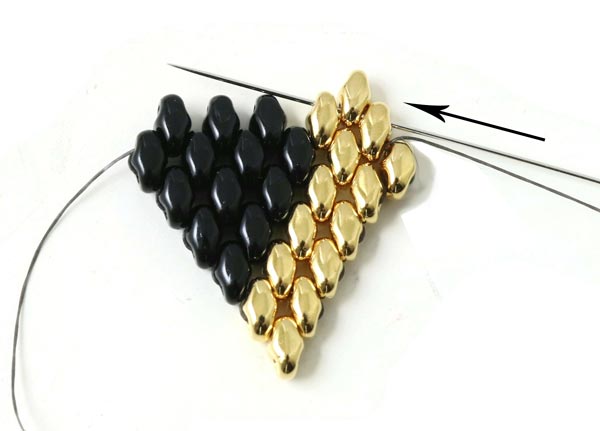
Fasten 1 golden bead more ... and then 2 black beads.
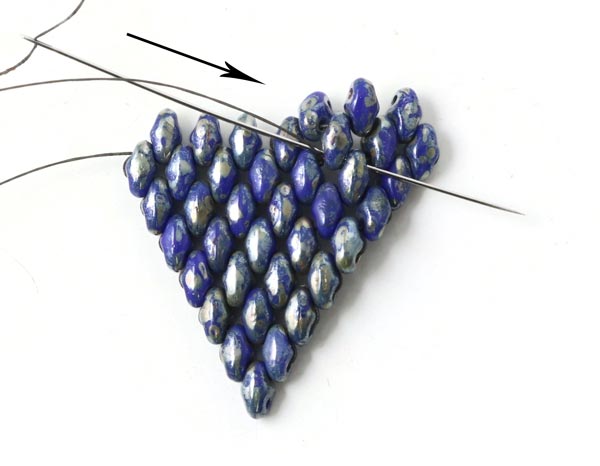
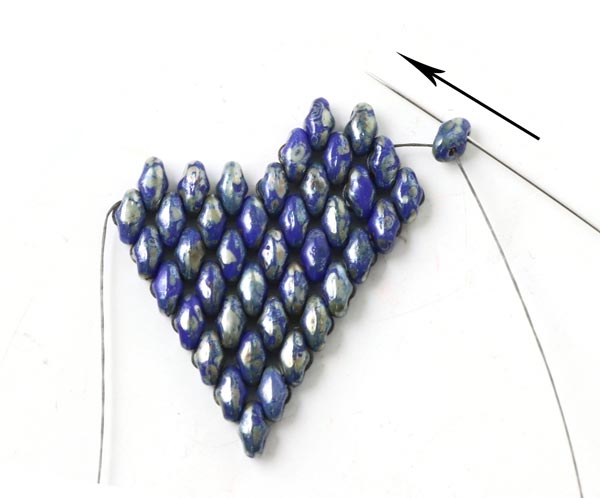
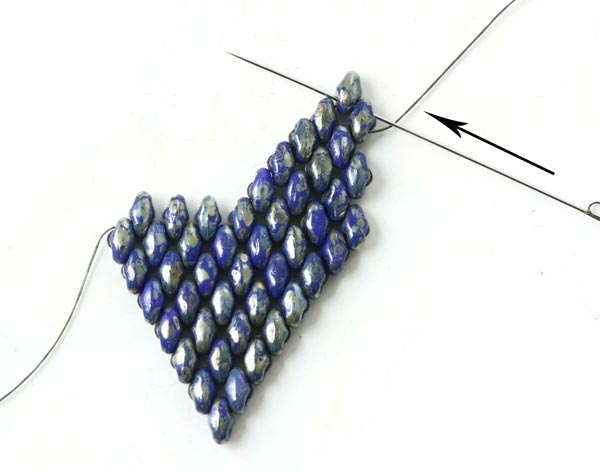
Take up the needle on the left and sew back through 2 beads. (Sew through a few beads at a time because they sit tightly.)
The needle is supposed to come out of the lower hole in the first golden bead in the top row. Then you can start the next row.

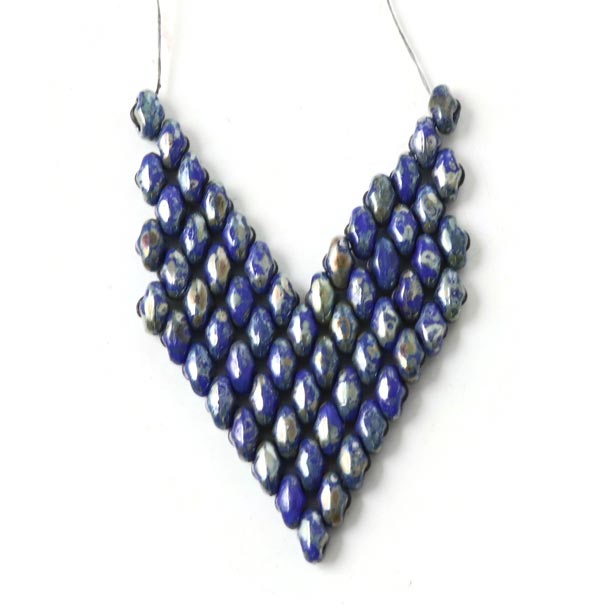
The last rows are sewn in the same way. The 2 first beads on the right are always golden. When you sew backwards, you always sew through the top hole of the second golden bead from the right, so the needle comes out of the lower hole of the last golden bead in the top row.
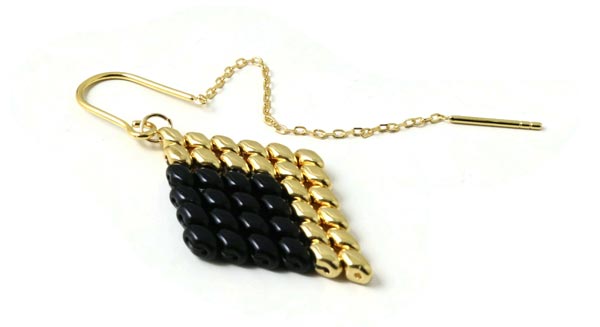
Finally, you sew up the two ends of thread, fasten a jumpring to the bead on top and hang it into an earwire of your choice.
We will publicly show your name and comment on this website. Your email is to ensure that the author of this post can get back to you. We promise to keep your data safe and secure.