
Dear reader
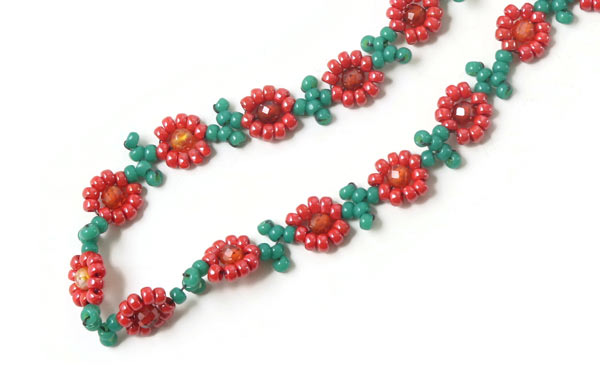
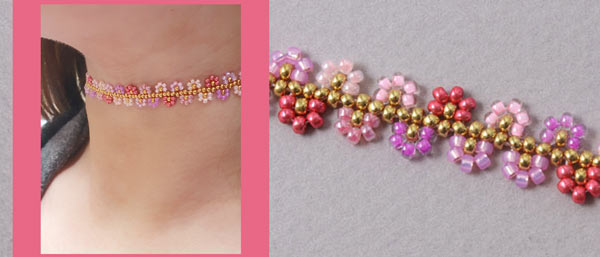
In this blog post, we at Smyks.com explore new seed‑bead patterns that we’ve used to create beautiful, close‑fitting choker‑style necklaces. The designs range from softly romantic to bohemian and even delightfully retro.
Our inspiration comes from old crochet and lace patterns—think delicate table runners, borders and similar vintage details—as well as from some of our earlier blog posts. By following the patterns, you’ll be able to create your own versions in the bead colours you prefer.
These jewellery‑making techniques are not limited to necklaces; they work wonderfully for bracelets and many other pieces too—the only limit is your imagination.
And remember, you’re always welcome to contact us or visit Smyks' bead shop in Copenhagen, Denmark, where we’re ready to help you with your jewellery projects.
Enjoy the tutorials :-)
 |
 |
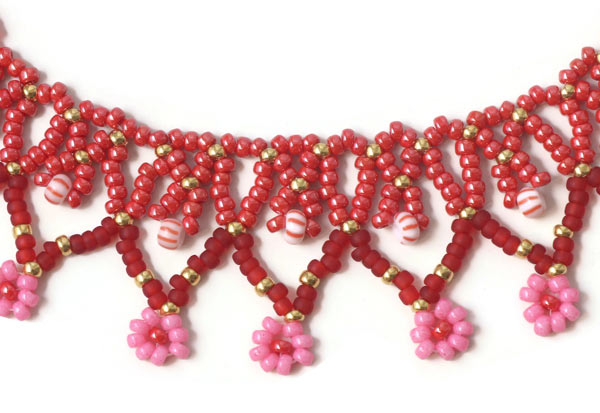
| Choker with blue tear-drops | Choker with hanging flowers |
 |
|
 |
 |
| Choker with daisies | Choker with small flowers |
|
|
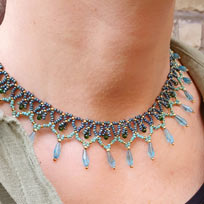
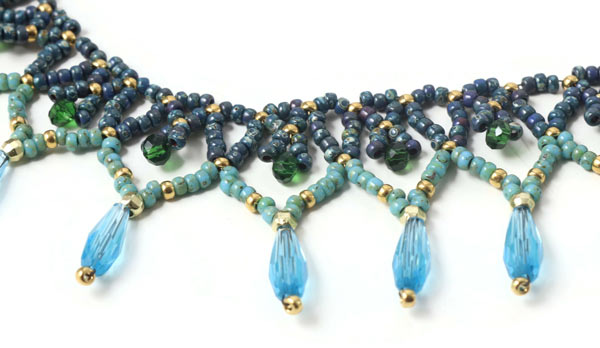
Choker with Blue Teardrops
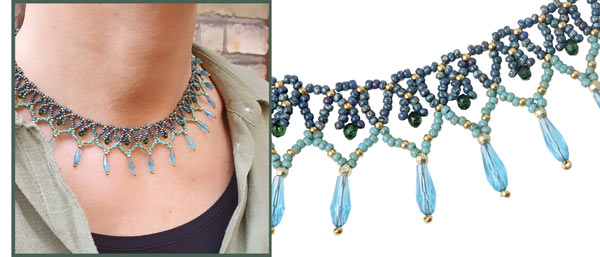
For this choker, we used the following DIY jewellery components:
Miyuki seed beads, size #11, dark teal picasso
Miyuki seed beads, size #11, turquoise blue picasso
Miyuki seed beads, size #11, golden duracoat
Beads, faceted, 3mm, gold-plated brass
Celestial crystal, blue teardrops
Celestial crystal, rondelle beads, dark green
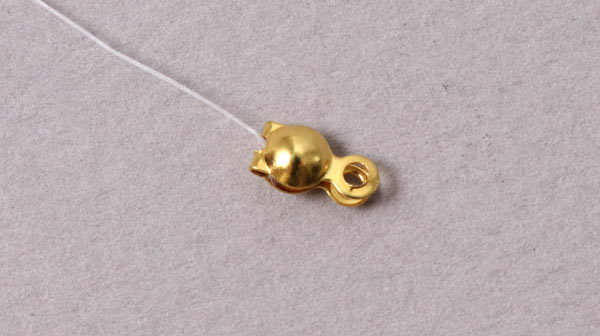
Crimp end with eyelet, gold-plated sterling silver
Jumprings, open, 4mm, gold-plated sterling silver
Lobster claw clasp, 9mm, gold-plated sterling silver
Chain extender, gold-plated sterling silver
+ FireLine, 8LB, black (approx. 2-2,5m)
+ Scissors
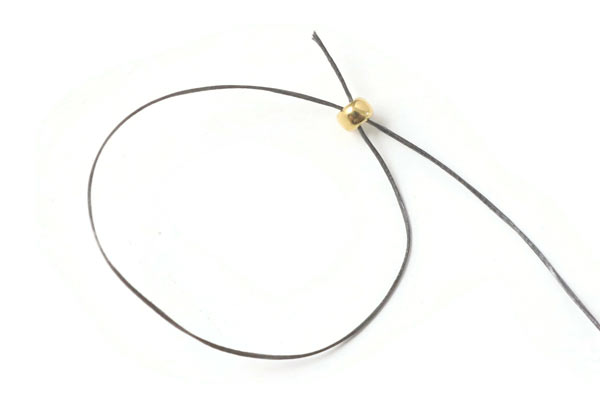
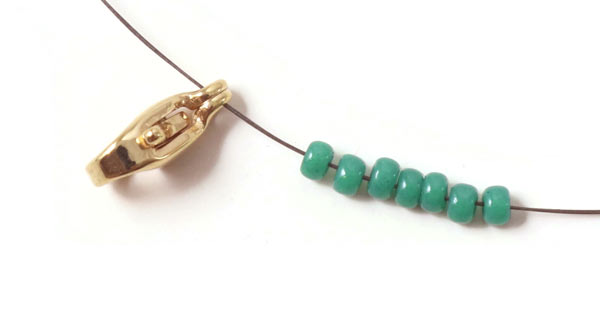
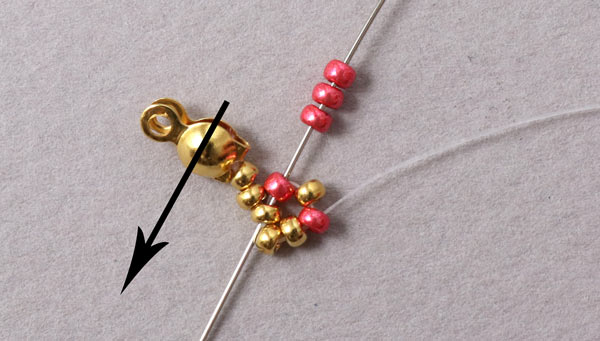
String 1 seed bead ... and sew through the bead one more time to form a loop.
Tighten the thread and tie a few additional knots. Apply a bit of glue so the knots won't open up again.
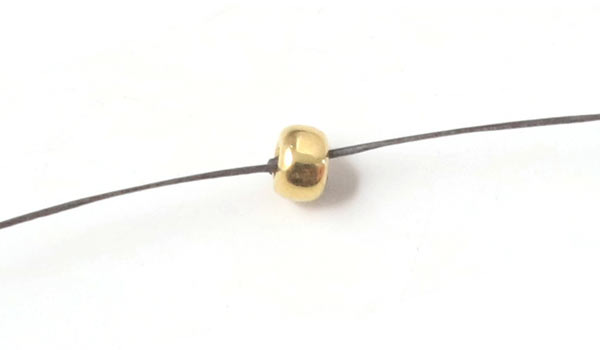
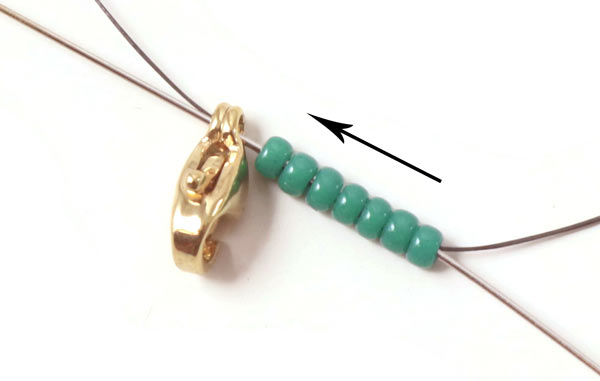
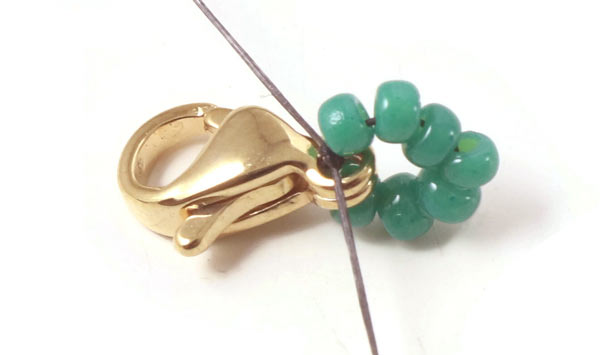
Cut off the excess thread. Pull the thread through the crimp end. Instead of using a bead, you can tie knots. But the thread is thin. You have to tie enough knots to ensure that the thread cannot be pulled out of the hole in the crimp end.
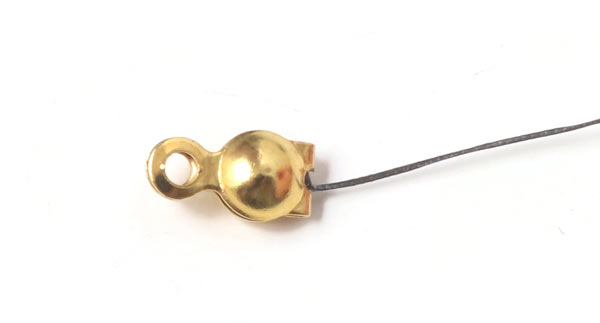
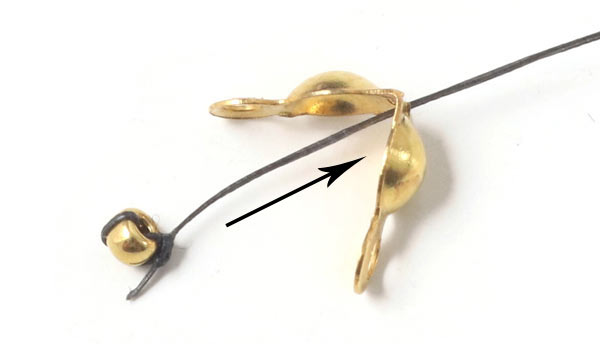
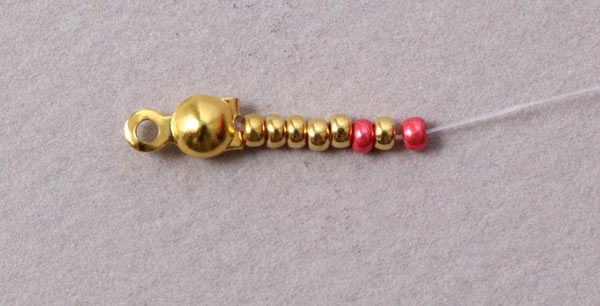
Close the crimp end.
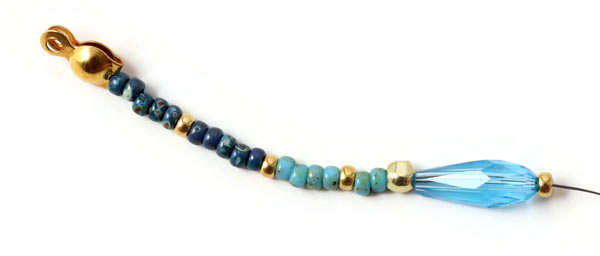
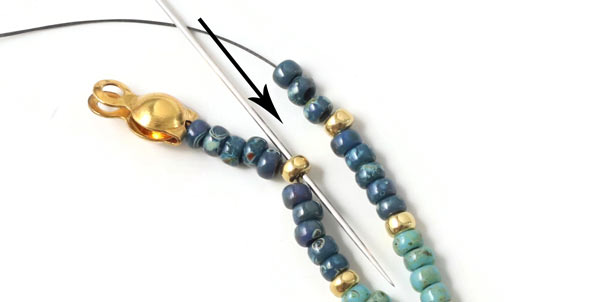
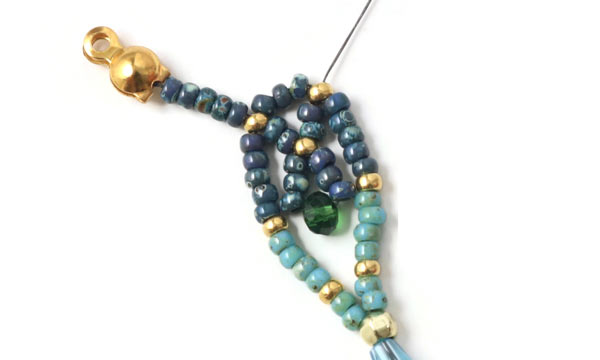
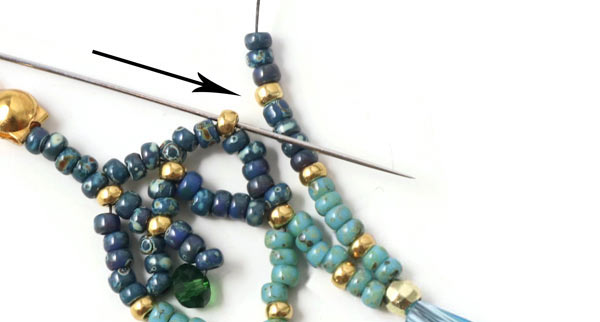
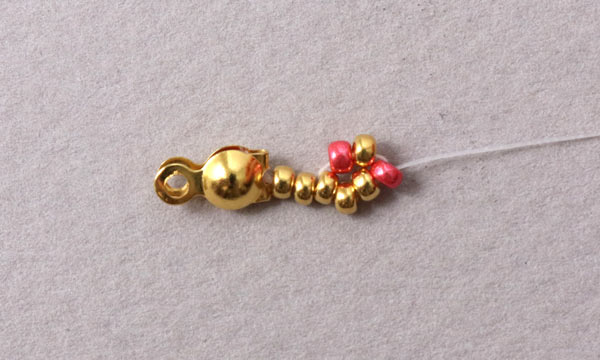
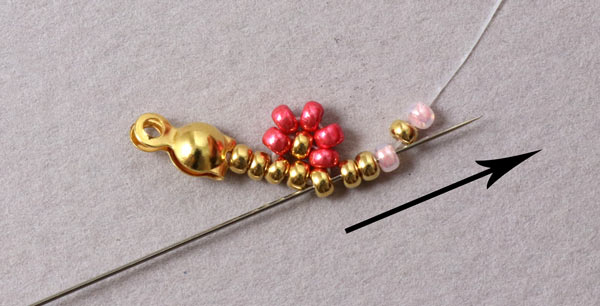
String the seed beads shown in the picture: 5 blue + 1 golden + 5 blue + 1 golden + 4 turquoise + 1 golden + 2 turquoise ...
followed by 1 faceted golden bead + 1 crystal teardrop + 1 golden seed bead.
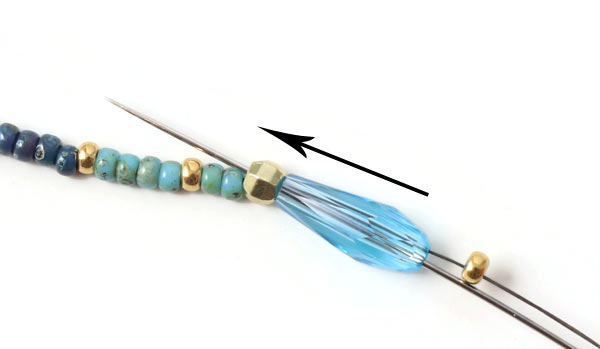
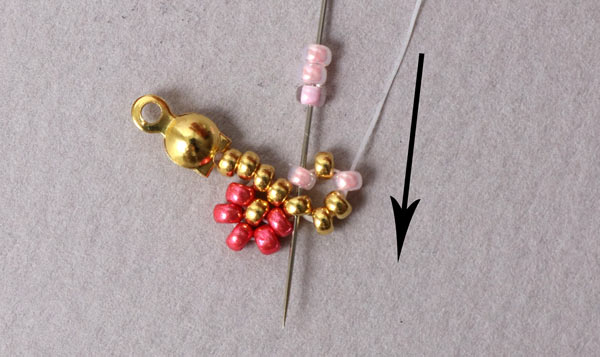
Skip the last seed bead ... and sew back through the teardrop and the faceted bead.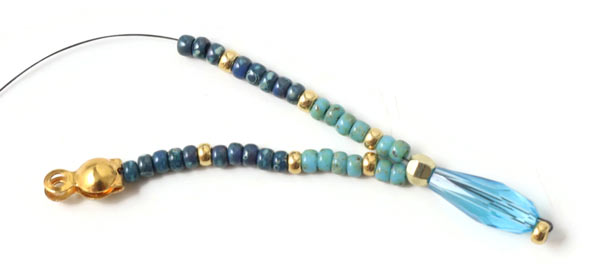
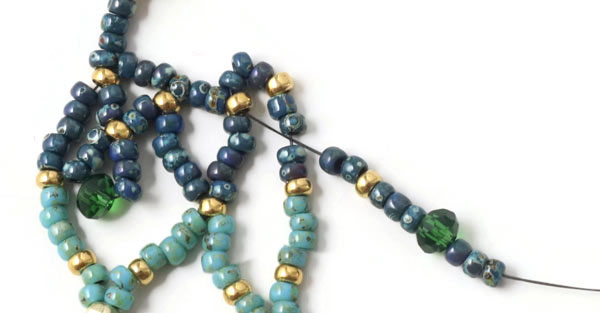
String the next row of seed beads as shown in the picture: 2 turquoise + 1 golden + 4 turquoise + 1 golden + 5 blue + 1 golden + 3 blue.
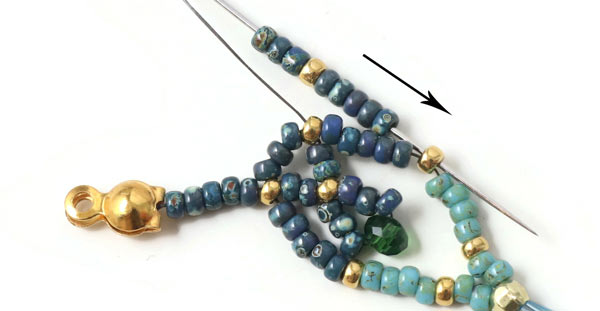
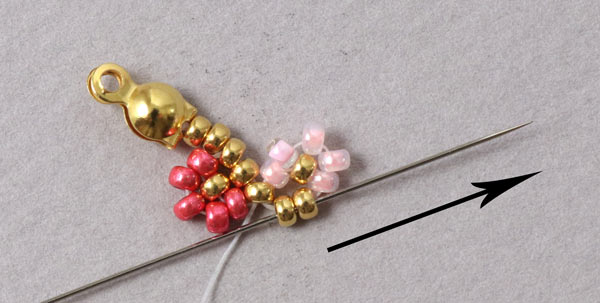
Sew back through the very first golden seed bead.
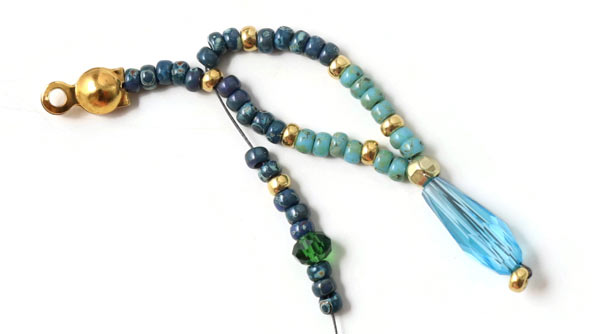
Then you string the beads shown in the picture: 2 blue + 1 golden + 3 blue + 1 green crystal + 3 bue.
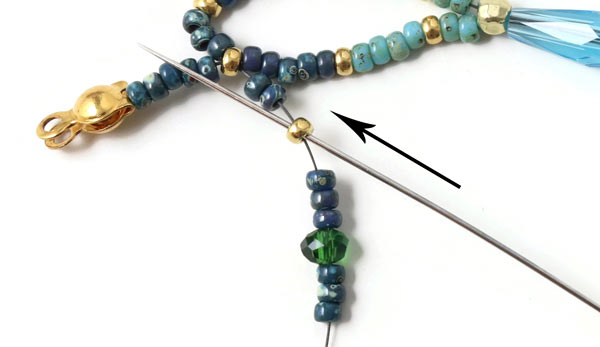
Sew back through the golden seed bead.
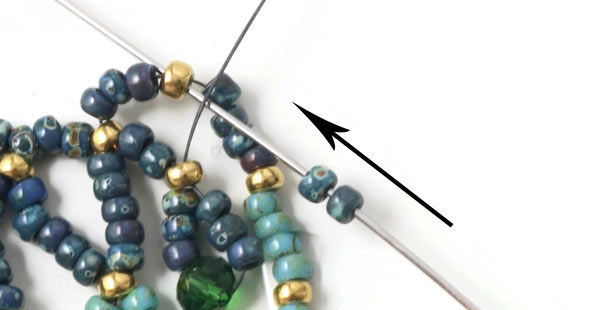
Tighten the thread. String 2 blue seed beads ... and sew through the golden seed bead (see picture).
Tighten the thread.
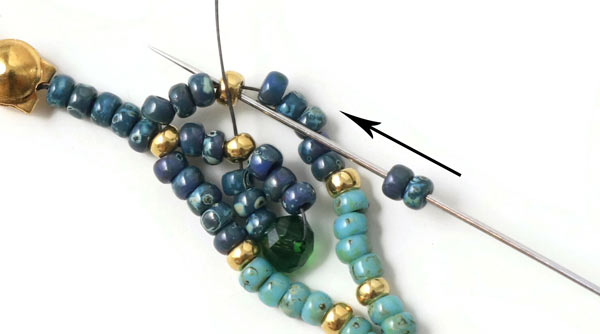
String the seed beads shown in the picture: 3 blue + 1 golden+ 5 blue. Then you sew back through the golden bead (see picture).
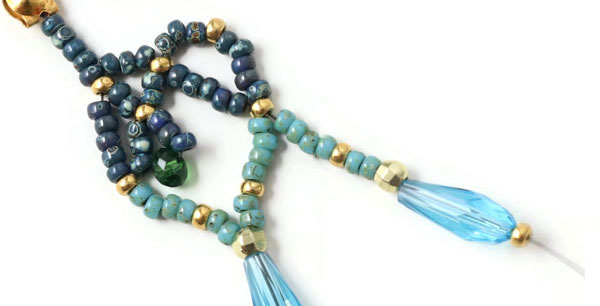
String the beads shown in the picture: 4 turquoise + 1 golden + 2 turquoise + 1 faceted golden bead + 1 crystal teardrop + 1 golden seed bead.
Skip the golden seed bead ... and sew back through the teardrop and the faceted bead.
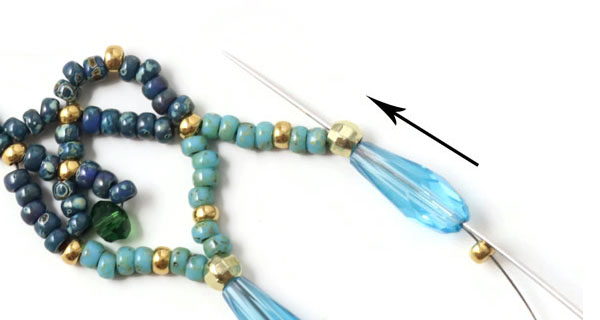
String the beads shown in the picture ... and sew back through the golden seed bead (see picture).
String the beads shown in the picture ...
... and sew back through the golden seed bead on top (see picture).
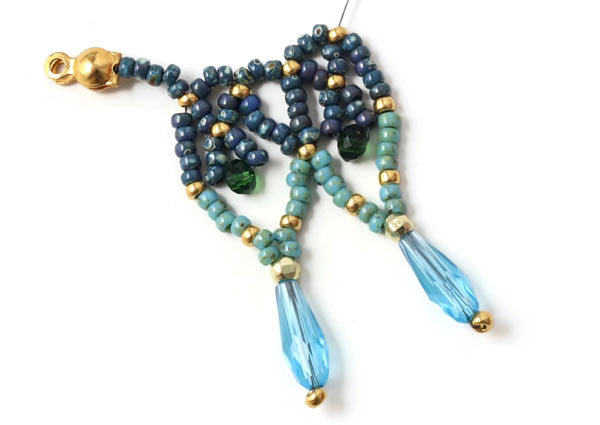
Tighten the thread. Continue like this until the choker has reached the length you want.
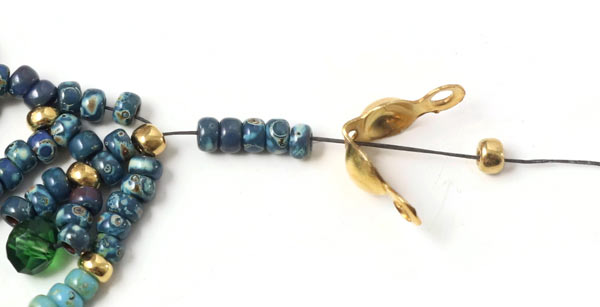
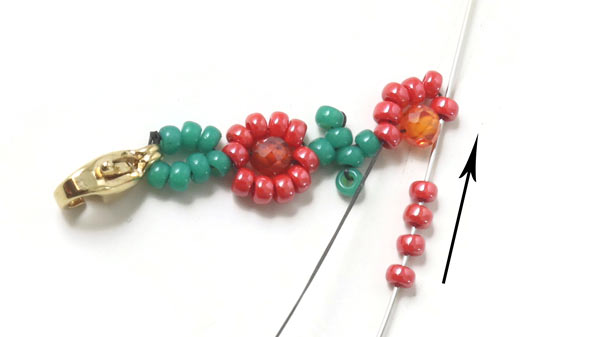
String 5 blue seed beads + 1 crimp end + 1 seed bead.
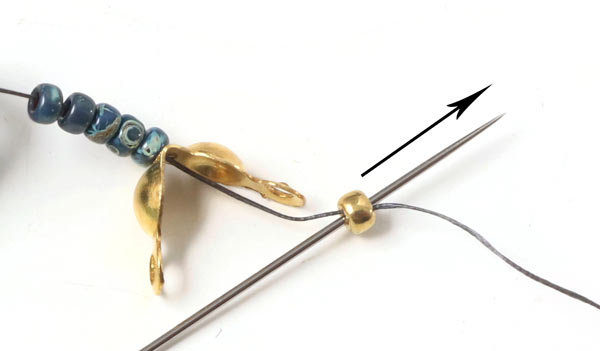
Sew through the golden bead one more time to form a loop.
Tighten the thread.
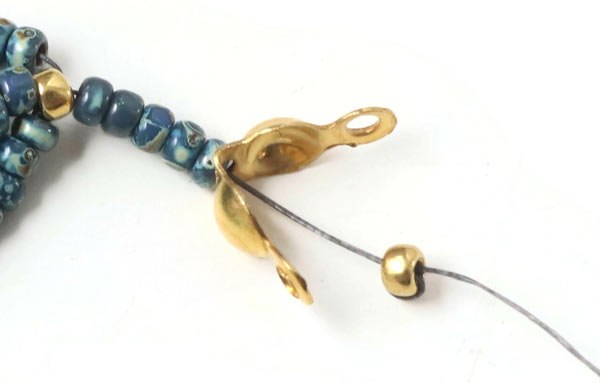
Pull the bead down to the crimp end. Tie a few extra knots and apply a bit of glue. After that, you cut off the excess thread.
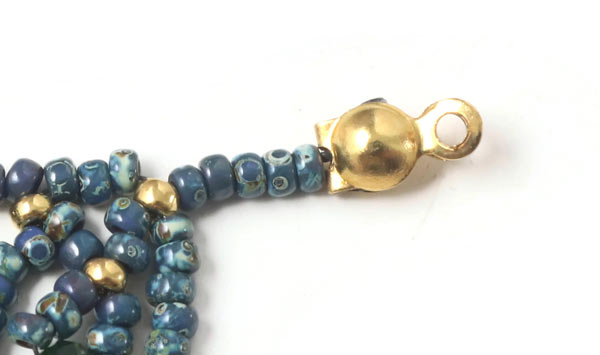
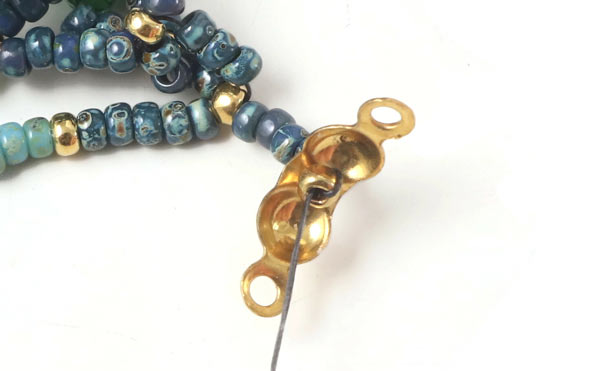
Close the crimp end (with the help of chain-nose pliers).
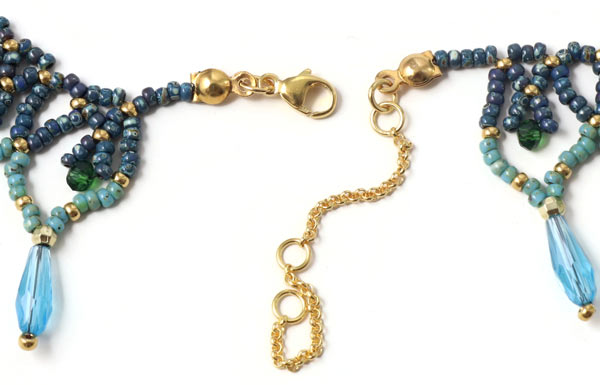
The clasp and the chain extender are fastened with the help of jumprings.
Your choker is done. You can also adapt this design to make necklaces, bracelets or ankle bracelets.
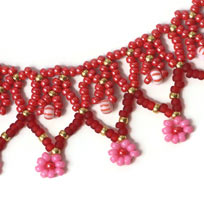
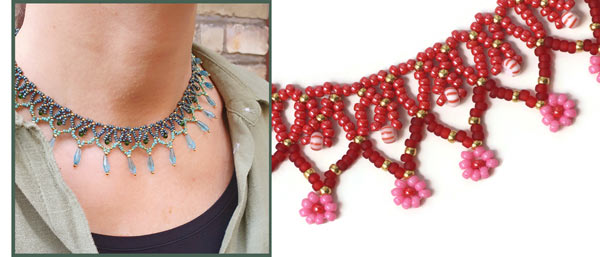
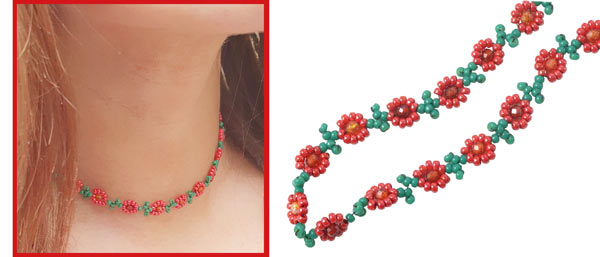
Choker with Seed Beads and Daisies
For this choker, we used the following DIY jewellery components:
Miyuki seed beads, size #11, red luster
Miyuki seed beads, size #11, ruby matte
Miyuki seed beads, size #11, golden duracoat
Miyuki seed beads, size #11, carnation pink
Seed beads, size #8, striped red/white
Crimp ends with eyelet, gold-plated sterling silver
Jumprings, open, 4mm, gold-plated sterling silver
Lobster claw clasp, 9mm, gold-plated sterling silver
Chain extender, gold-plated sterling silver
+ FireLine, 8LB, white (approx. 2-2.5m)
+ Scissors

The procedure is the same as in the example above. The crystal teardrops are replaced by seed bead daisies.
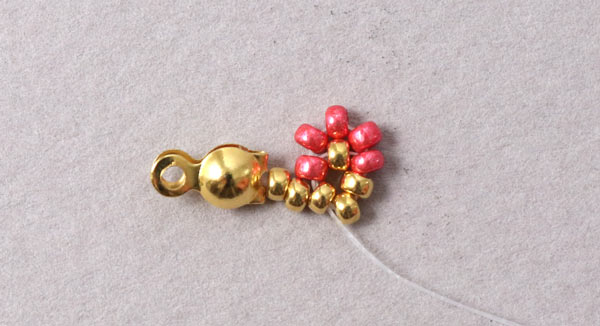
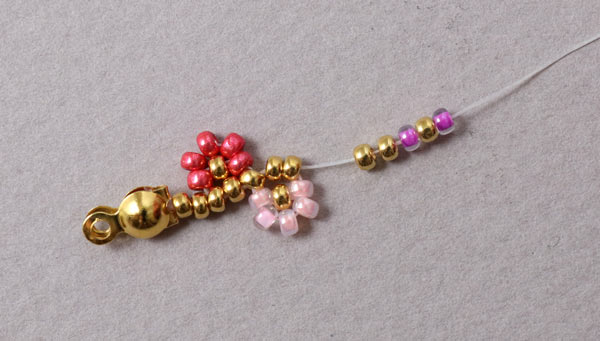
This is how you assemble the daisies: Instead of the faceted golden bead and the crystal teardrop, you string 1 golden seed bead + 4 pink seed beads + 1 red seed bead.
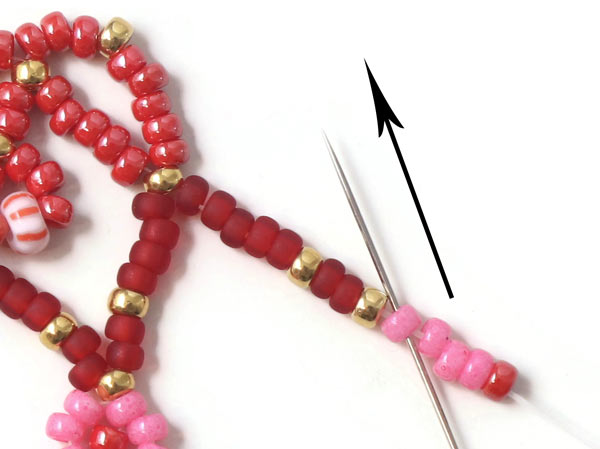
Then you sew back through the first pink bead.
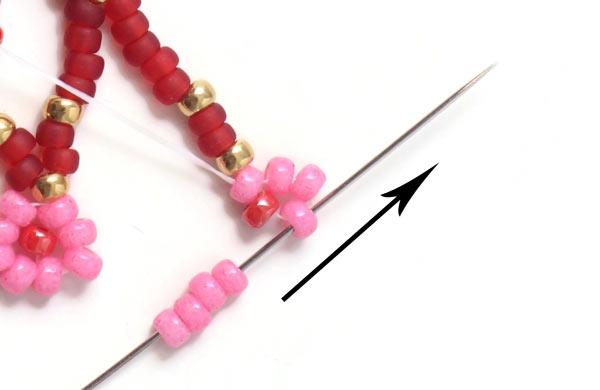
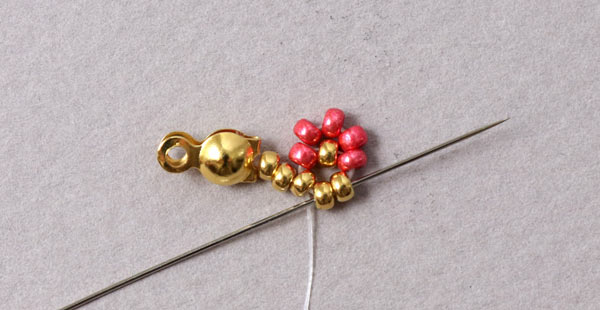
String another 4 pink seed beads ... and sew through the next pink bead (see picture).
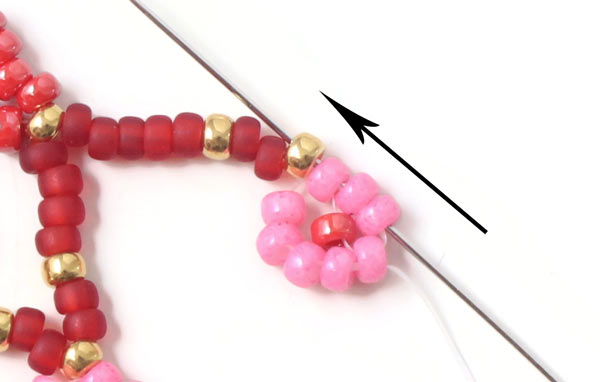
Then you sew through the next 3 pink beads and the golden bead.
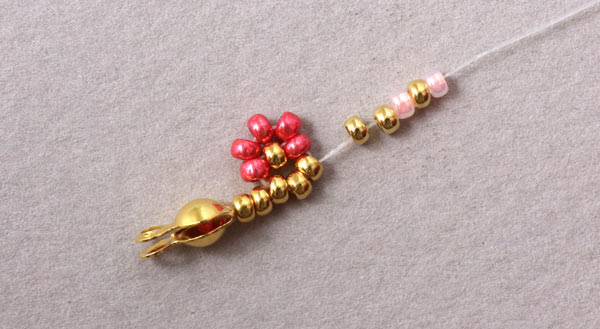
Continue like that, until the choker has reached the length you want.
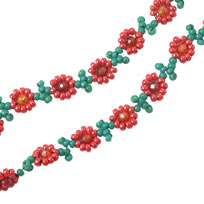
Choker with Daisies
For this choker, we used the following DIY jewellery components:
Miyuki seed beads str. #11, red luster
Miyuki seed beads str. #11, fir green
Cubic Zirconia, faceted, 3mm, orange/red
Jumprings, closed, 5mm, gold-plated sterling silver
Lobster claw clasp, 9mm, gold-plated sterling silver
+ FireLine, 8LB, black (approx. 1.5m)
+ Scissors
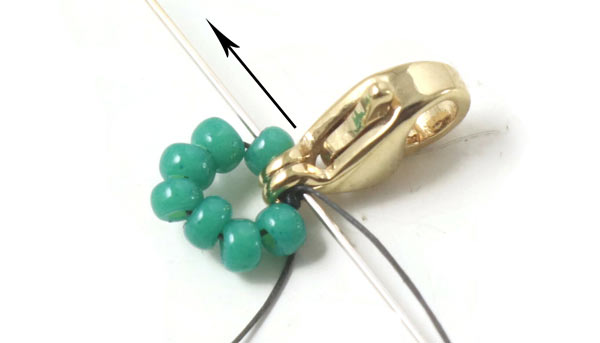
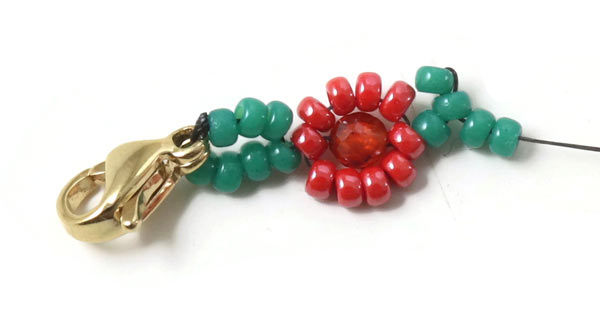
String 1 lobster claw clasp + 7 green seed beads.
Sew through the beads and the clasp one more time in order to form a circle.
Tighten the thread ... and tie 3 knots.
Sew through the clasp and the next bead ...
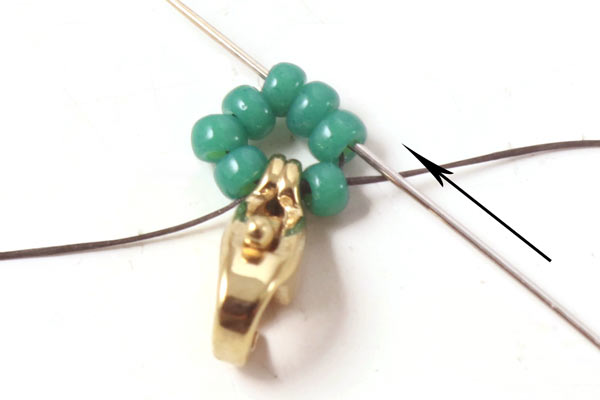
.... and continue through the next 3 beads. Apply a bit of glue on the knot and cut off the excess thread.
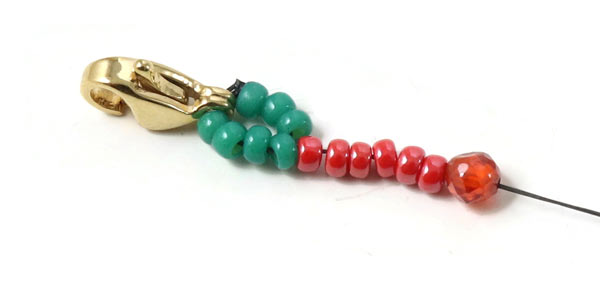
String 6 red seed beads + 1 cubic zirconia bead.
Sew back through the first red seed bead ...
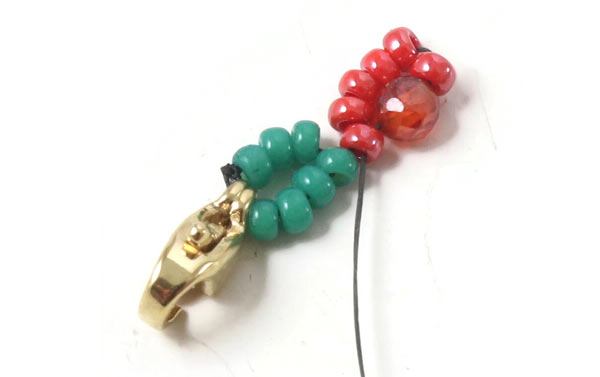
... and tighten the thread.

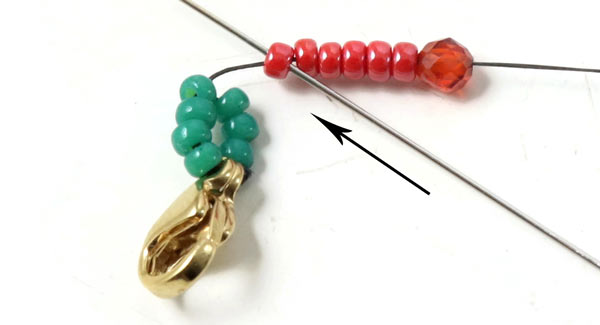
String 4 red seed beads ... and sew through the red seed bead on top of the flower (see picture).
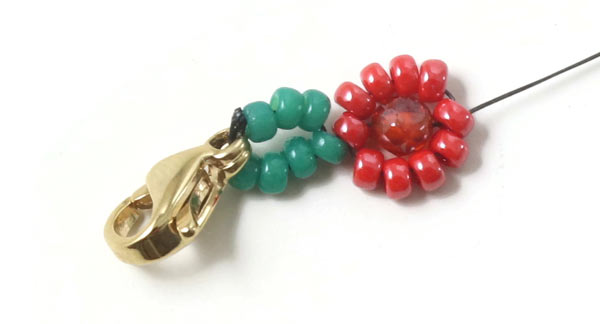
Tighten the thread.

String 3 green seed beads ...
... and sew back through the green bead in the middle.
Tighten the thread.
String 2 green seed beads ...
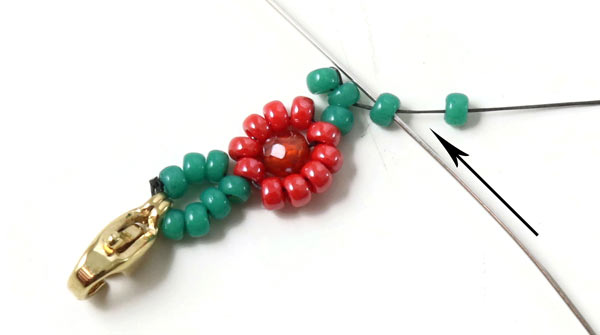
... and sew back through the first of the last two green beads.
Tighten the thread.
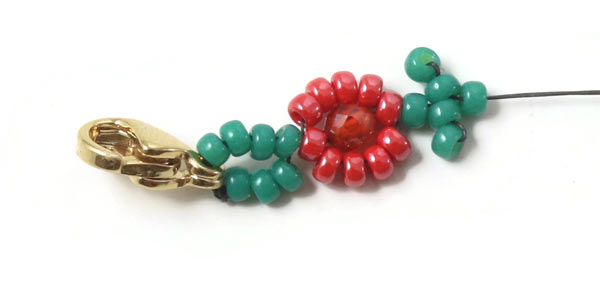
String 1 green bead.
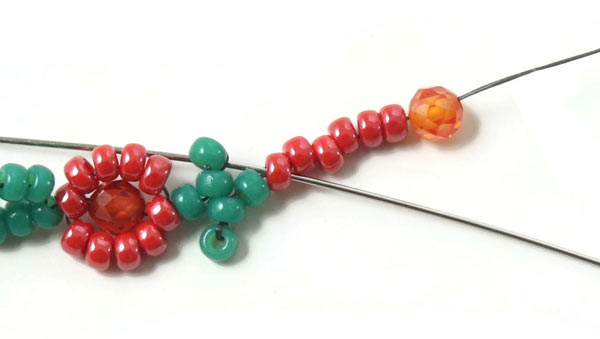
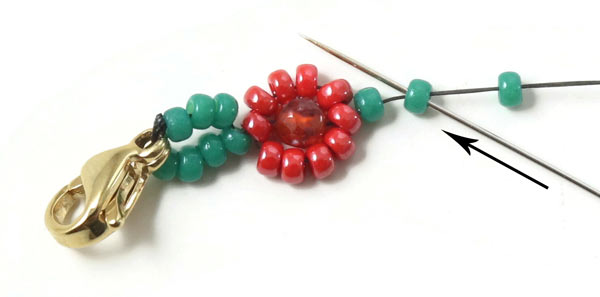
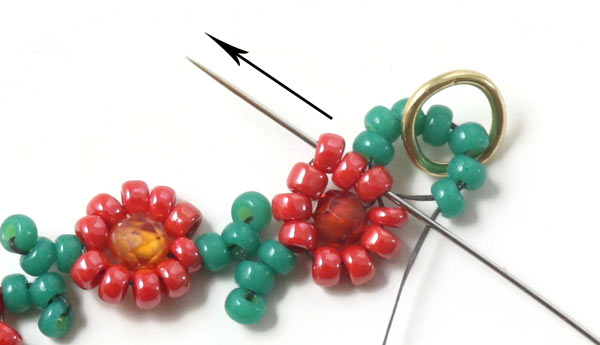
After that, you string again 6 red seed beads + 1 cubic zirconia bead ... and sew through the first red seed bead.
String 4 red seed beads ... and sew through the red bead on top of the flower (see picture).
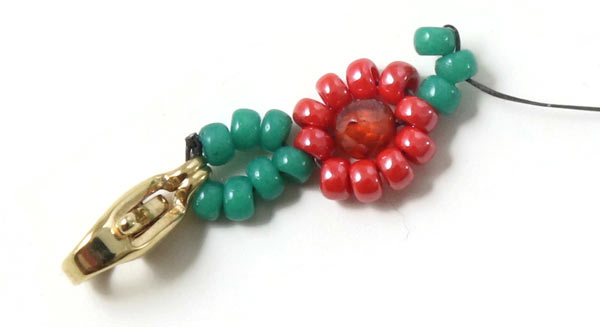
Continue like that until the choker has reached the length you want.
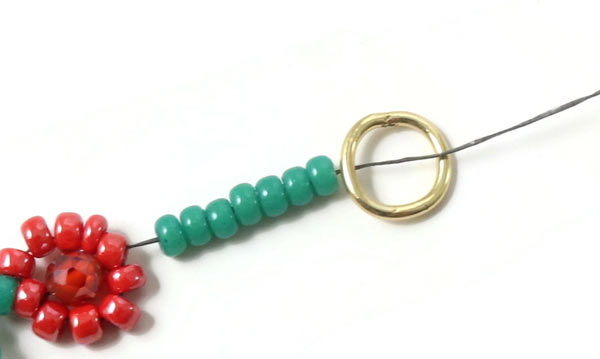
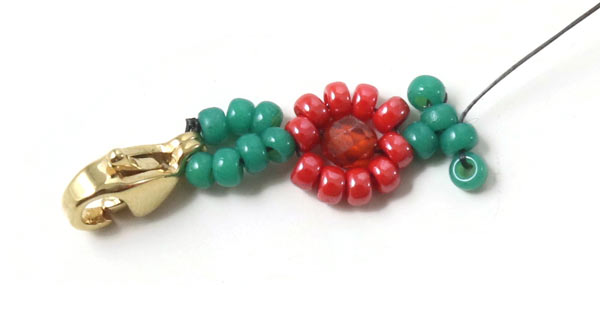
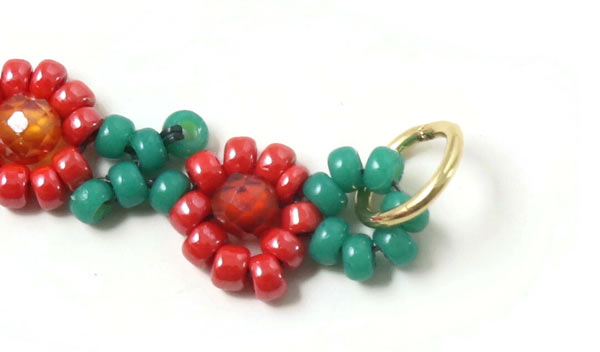
String 7 green beads and 1 closed jumpring.
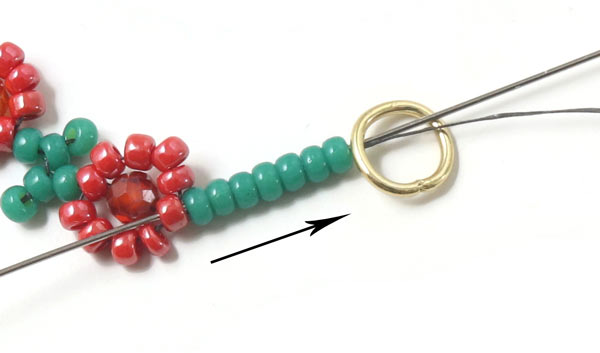
Sew through 1 red bead + 7 green beads + the closed ring one more time.
Now, the green beads form a circle in the closed ring. Fasten the thread by sewing through random beads.
Cut off the excess thread.
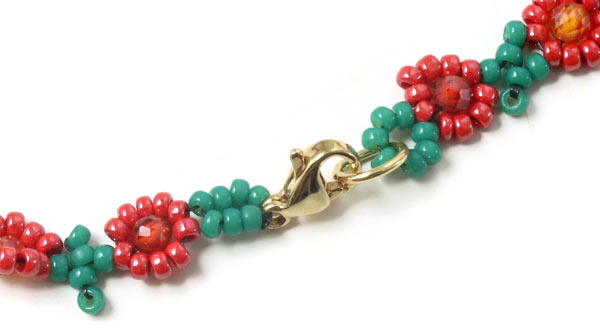
Optionally, you can add a chain extender to make the choker adjustable in length.
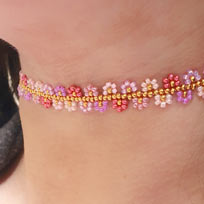
Choker with Double Row of Daisies
For this choker, we used the following DIY jewellery components:
Miyuki seed beads, size #11, pink mix
Crimp ends with eyelet, gold-plated sterling silver
Jumprings, open, 4mm, gold-plated sterling silver
Lobster claw clasp, 9mm, gold-plated sterling silver
Chain extender, gold-plated sterling silver
+ FireLine, 8LB, white (approx. 2-2.5m)
+ Scissors
First, you fasten a crimp bead at the end of the thread (see the first example in this blog post).
String the seed beads shown in the picture.

Sew through 3 golden seed beads + 1 red seed bead (see picture).
Tighten the thread.
String 3 red beads. Skip 1 golden bead ... and sew through the next red bead + 1 golden bead.
Tighten the thread.
Sew through the next 2 golden beads.
String the beads shown in the picture.
Sew through 3 golden beads + 1 pink bead.
Tighten the thread.
String 3 pink beads. Skip 1 golden bead and sew through the next pink bead + 1 golden bead.
Then you sew through the next 2 golden beads.
String the beads shown in the picture.
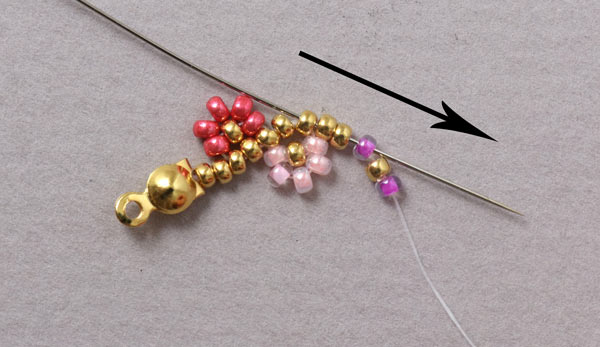
Sew through 3 golden beads + 1 purple bead.
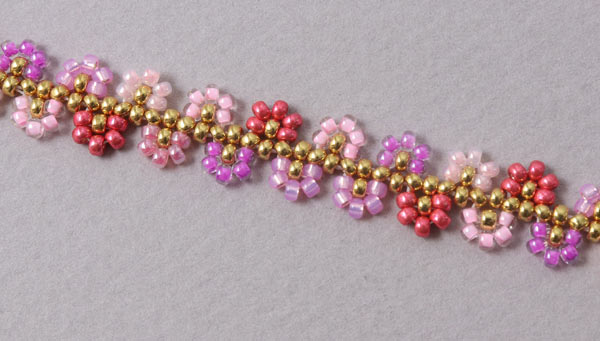
Continue like that until the choker/bracelet has reached the length you want.
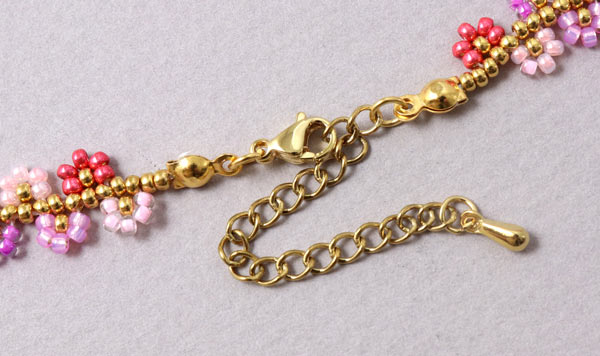
Finally, you finish off the choker/bracelet as shown in the first example in this blog post.
Have fun :-)
We will publicly show your name and comment on this website. Your email is to ensure that the author of this post can get back to you. We promise to keep your data safe and secure.