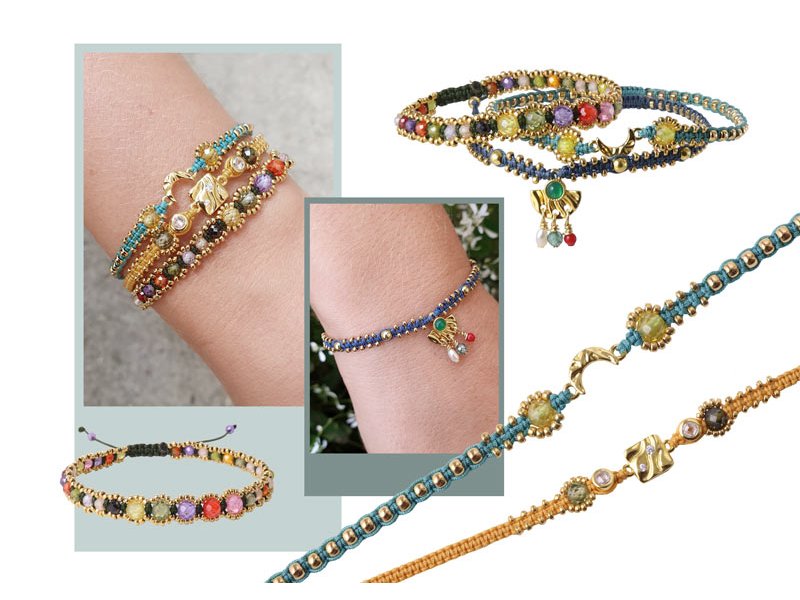
All the examples presented here are made with the basic macramé knotting technique. We show you how you can decorate the otherwise simple bracelets with beads, cubic zirconia, links, pendants and crimp beads.
We knotted these bracelets on a beading loom because it makes your work a lot easier when the bracelet is fixated.
If you are not familiar with this knotting technique yet, you can find a step-by-step instruction in this macramé guide.
Find more inspiration in our earlier blog post on DIY macramé bracelets.
Macramé: A historical knotting technique
The origins of macramé can be traced back to the 13th century. It is believed to have originated in the Mediterranean region, particularly within Arab culture. It then spread via trade routes to Spain and Italy, before being taken to other parts of Europe by sailors and merchants.
Macramé enjoyed considerable popularity in the West in the 1970s, when it was used to make everything from wall hangings and plant hangers to key rings, jewellery and clothing. Although its popularity waned slightly after that decade, interest in macramé has flared up again in recent years with the growing interest in crafts and handmade products.
The creative freedom and wide range of possibilities make macramé a favourite among craftspeople and jewellery makers and in various jewellery shops. The technique requires little equipment and offers simple patterns for beginners as well as complex designs for experienced jewellery designers. Today, macramé is used to create everything from modern wall hangings and bohemian jewellery to wedding decorations and interior design details.
 |
 |
| Bracelet with zirconia | Bracelet with crescent moon |
 |
 |
 |
 |
| Bracelet with square link | Bracelet with pendant |
|
|
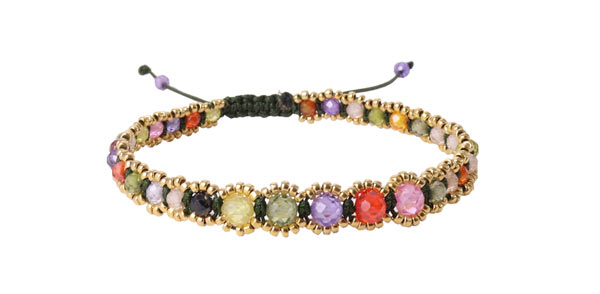
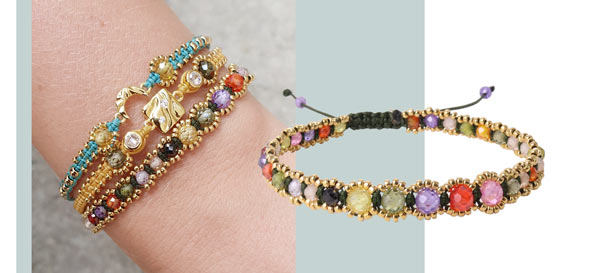
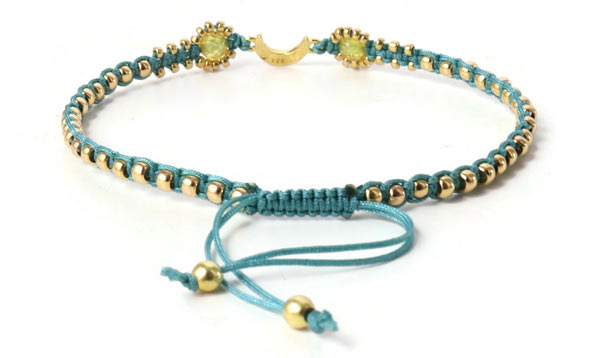
Macramé Bracelet with Zirconia Beads
We used the following components to make this bracelet:
- Zirconia, 3mm, mixed colours
- Zirconia, 4mm, mixed colours
- Miyuki seed beads, size #15 , 24 karat gold-plated
- 2-3m nylon cord, 0.5mm, khaki green
+ scissors
+ lighter
Cut approx, 30cm cord and put it aside for the closure. Then you cut another 30cm for the filler cord (the one you knot around). The rest of the cord is used for the actual knotting.
Singe the cord ends carefully so they harden and become like needles. That makes it easier to string the beads.
You start knotting around 13 zirconia beads with a diameter of 3mm. Before you tie a knot, you string 3 golden seed beads on each working cord. Next, you knot around 5 zirconia with a diameter of 4mm ... and string 5 seed beads on each working cord before you tie the knot. After that, you fasten 13 zirconia with 3mm diameter again ... with 3 seed beads around each working cord. Singe the cord ends.
The amount of beads depends on the size you want the bracelet to be.
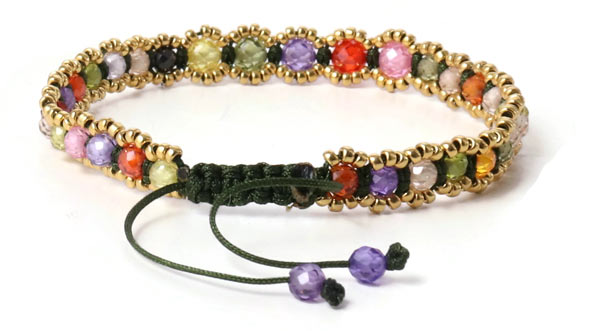
Finally, you knot the closure. In our example, each cord end is decorated with a 3mm zirconia bead.
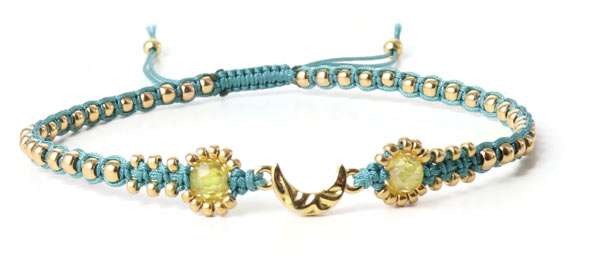
Macramé Bracelet with Crescent Moon
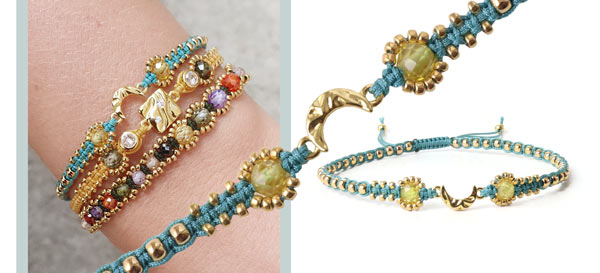
We used the following components to make this bracelet:
- Link, crescent moon, gold-plated sterling silver
- Zirconia, 4mm, mixed colours
- Miyuki seed beads, size #15 , 24 karat gold-plated
- Miyuki seed beads, size #8 , Duracoat gold-plated
- 2 Beads, 3mm, gold-plated sterling silver
- Approx. 3m nylon cord, 0.5mm, sea green
+ scissors
+ lighter
Cut off 2 x 40cm cord ... and fasten the cords to the eyelets on either side of the crescent moon. Fasten the bracelet to the beading loom and knot each side of the bracelet seperately ... from the middle.
Singe the cord ends carefully so they harden and become like needles. That makes it easier to string the beads.
You start knotting around 1 zirconia beads with a diameter of 4mm. Before you tie a knot, you string 5 golden seed beads on each working cord. Then you knot a short section with 1 seed bead on either side. For the rest of the bracelet, you string 1 crimp bead on the filler cord and knot around it. The other half of the bracelet is made in the same way.
Finally, you knot the closure. In our example, each cord end is decorated with a 3mm gold-plated bead.
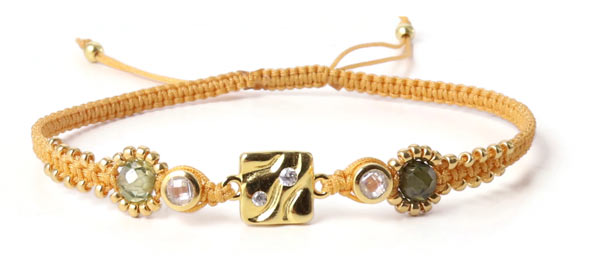
Macramé Bracelet with Square Link
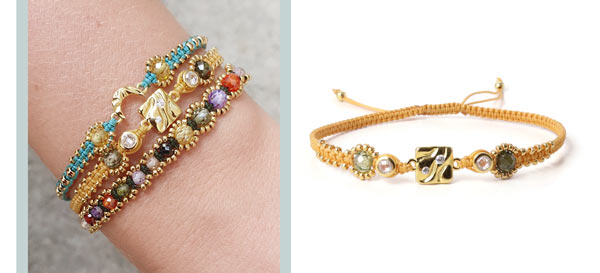
We used the following components to make this bracelet:
- Square-shaped link, gold-plated sterling silver
- 2 small beads with crystal, gold-plated sterling silver
- Zirconia, 4mm, mixed colours
- Miyuki seed beads, size #15 , 24 karat gold-plated
- 2 beads, 3mm, gold-plated sterling silver
- Approx. 3m nylon cord, golden
+ scissors
+ lighter
Cut off 2 x 40cm cord ... and fasten the cords to the eyelets on either side of the square-shaped link. Fasten the bracelet to the beading loom and knot each side of the bracelet seperately ... from the middle.
Singe the cord ends carefully so they harden and become like needles. That makes it easier to string the beads.
First, you incorporate the small bead with crystal ... and then the 4mm zirconia. Before you knot around the zirconia, you string 5 seed beads on each working cord. After that, you knot a short section with 1 seed bead on either side. The rest of the bracelet is classic macramé.
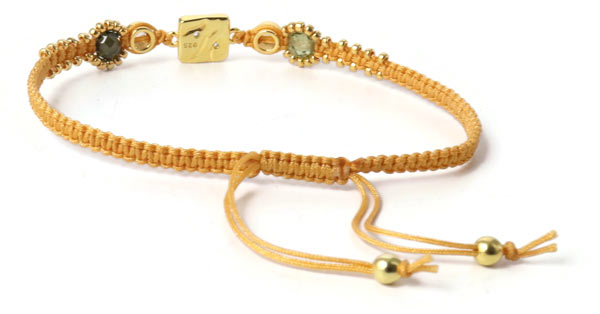
Finally, you knot the closure. In our example, each cord end is decorated with a 3mm gold-plated bead.
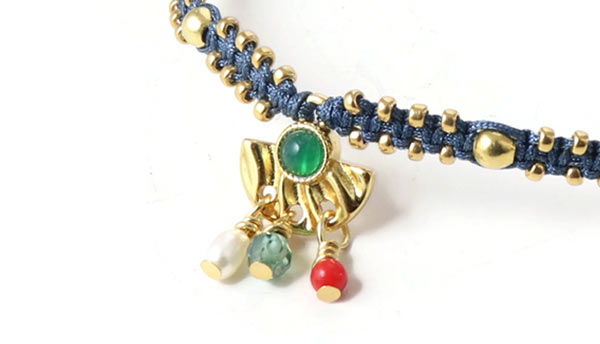
Macramé Bracelet with Pendant
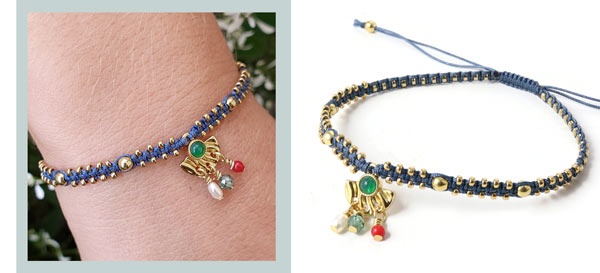
We used the following components to make this bracelet:
- Link, fan with green onyx, gold-plated sterling silver
- Miyuki seed beads, size #15 , 24 karat gold-plated
- 6 beads, 3mm, gold-plated sterling silver
- Miyuki seed beads, size #8 , Duracoat gold-plated
- Headpins with plate, gold-plated sterling silver
- 3 small beads (small freshwater pearl, zirconia 3mm, coral 3mm)
- Approx. 3m nylon cord, marine blue
+ scissors
+ lighter
Cut off 2 x 40cm cord ... and fasten the cords to the eyelet of the fan-shaped link. Fasten the bracelet to the beading loom and knot each side of the bracelet seperately ... from the middle.
Singe the cord ends carefully so they harden and become like needles. That makes it easier to string the beads.
First, you knot a short section with 1 seed bead on either side. Then, you knot around a 3mm bead. Repeat these two steps. For the last section of the bracelet, you knot around crimp beads.
Fasten 3 small beads to the fan with the help of headpins. For that, you pull a bead on a headpin, form a loop and connect the loop to one of the eyelets in the fan. Then you make the windings to close the loop. For more detailed instructions please read our DIY guide This is how you make a loop.
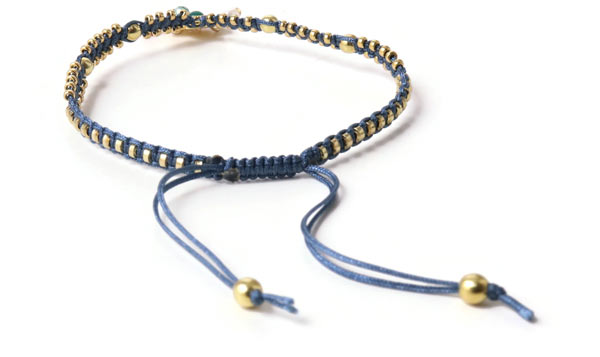
Finally, you knot the closure. In our example, each cord end is decorated with a 3mm gold-plated bead.
Macramé: Bracelets with your personal style woven in
Macramé is more than just a technique for making bracelets; it is an art form that allows you to express your unique style and personality. By combining colourful cords and different knotting techniques, as shown in the blog post, you can create bracelets that are uniquely tailored to you or your loved ones.
With macramé, you can experiment with patterns, colours and beads to create jewellery that reflects your creativity and individuality. Whether you prefer a bohemian vibe, minimalist elegance or something in between, macramé can be adapted to meet your wishes and preferences.
Explore your creative side and let macramé be your way of creating unique bracelets that tell your personal story with every single knot.
The history of macramé
Macramé is a craft technique with a fascinating history dating back to the 13th century. Originally developed in Arab culture, macramé quickly spread to medieval Europe via trade routes and subsequently became a popular technique in the sail-making trade. Its name derives from the Arabic word ‘migramah’, meaning ‘edge’ or ‘fringe’.
During the 1970s, macramé experienced a revival as part of the bohemian movement and became synonymous with hippie culture. Since then, the knotting technique has evolved and found its way into modern arts and crafts and jewellery making, such as bracelets.
Getting creative with knotted bracelets
Macramé is an incredibly versatile craft that allows artists, designers and jewellery makers to express their creativity through colours, patterns and textures. It involves knotting and weaving cords together to create beautiful and durable patterns. This craft allows you to experiment with different techniques such as spiral and macramé knotting, enabling you to create everything from elegant necklaces to bohemian-inspired bracelets.
Macramé also offers the chance to incorporate various types of beads, gemstones and other jewellery materials, such as pendants, into the design, adding an extra dimension of beauty and personality to your handmade jewellery.
Weave macramé into your jewellery-making
Macramé has become a popular technique in jewellery making due to its versatility and aesthetic appeal. By combining different materials such as nylon cord, waxed cotton cord, satin, leather and paracord with beads or charms, jewellery designers can create unique and personalised pieces to suit every taste and occasion.
Necklaces, bracelets and earrings made using macramé are often handmade masterpieces that radiate a special charm and personality. They are not merely jewellery, but works of art that tell stories and reflect the skill and passion put into their creation.
Today, macramé has found its place in both the fashion world and modern craftsmanship, and the knotting technique continues to inspire artists and jewellery designers worldwide to explore the limits of their creativity and create jewellery that is as unique as the people who wear it.
We will publicly show your name and comment on this website. Your email is to ensure that the author of this post can get back to you. We promise to keep your data safe and secure.